Welcome to the Knowledge Base for
))
The DAISY+ Practice Management System provides the tools you need to help you increase productivity, improve cash flow, and decrease the costs of running your dental office.
DAISY+ Chart is the premier solution for dentists who want to enhance the clinical side of their practice. This flexible, electronic periodontal and hard tissue charting application provides the latest advances in electronic charting.
This knowledge base introduces you to DAISY+ and DAISY+ Chart and gets you up and running quickly. It provides an overview of how the software works, suggests strategies to help you get the most from using DAISY+ and DAISY+ Chart, and helps you evaluate workflows in your office by suggesting various scenarios and solutions.
It shows you how to do the most common tasks, where to learn more about DAISY+ and DAISY+ Chart, and how to get help when you need it.
The DAISY+ Practice Management System provides the tools you need to help you increase productivity, improve cash flow, and decrease the costs of running your dental office.
DAISY+ Chart is the premier solution for dentists who want to enhance the clinical side of their practice. This flexible, electronic periodontal and hard tissue charting application provides the latest advances in electronic charting.
This book introduces you to DAISY+ and DAISY+ Chart and gets you up and running quickly. It provides an overview of how the software works, suggests strategies to help you get the most from using DAISY+ and DAISY+ Chart, and helps you evaluate workflows in your office by suggesting various scenarios and solutions.
It shows you how to do the most common tasks, where to learn more about DAISY+ and DAISY+ Chart, and how to get help when you need it.
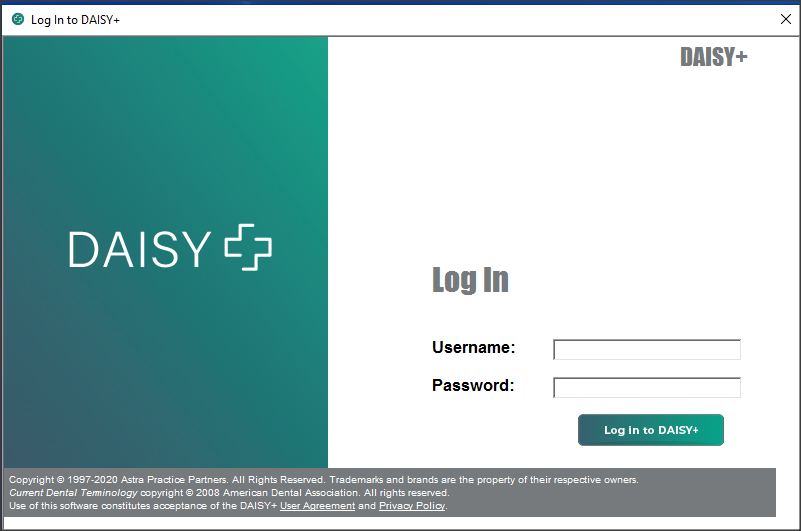
Before you can use DAISY+, you need to log in using your username and password.
To log in to DAISY+
- From the Windows Start menu select Programs, select DAISY+, then select DAISY+.
-
Type your username and password.
-
Click Log in to DAISY+.
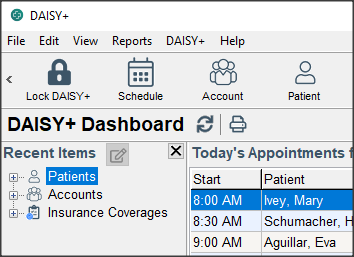
DAISY+ may take a moment to open. You see the DAISY+ Central window.
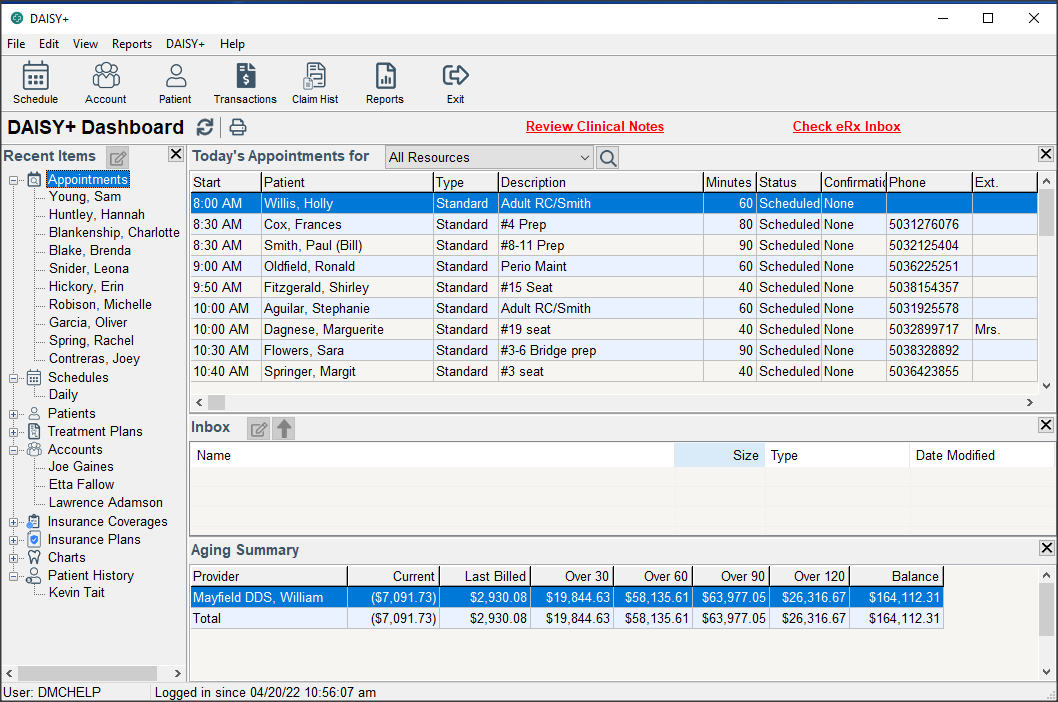
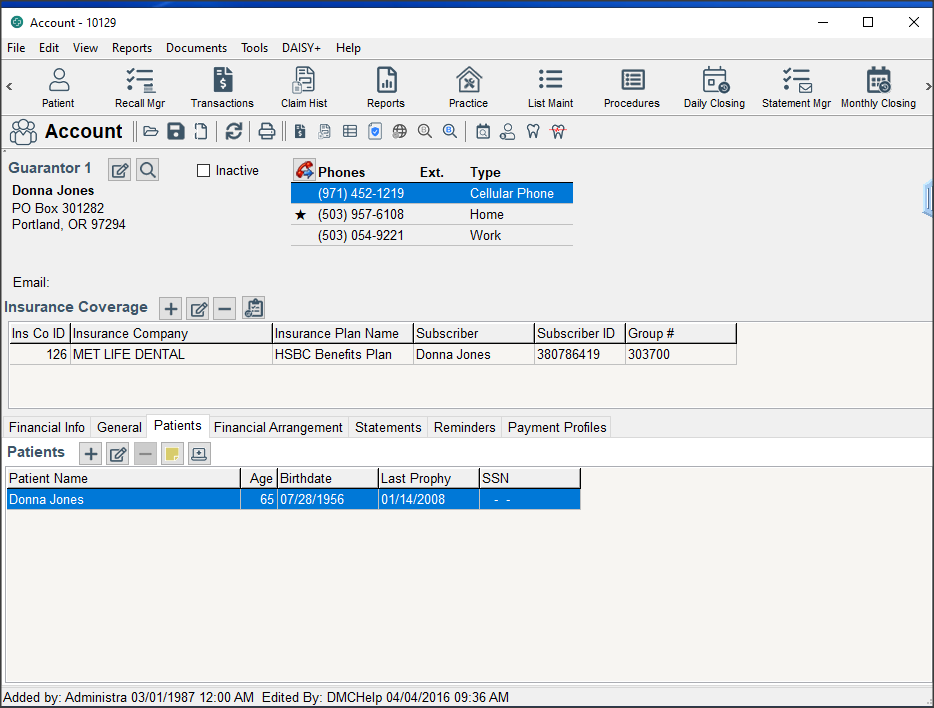
The DAISY+ Central window provides a convenient summary of the most common types of information you want to know at the start of your day.
- Recent Items lists the most recently accessed items in DAISY+, such as a patient record, an account, the ledger, or an insurance company. Double-click the item to return to the appropriate window.
- Today’s Appointments lists the day’s scheduled appointments. It shows the patient’s name, the start time, appointment type and description, the amount of time assigned, and the status, as well as whether the appointment was confirmed. Double-click the appointment to open the appointment detail window.
- Inbox lists electronic claims status reports, DAISY+’s Business Matters newsletter, and other files. Double-click the report or newsletter to view it.
- Aging Summary lists total receivables by provider, as well as the practice. It shows totals for the current receivables, the receivables last billed, and by aging status (30, 60, 90 and 120 days).
Note: When you log in, only buttons that open modules you are permitted to access are activated on the DAISY+ toolbar.
Tip: You can choose which categories of information you want to display in the DAISY+ Central window. From the View Menu, select one or more categories to display. A check mark indicates that the item is selected.
Use the DAISY+ toolbar
The DAISY+ toolbar is located near the top of all major DAISY+ windows and it can be customized to fit your particular needs. However, when DAISY+ is first installed on your system, the DAISY+ toolbar contains the following default set of buttons
Use this button... |
To do this... |
|---|---|
|
|
Manage appointments and create appointment templates. |
|
|
Store individual patient information, such as recall status, medical alerts, referrals, and prescriptions. |
|
|
Generate a quick estimate for a patient without creating a treatment plan or sending a pre-authorization request to the patient’s insurance company. |
|
|
Manage charges, payments, and adjustments. |
|
|
Set up new accounts, and add patients or insurance to an existing account. Store account information, such as the responsible party, financials, and guarantor’s address. |
|
|
View account history. |
|
|
Manage insurance company information. |
|
|
View detailed claim information. |
|
|
Generate reports for your practice. |
|
|
Open a patient’s dental chart to record and display hard tissue measurements, and summarize and print findings. |
|
|
Open a patient’s dental chart to record and display periodontal measurements, and summarize and print findings. |
|
|
Use the Patient Account Wizard as an alternative way to set up new accounts, and add patients or insurance to an existing account. |
|
|
Generate the day’s claims and QuickStatements to send to DMC for processing. Run backups of your DAISY database. |
|
|
Generate a list of recall cards that DAISY can print and mail to patients. |
|
|
Confirm an appointment. View related information such as account status and resources assigned to the appointment, as well as indicate if and how an appointment was confirmed. |
|
|
View the Data Exchange Inbox to ensure that the claims and statements sent to DAISY the previous day were received. |
|
|
Log off the current user and log in as a different user. Logging in as a different user does not close DAISY. To close DAISY, click the Exit button. |
|
|
Log off the current user and exit all DAISY windows. |
Change the Daisy toolbar
You can modify the DAISY+ toolbar to fit the way you work. You can choose:
- Which buttons appear on the toolbar
- Whether to show explanatory captions below the buttons
- Button order
- Button size
The DAISY+ toolbar can be changed from most DAISY+ windows.
To change the toolbar from the DAISY+ Central window:
- From the DAISY+ menu, select Configure DAISY+ Toolbar.
- Make the appropriate changes, then click OK.
Use the Quick Access toolbar
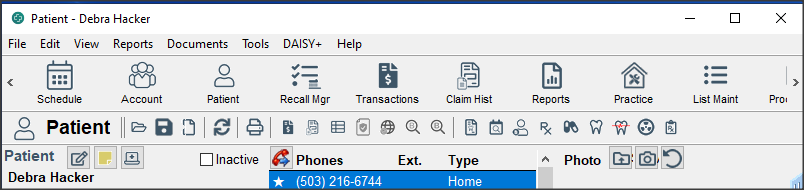
The Quick Access toolbar provides shortcuts to related tasks that you want to perform. Icons that include red arrows link directly to a related window. For example, clicking the Chart icon in the Patient window opens a chart for the selected patient Dirk Abrahms.
Use the Search window in DAISY+
Before you can view or modify information about a patient, account, or insurance record, you have to search for it. DAISY+ automatically opens a Search window whenever you click the Patient, Account, or Insurance buttons on the DAISY+ toolbar. You can also search from within many DAISY+ windows.
Tip: Search window filters can help you narrow your search to a specific group.
From a Search window, you can quickly locate specific information in your DAISY+ database, such as:
- Any person in the system
- Accounts, patients, providers, insurance companies, and employers
- Prescriptions, procedure codes, procedure fees, cities (used in addresses), and other information stored in DAISY+
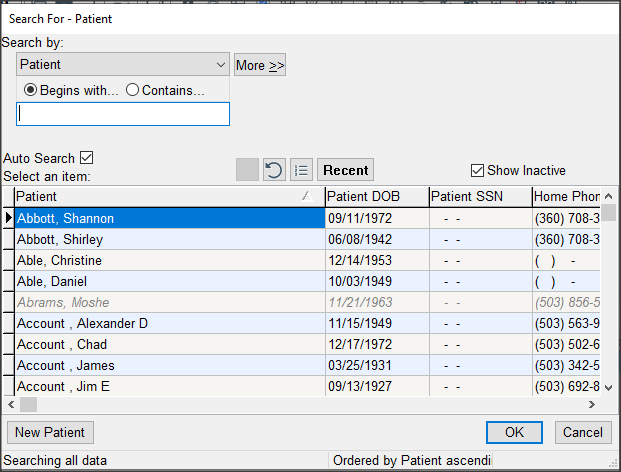
Search windows are tailored to reflect the kind of information you are seeking. In the following example, the Search window for finding patients has selections in the Search By drop-down list such as Patient, Patient SSN, Patient DOB, or Home Phone No. column headings also relate to patient information.
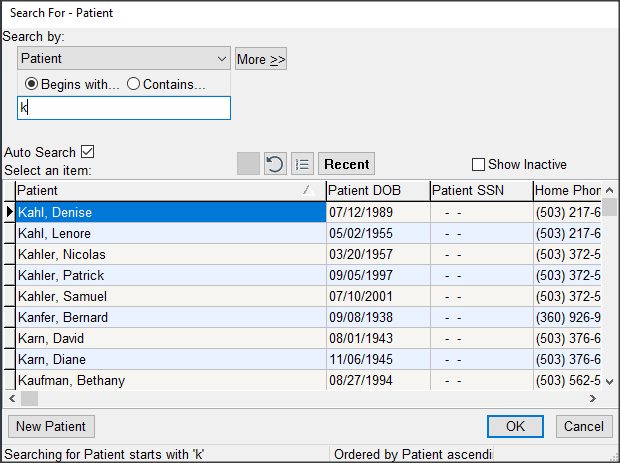
► To do a search:
- Open a Search window from the DAISY+ toolbar or within an application window. For example, from the DAISY+ toolbar, click Patient.
- In the Search By drop-down list, select the type of information to search by. For example, you can search by patient, birth date, or Social Security number.
- If present, choose either the Begins With or the Contains option.
For example, if you want to find a patient whose name begins with Mac, choose Begins With. In the next text box, you’ll type Mac. - In the next text box, type the information you want to match.
In this example, you would type Mac. -
ClickSearch results display in the lower half of the window.Note: To always search automatically without having to click , check the Auto Search check box in the Search window.
- Select the result you want, then click OK.
Tip: Search window filters can help you narrow your search to a specific group.
Tip: Occasionally a dialog window may get hidden behind a main DAISY+ window. If DAISY+ does not seem to be responding, press ALT-TAB to bring the dialog box to the front.
Use the Search window in DAISY+ Chart
Before you can view or modify information about a patient, chart, or clinical note, you have to search for it. DAISY+ automatically opens a Search window whenever you click the Patient, Chart, Perio Exam, or Clinical Notes button on the DAISY+ toolbar. You can also search from within many DAISY+ windows.
From a Search window, you can quickly locate specific information in your DAISY+ database, such as:
- Any person in the system
- Patients, and providers
- Prescriptions, procedure codes, procedure fees
Search windows are tailored to reflect the kind of information you are seeking. In the following example, the Search window for finding patients has selections to search by in the drop-down list such as Patient, Patient SSN, Patient DOB, or Home Phone No. column headings also relate to patient information.
To do a search:
- Open a Search window from the DAISY+ toolbar or within an application window.
For example, from the DAISY+ toolbar, click Patient. - In the drop-down list, select the type of information to search by.
For example, you can search by patient, birth date, or Social Security number. - If present, choose either the Begins With or the Contains option.
For example, if you want to find a patient whose name begins with Mac, choose Begins With. In the next text box, you’ll type Mac. - In the next text box, type the information you want to match.
In this example, you would type Mac. -
ClickSearch results display in the lower half of the window.Note: To always search automatically without having to click , check the Auto Search check box in the Search window.
- Select the result you want, then click OK.
Tip: Occasionally a dialog window may get hidden behind a main DAISY+ window. If DAISY+ does not seem to be responding, press ALT-TAB to bring the dialog box to the front.
Rearrange table columns
You can rearrange the order of columns in any DAISY+ window that contains a table, such as the Claim History window.
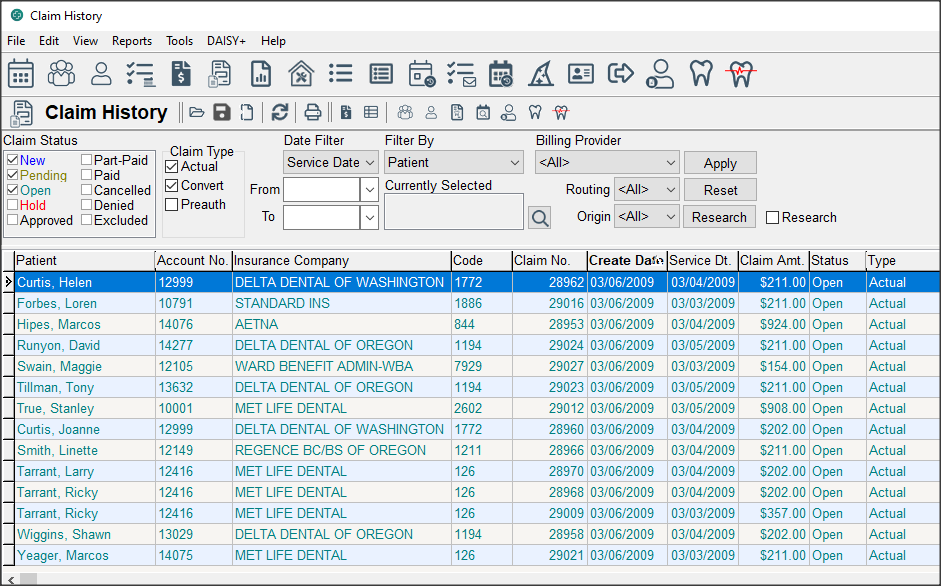
To rearrange table columns:
- In the window, click the column heading you want to move and keep the mouse button depressed.
You see a thick dark gray line (the cursor) running down the start of the column you want to move. - Keep the mouse button depressed and drag the cursor until is just to the left of the column that will follow the one you are moving, then release the mouse button.
Note: DAISY+ retains this new column order until you decide to change it.
Lock a DAISY+ session
- You can lock your DAISY+ session to prevent unauthorized access when you leave your computer.
- If the DAISY+ session is locked, the computer can still to be used for other Windows applications.
- To unlock the DAISY+ session, you must enter the user account password associated with the session.
- DAISY+ windows that are minimized on the Windows task bar cannot be viewed until the session is unlocked.
- For easy access, a “Lock DAISY+” button can be added to the DAISY+ toolbar.
► To lock a DAISY+ session:
-
From the File menu, select Lock DAISY+.
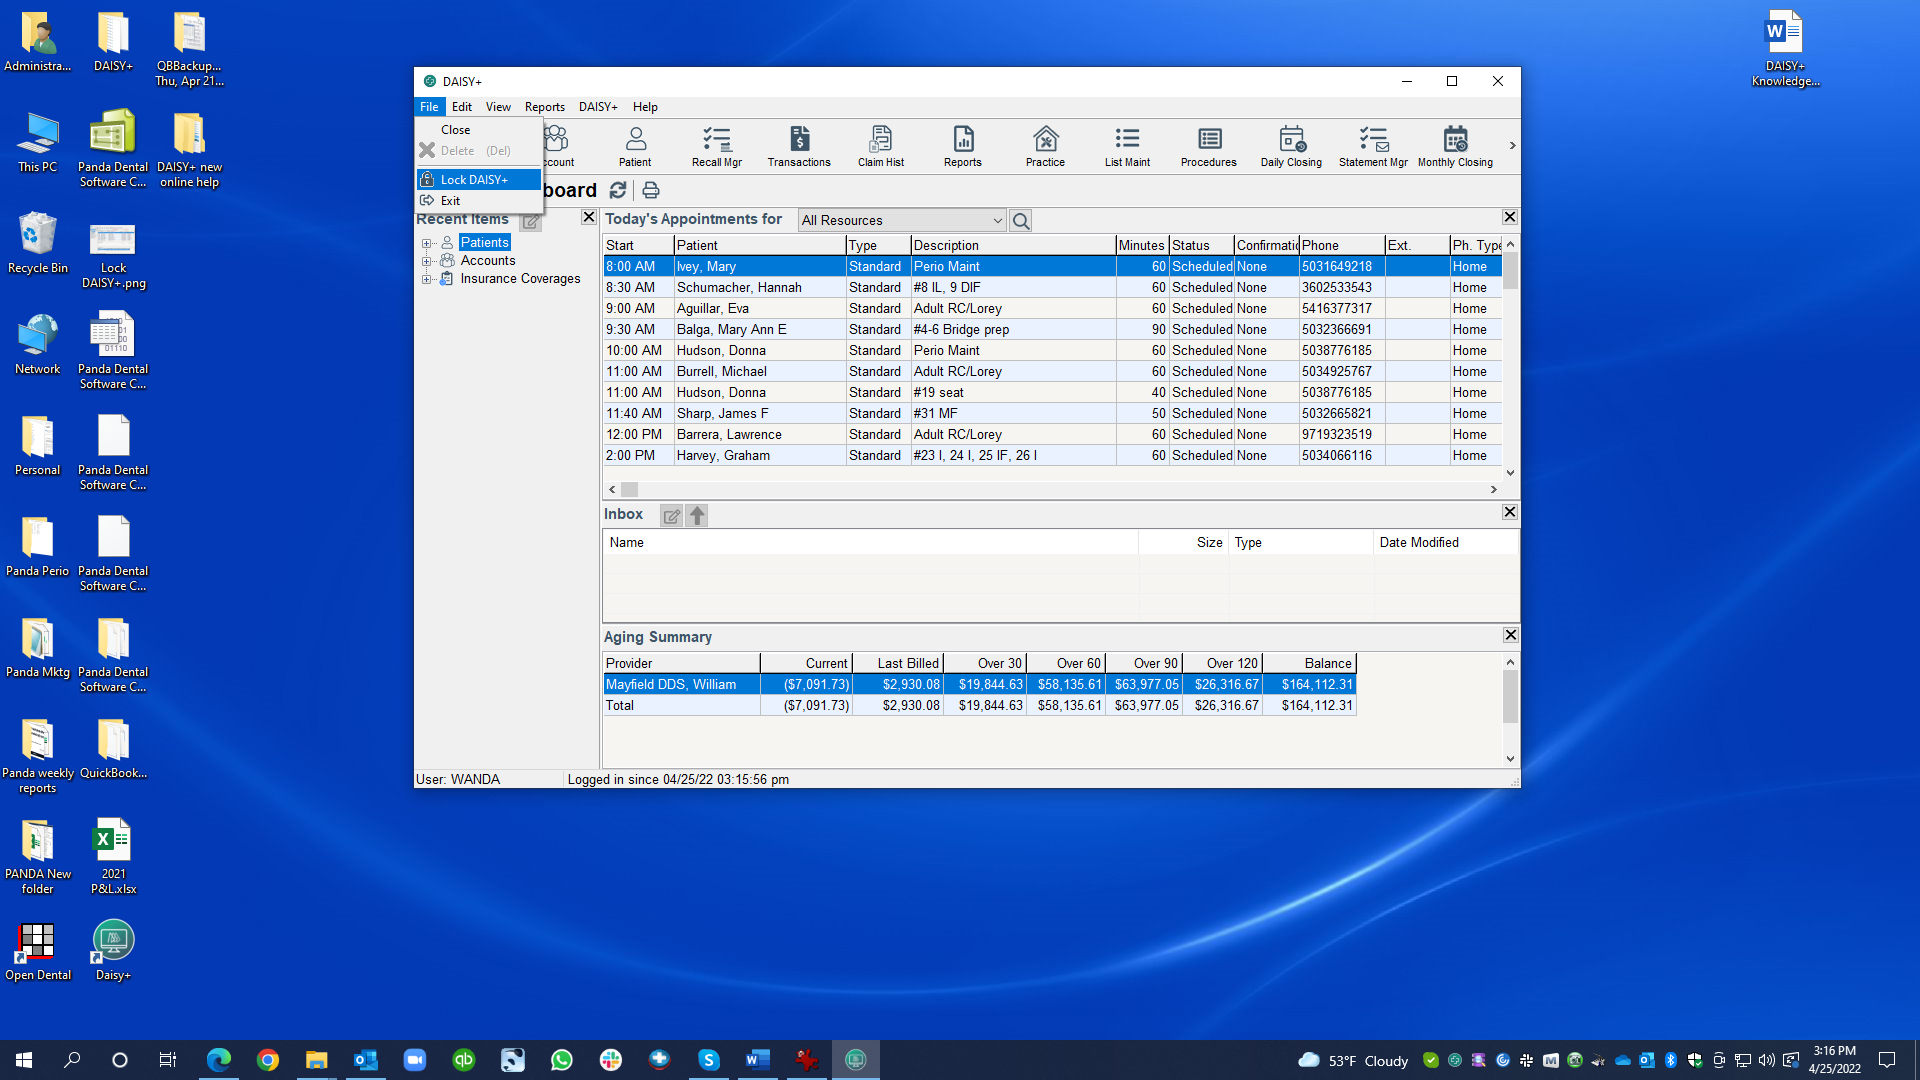
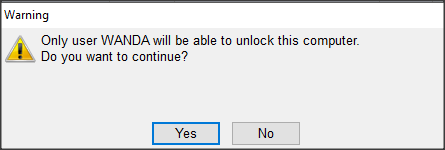
-
In the Warning dialog box, click Yes.
You see the Unlock version of the Log In to DAISY+ window.
► To add a Lock DAISY+ button to the DAISY+ toolbar:
- From the DAISY+ menu, select Configure DAISY+ Toolbar.
-
Check the Lock DAISY+ check box, then click OK.
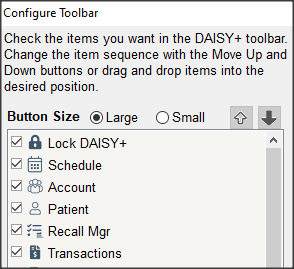
The Lock DAISY+ button is added to the toolbar.
Unlock a DAISY+ session
► To unlock a DAISY+ session:
-
In the Password text box, type the password of the user account that is locked.
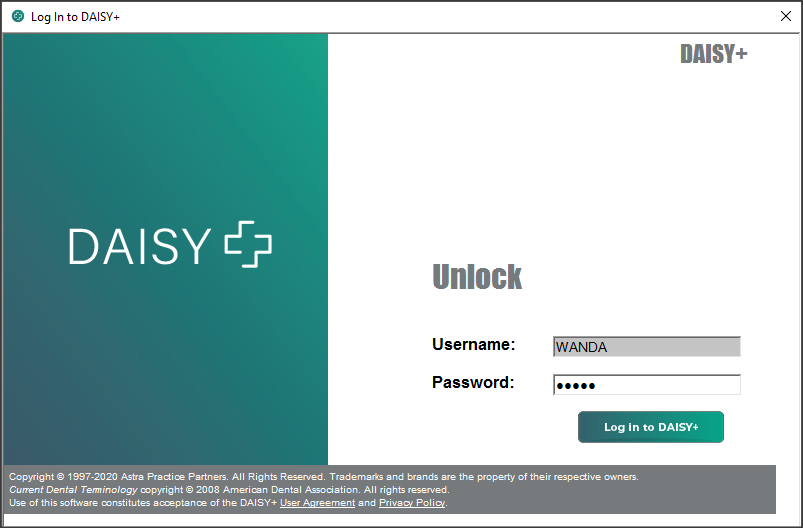
Note: DAISY+ automatically fills in the username of the account that is locked.
-
Click Log In to DAISY+.
The session returns to where you left off.
To set up a new account, you need to complete the following steps in this order:
- Create an account and set up a guarantor.
- Assign a provider and a fee schedule to the account.
- Select account options, then save the account.
-
Optionally, you can also:
- Add second guarantor.
- Add insurance coverages.
- Add more patients.
Account terminology
Guarantor. The person who is financially responsible for an account.
Subscriber. The person who carries the insurance.
Patient. The person who receives treatment.
When you open a new account, you have to assign at least one guarantor. The guarantor is the person who is financially responsible for the account. You can have up to two guarantors on an account.
► To open an account and set up a guarantor:
-
From the DAISY+ toolbar, click

-
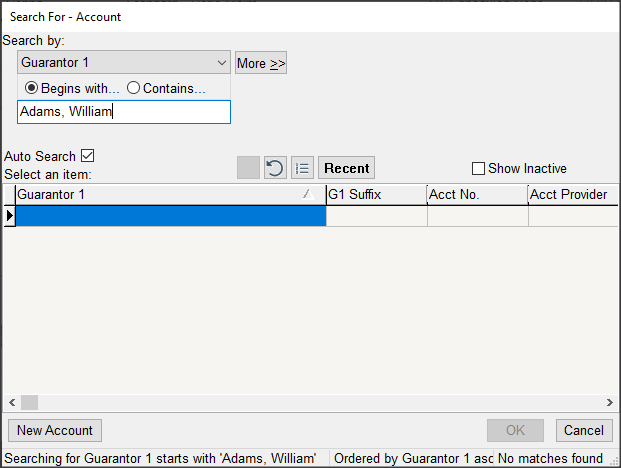
In the Search For – Account window:
- To avoid creating a duplicate account, search for an existing one. If you find one, you don’t need to create a new account.
- If you’re sure no account exists for this person, click New Account.
-
In the Search For – Guarantor for the New Account window, do one of the following:
- Search for and select the guarantor, then click OK.
- If you’re sure this person is not in the system, click New Guarantor for the New Account.
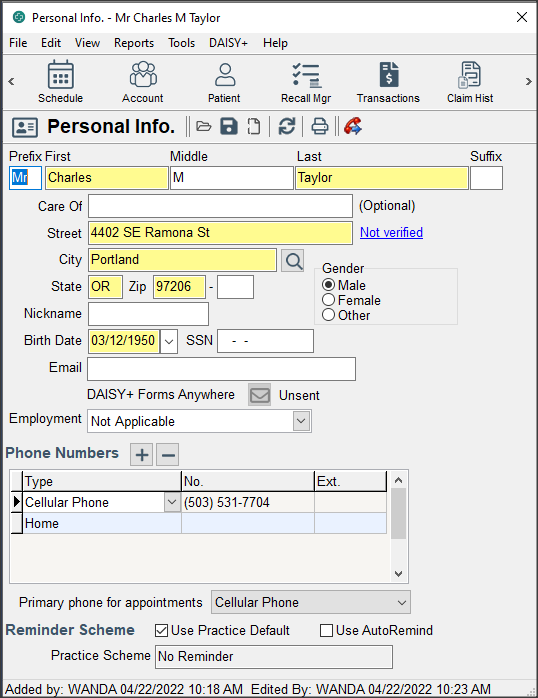
-
In the Personal Info window, complete this person’s information.
-
Click , then close the Personal Info window.
Note: When you create an account, DAISY+ automatically adds the guarantor as a patient on the account. If the guarantor is not also a patient, you must first add another patient to the account, then remove the guarantor as a patient. For more information, see "Add a patient".
Tip: You can also use the Patient Account Wizard to set up accounts. To run the Wizard, click
on the DAISY+ toolbar.Tip: Guarantor information can be modified after the account is set up.
-
In the Account window, click the General tab.
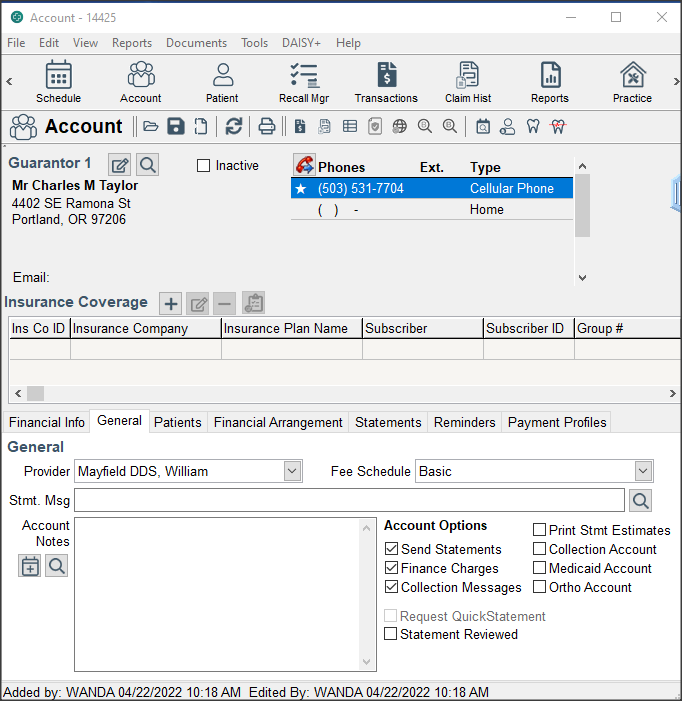
DAISY+ automatically assigns a default provider and fee schedule for this account.
- To change the provider, select a provider from the Provider drop-down list.
- To change the Fee Schedule, select a fee schedule from the Fee Schedule drop-down list.
-
Select from the following Account Options:
Use this Account Option... To do this... Send Statement When checked, sends the account’s guarantor(s) an account statement. Finance Charges When checked, the account will incur fees on outstanding balances when you run monthly processing. Collection Messages When checked, adds collection messages to the account statement. Print Stmt Estimates When checked, the account’s statement will print the estimated patient and insurance portions that are due. Collection Account Indicates the account is in collection. When checked, the account does not receive statements. Medicaid Account Indicates that account charges are billed to Medicaid. When checked, the account does not receive statements. Ortho Account Indicates the account is reserved for patients who receive orthodontic charges. When checked, an Ortho tab gets added to the Account window. Request Quick Statement When checked, a Quick Statement for this account will be generated during the next Daily Closing and no monthly statement will be generated.
This option disables automatically after the next Daily Closing runs.
The option is grayed out if the account has a zero balance and if the Send Statement option is not checked in the Account screen.
Statement Reviewed Indicates that the account has been reviewed for accuracy. This option gets checked automatically when the Reviewed check box for the account is checked in Statement Manager. - Click to save the information.
Tip: Account Options can be modified after the account is set up. From the DAISY+ toolbar, click Account. Search for and select the account. Click the General tab and change account options. Guarantor information can also be modified after the account is set up.
Add a patient
If the guarantor is the only patient on this account, skip to "Set up insurance coverage".
► To add a patient:
-
In the Account window, click the Patients tab, then click in the Patients section.
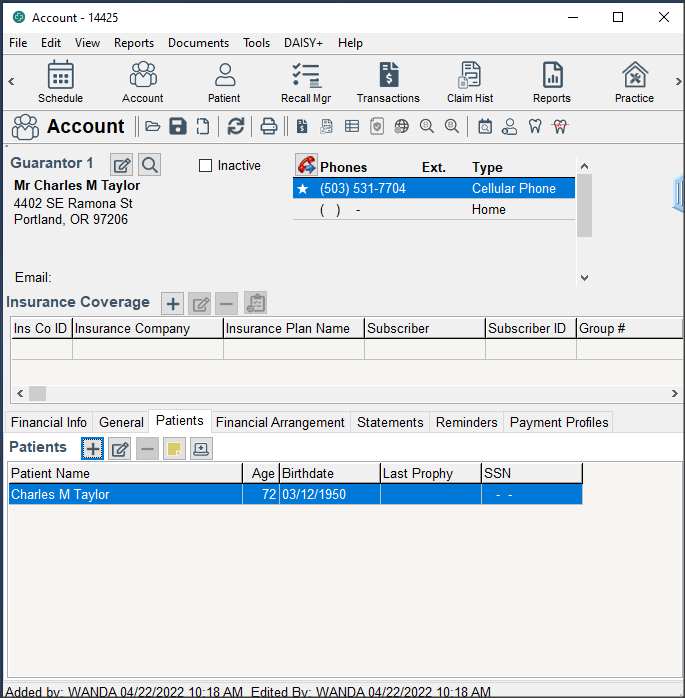
-
In the Search For – Patient window, do one of the following:
- Search for and select the person you want, then click OK.
- If this patient is not in the system, click New Patient.
In the Personal Info window, complete this person’s information.
Note: A yellow text box indicates that the information is required.
Important: If the contact information for this patient doesn’t match the guarantor’s contact information, DAISY+ will open the Update Family Addresses window so you can also change the contact information for people related to that person.
- Click , then close the Personal Info window.
The Patient window remains open. You can now add detailed information about the patient. -
In the Patient window, optionally enter more information about this patient.
Use this tab... To do this... General Specify the patient’s marital status, student status, emergency information, and special notes about the patient. Referral Info Track how this patient found your practice. Track to whom you referred this patient. Recall Specify the way you want to notify this patient about recall (phone, card, label, none) and the type of recall (prophy, perio, etc.) you want to track. Prescriptions Record prescriptions your office gave to this patient. Insurance Coverage View details about this patient's insurance coverage. Reminders/Tags Use the Reminders section when you need to follow up on a patient.
Use the User Defined Tags section to identify individual patients or groups of patients. For example, set up a “short notice” tag.
Ortho Account Indicates the account is reserved for patients who receive orthodontic charges. When checked, an Ortho tab gets added to the Account window. Medical Alert Record important medical status information about the patient. If a patient has a medical alert, a red cross symbol is displayed in the Patient window and on the appointment in the Schedule.
Statement Reviewed Indicates that the account has been reviewed for accuracy. This option gets checked automatically when the Reviewed check box for the account is checked in Statement Manager. -
Click , then close the Patient window.
Tip: To make changes to a patient’s demographic information, from the DAISY+ toolbar, click Patient.
Search for and select the patient, then click OK to open the Patient window. Click in the Patient section to open the Personal Info window.
Since patients are sometimes covered under more than one plan, or different patients on an account are covered by different plans, you need to add each plan to the account. When you add insurance coverage to an account, you:
- Specify the subscriber of the plan
- Select an existing plan or add a new plan
- Assign patient relationships to the subscriber
Note: Each time you set up insurance coverage on an account, always check for an existing plan first to avoid creating a duplicate plan in your database.
► To set up insurance coverage:
- Open the appropriate account.
-
In the Insurance Coverage section, click
-
In the Search For – Subscriber window, do one of the following:
- Search for and select the subscriber, then click OK.
-
If this subscriber is not in the system, click New Subscriber.
- In the Personal Info window, complete this person’s information.
- Click , then close the Personal Info window.
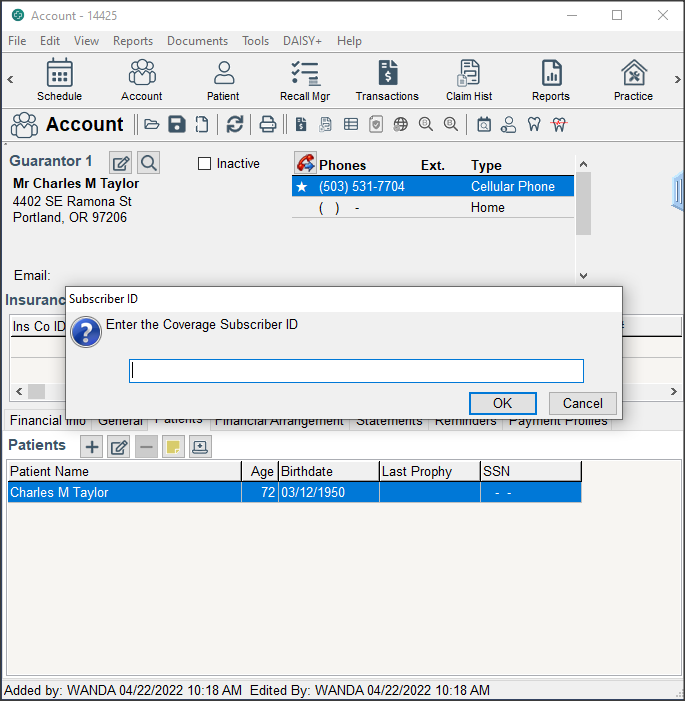
-
In the Enter the Coverage Subscriber ID dialog window, type the subscriber ID number, then click OK.
Note: To help ensure that electronic claims process reliably, the words “none” or “unknown” can no longer be entered in the Subscriber ID text box. The Subscriber ID must now contain:
- At least two characters
- Valid characters only: 0-9, a-z, A-Z, #, space, . (dot), and - (dash)
The Subscriber ID (assigned by the insurance company) can be entered in the Insurance Coverage window or when adding insurance coverage from the Account window. The Subscriber ID can also be viewed in Patient and Account windows.
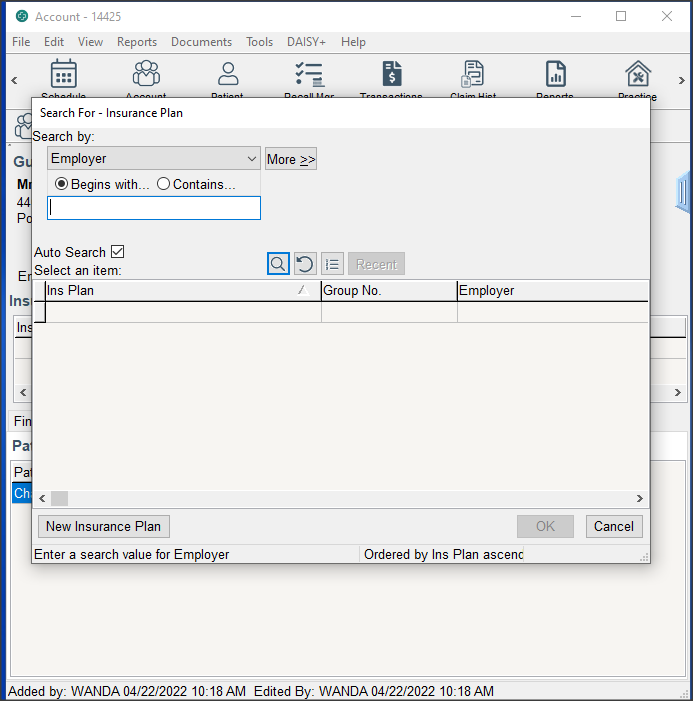
-
In the Search For – Insurance Plan window, do one of the following:
- Search for and select the insurance plan, then click OK.
-
Click New Insurance Plan and add the new plan to the system.
-
From the Pri drop-down list in the Assign Patient Coverage window, select the new patient's primary insurance coverage.

- From the Relationship drop-down list, select the patient's relationship to the subscriber.
- If there is secondary coverage, from the Sec drop-down list, select the person’s secondary insurance, then select the patient’s relationship to the subscriber.
- Click OK.
- For each additional insurance plan on an account, repeat steps 2 through 11.
- Click , then close the Account window.
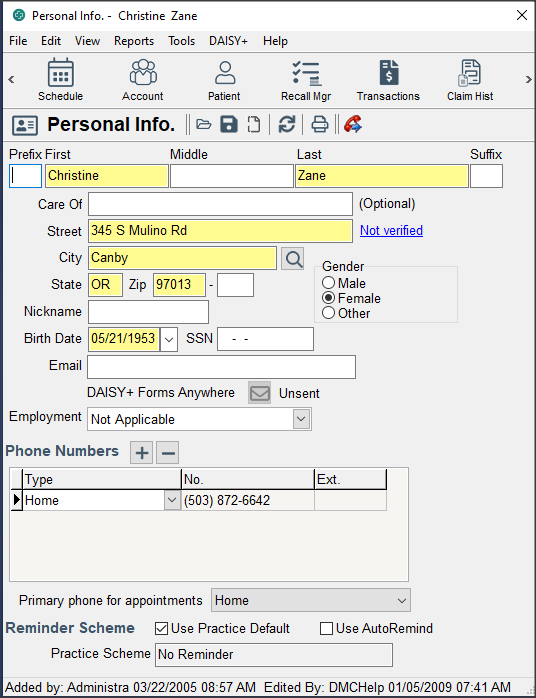
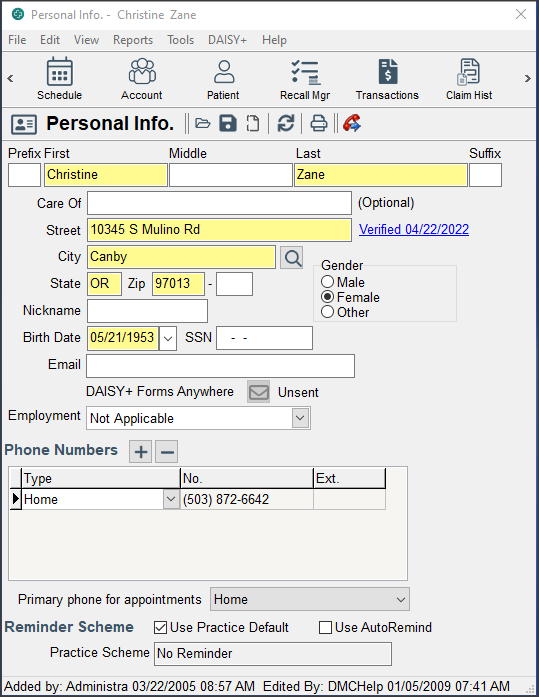
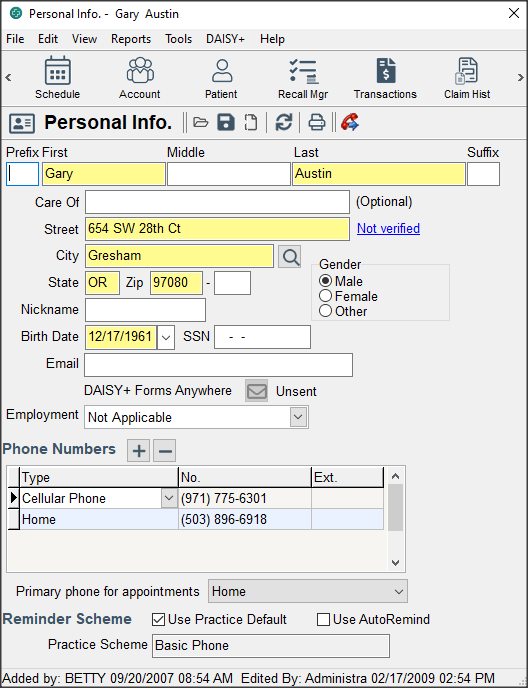
In the Personal Info window, you can verify mailing addresses using information from the U.S. Postal Service (USPS). Verifying mailing addresses helps to maximize collections and ensure that electronic claims process reliably.
► To verify a mailing address:
- From the DAISY+ toolbar, click

- Search for and select the appropriate person, then click OK to open the Personal Info window.
-
To the right of the Street text box, click Not Verified.
-
Do one of the following:
-
If the address matches the information in the USPS database, you see that the address verified and the verification date. Close the window.
-
If the address cannot be verified, you see a warning. Click OK and close the window.

-
-
Note: A correct zip code is not enough to verify an address. The street address, city, state, and zip code must all be correct in the Personal Info window.
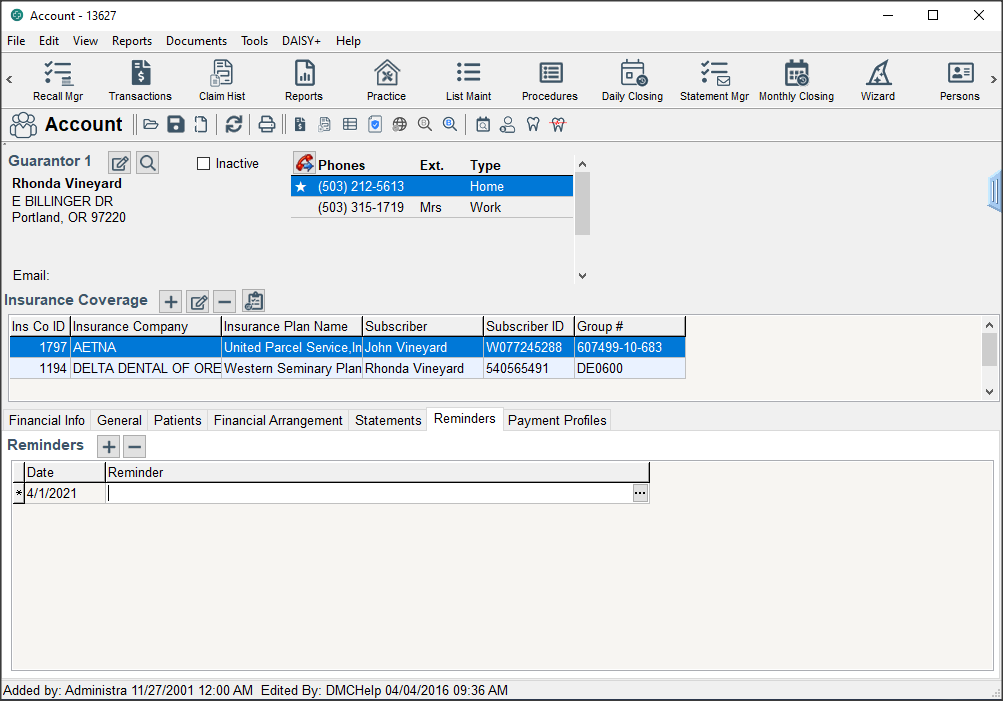
Add account an reminder
Users can add, edit, or delete account reminders from a new Reminders tab in the Account window. Each reminder is limited to 60 characters, including spaces.
► To add a reminder to an account:
- From the DAISY+ toolbar, click
- Search for and select the account, then click OK.
- In the Account window, click the Reminders tab.
-
In the Reminders section, click
-
In the Reminder column, do one of the following:
- Type a reminder for this account.
- Click and select canned text for the reminder.
-
Click , then close the window.
Once the account reminder is added, the reminder pops up whenever you open:
- An account-related window for the account, such as the Account or Ledger window.
- A patient-related window, such as Treatment Plan, for the account’s guarantor or any patient on the account.
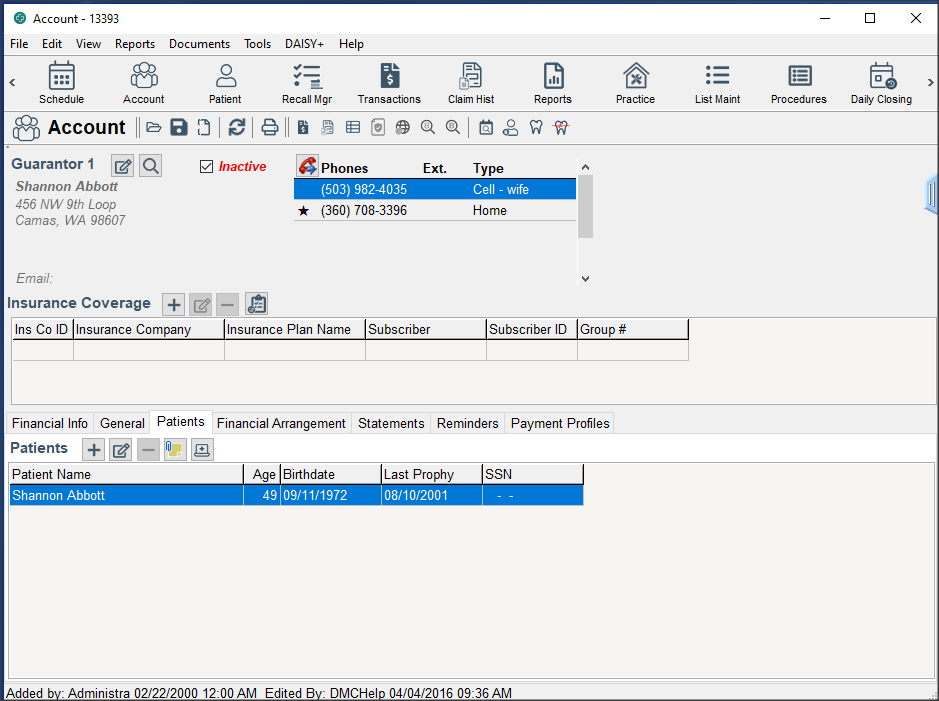
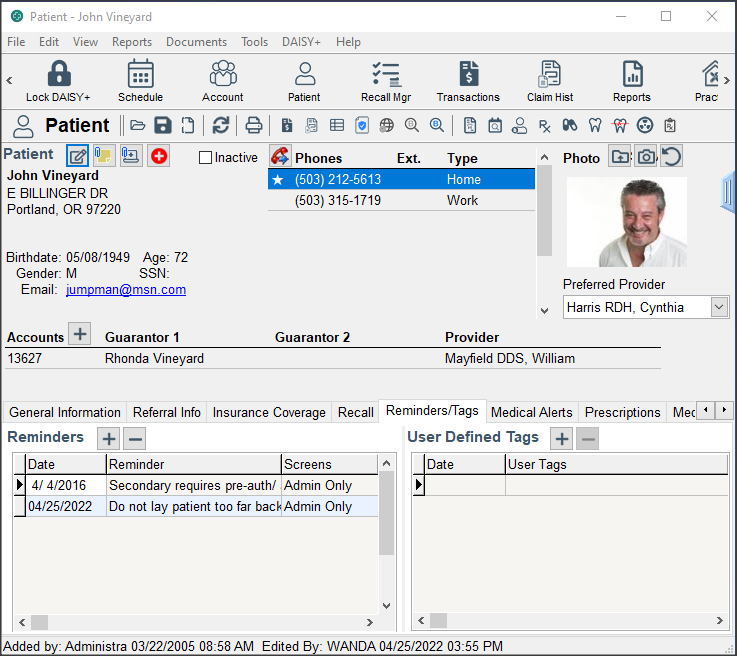
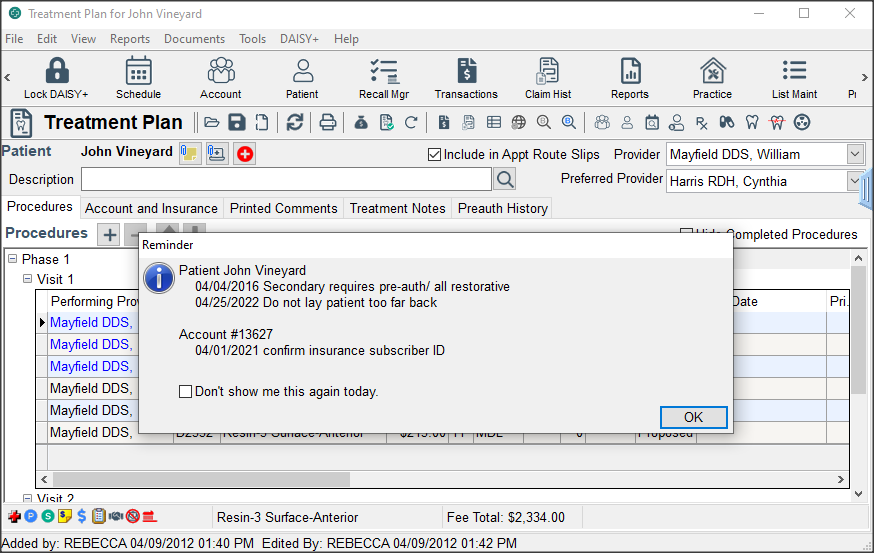
In the following example, Rhonda Vineyard's account has a reminder. Her account includes her husband, John Vineyard. When John’s patient window is opened, both his patient reminder and Rhonda’s account reminder show in his Reminder pop-up window.
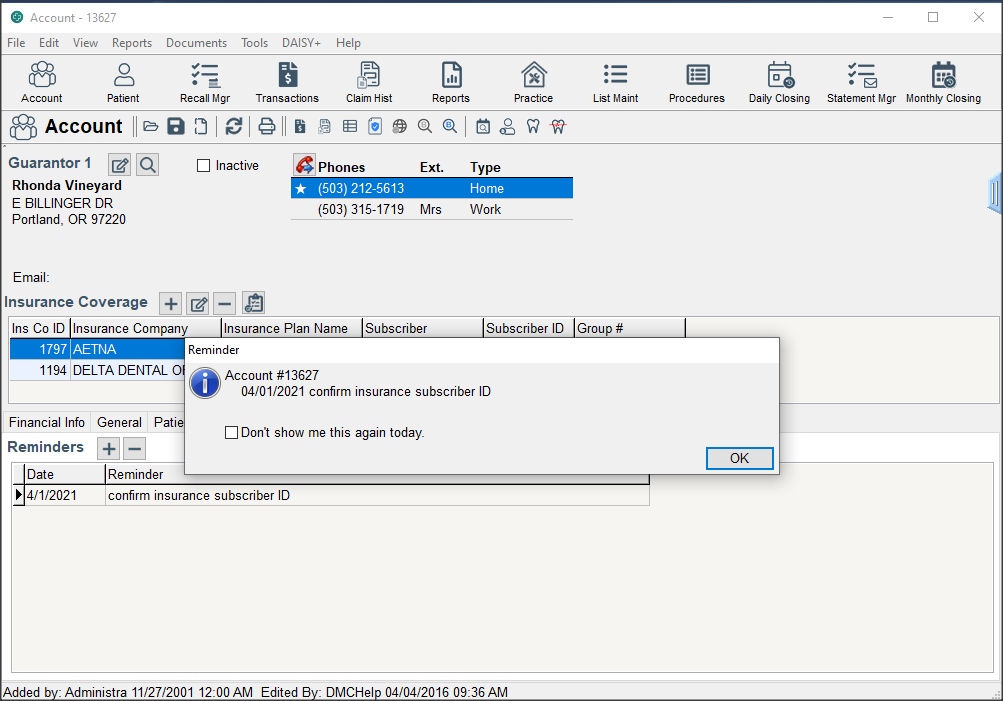
In the Reminder pop-up window, patient reminders are listed first. If the patient or account has more than one reminder, the reminders are listed in date order.

► To delete a reminder for an account:
- From the DAISY+ toolbar, click
- Search for and select the account, then click OK.
- In the Account window, click the Reminders tab.
- In the Reminders section, select the reminder to delete, then click
- In the Confirm dialog box, click Yes.
Delete the remaining duplicate names
Finally, delete all of the other name variations that you chose not to use. For example, SusanB Jones.
To delete a duplicate name, you need to complete the following steps in this order:
- From the DAISY+ menu, select Configure, then Persons.
- Search for and select the name, then click OK.
The Personal Info window opens. - From the File menu, select Delete, then select Person.
- In the Confirm dialog box, click Yes to delete the person.
Note: If you see a dialog box that states the person cannot be deleted, followed by a list of reasons, you must correct the problem(s) before you can delete the person.
- For each additional duplicate name, do the following:
- From the File menu, select Open Another Person.
- Repeat steps 2 through 4.
- Click Yes to confirm the change, then click OK.
All duplicate names should now be deleted.
Note: To avoid having a duplicate name problem, always search for the name before you try to add it to DAISY+.
Important: When you change information in the Person window, only update the required fields that are specific to that person.
Use caution when you change a first name, because an error could result in inadvertent changes to other information stored in DAISY+.
Make each duplicate name distinct
The easiest way to make a name distinct is to add an initial to the first name (no spaces). For example, if you’ve got two persons named Susan Jones, change the first Susan Jones to SusanA Jones to distinguish it from the second one, SusanB Jones. Make all duplicates different from each other.
Important: In the Persons window, be sure you modify the first name rather than adding an initial in the Middle Name field. For example, SusanA Jones, rather than Susan A Jones.
About the Persons list
Each person, whether a subscriber, guarantor or patient, is stored in the Persons list.
Removing a person from an account does not remove that person from the Persons list. All information about the person remains available in DAISY+, so if you need to add the person to an account again, you simply search for and select the person.
Deleting a person from the Persons list makes that information permanently unavailable. If you need to add the person to an account later on, you’ll have to completely re-enter all of the person’s information into DAISY+.
► To make each duplicate name distinct:
- From the DAISY+ menu, select Configure, then Persons.
- Search for and select one of the duplicate names, then click OK.
The Personal Info window opens.
-
Change the name to make it distinct.
For example, change Susan Jones to SusanA Jones.
-
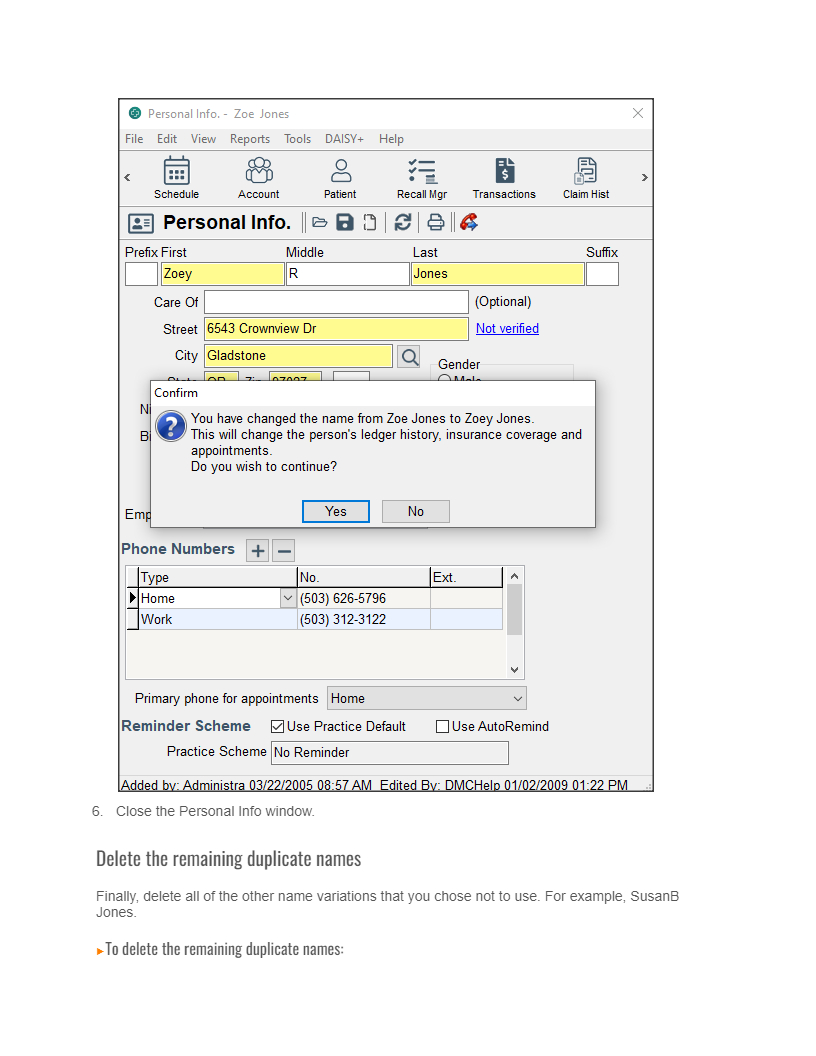
In the Confirm dialog box, click Yes.
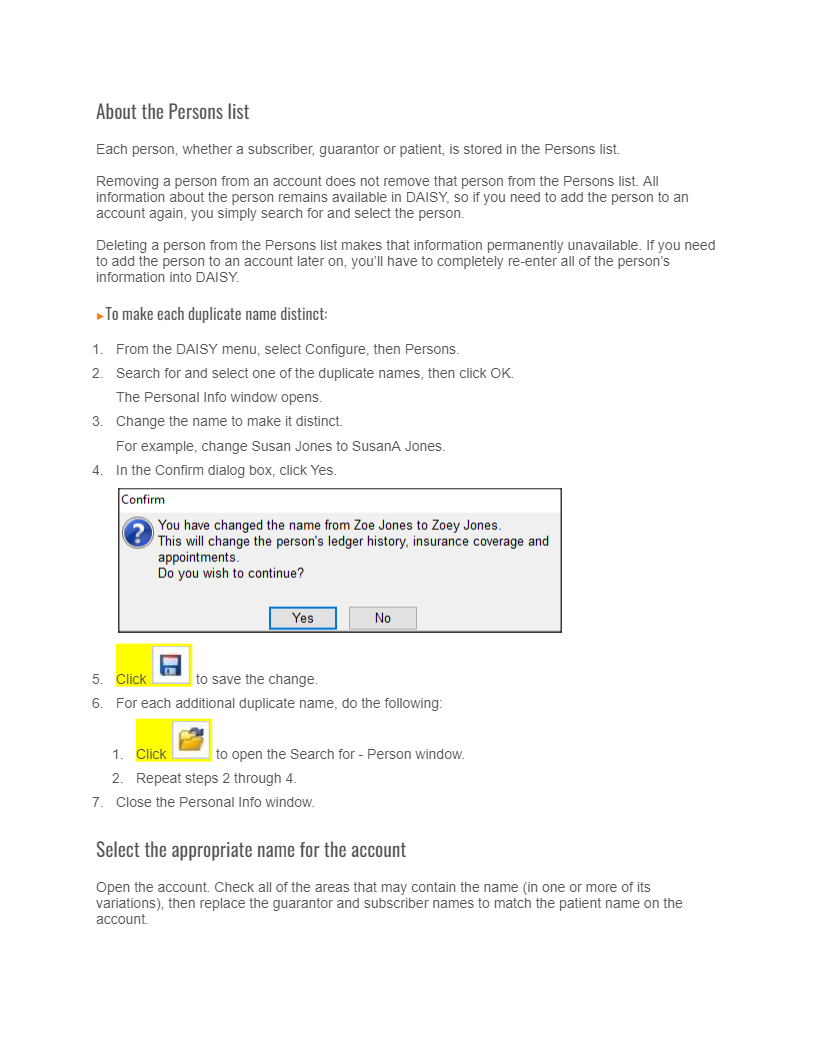
- Click to save the change.
-
For each additional duplicate name, do the following:
- Click

- Repeat steps 2 through 4.
- Click
- Close the Personal Info window.
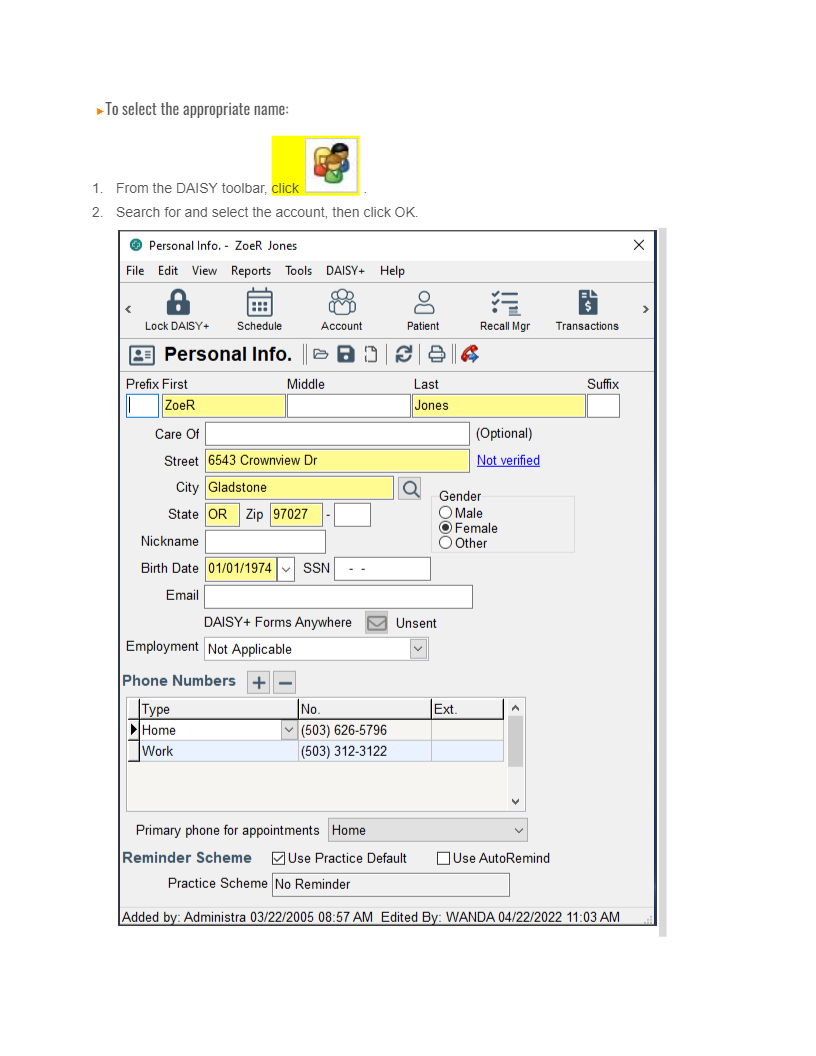
Select the appropriate name for the account
Open the account. Check all of the areas that may contain the name (in one or more of its variations), then replace the guarantor and subscriber names to match the patient name on the account.
► To select the appropriate name:
- From the DAISY+ toolbar, click
-
Search for and select the account, then click OK.
-
Check the Guarantor, Patient and Subscriber sections to see which of the name variations are used.
For example, SusanA Jones is the patient and guarantor. SusanB Jones is the subscriber.
-
Replace the guarantor and the subscriber names to match the patient name.
-
To replace the guarantor name:
- Right-click near the guarantor’s name and choose Select Guarantor on Account.
- Select the same name variation as the one used for the patient name and click OK.
-
To replace the subscriber name:
- In the Insurance Coverage section, click

- Select the Subscriber tab.
- Right-click and choose Select Subscriber for Coverage.
- Select the same name variation as the one used for the patient name, and click OK.
- In the Insurance Coverage section, click
-
Rename the duplicate name to its original designation
Next you need to rename the duplicate name that you chose to keep to its original designation. For example, if you kept SusanA Jones, change the name back to Susan Jones.
► To change the name back to its original designation:
- From the DAISY+ menu, select Configure, then Persons.
-
Search for and select the duplicate name you want to keep, then click OK.
The Personal Info window opens.
-
Change the name back to its original designation.
For example, Susan Jones.
-
Change the name back to its original designation.
For example, Susan Jones.
- In the Confirm dialog box, click Yes.
-
Click to save the change.
All the names in the account are the same.
- Close the Personal Info window.
Delete the remaining duplicate names
Finally, delete all of the other name variations that you chose not to use. For example, SusanB Jones.
► To delete the remaining duplicate names:
- From the DAISY+ menu, select Configure, then Persons.
-
Search for and select the name, then click OK.
The Personal Info window opens.
- From the File menu, select Delete, then select Person.
-
In the Confirm dialog box, click Yes to delete the person.
Note: If you see a dialog box that states the person cannot be deleted, followed by a list of reasons, you must correct the problem(s) before you can delete the person.
-
For each additional duplicate name, do the following:
- From the File menu, select Open Another Person.
- Repeat steps 2 through 4.
-
Click Yes to confirm the change, then click OK.
All duplicate names should now be deleted.
Change the guarantor on an account
The guarantor receives the statement and is financially responsible for the account. Sometimes you may need to change an account’s designated guarantor. For example, when adding an account, you might accidentally make the child, rather than the parent, the guarantor.
Note: Never change the guarantor by editing the guarantor’s information in the Personal Info window. This changes the identity of the patient on the account, and is equivalent to crossing a person’s name off a paper chart and writing someone else’s name in its place.
► To change the guarantor on an account:
- From the DAISY+ toolbar, click
- Search for and select the account you want, then click OK.
- In the Account window, right-click and choose Select Guarantor on Account.
- In the Search For - Guarantor window, do one of the following:
- Search for and select the new guarantor, and then click OK.
- If the guarantor is not in the system, click the New Guarantor button. In the Personal Info window, complete the required information for the person.
Note: A yellow text box indicates the information is required.
-
Click and then close the Personal Info window.
The person you selected or added becomes the guarantor for that account.
- Click and then close the Account window.
Change the subscriber on an account
The subscriber, who may or may not be a patient, is the person who carries the insurance.
► To change the subscriber to a different person:
- From the DAISY+ menu, select Insurance, then Coverage.
- Search by subscriber, then select the subscriber you want and click OK.
- In the Coverage window, click the Subscriber tab.
- Right-click and choose Select Subscriber for Coverage.
- In the Search For - Subscriber window, do one of the following:
- Search for and select the new subscriber, and then click OK.
- If the subscriber is a person not currently listed in your DAISY+ database, click the New Subscriber button.
DAISY+ opens the Personal Info window on top of the Coverage window.
-
In the Personal Info window, update or complete any required information for the subscriber.
Note: A yellow text box indicates that the information is required.
-
Click to save the change, and then close the Personal Info window. The Coverage window now lists the new subscriber.
The Confirm window opens.
- To reset the subscriber ID, click Yes.
- In the Select the Account for Coverage window, select the account.
The Assign Patient Coverage window opens.
- From the Relationship drop-down list, select the patient’s relationship to the subscriber, then click OK.
- In the Coverage window, type the Subscriber ID.
- Click to save and then close the Coverage window.
The subscriber, who may or may not be a patient, is the person who carries the insurance.
Use this procedure to create a new account for a patient who is already assigned to another account, such as when a child is no longer covered on the parent’s account, or when parents divorce and their child’s charges become the responsibility of a different parent.
- The new account retains the same default provider, fee schedule, and account options as the original account.
- Initially, this patient will be assigned as the guarantor. If the patient should not be the guarantor, that assignment can be changed after another patient is added to the account.
- If insurance is assigned to the patient on the original account, that information will transfer to the new account.
► To move an existing patient to a new account:
- From the DAISY+ toolbar, click

- Search for and select the patient’s name, then click OK.
- In the Patient window, right-click and select New Account for Patient.
You see the Please Select Patient(s) to Add to New Account window.
- Select the patient and click OK.
- In the Personal Info window, update the required information for the patient.
Note: A yellow text box indicates that the information is required.
- Click and then close the Personal Info window.
In the Account window, the new account information displays. The selected patient is automatically assigned as the guarantor on this new account. If the patient is not actually the guarantor, you can change this information after another patient is added.
- To modify the new account, do the following:
- Change account options, such as the account provider. Click the General tab and select a provider from the Provider drop-down list.
- Change the fee schedule. Click the General tab and select a fee schedule from the Fee Schedule drop-down list.
- Assign a different guarantor. Right-click near the guarantor’s name and choose Select Guarantor on Account. Search for and select the guarantor you want, then click OK.
- Update the insurance coverage. In the Insurance Coverage section, click . Search for and select the subscriber, then click OK. In the Personal Info window, make appropriate changes, then close the Personal Info window.
- Click and then close the Account window.
- Open the original account and remove the patient.
Note: The deleted patient’s account history remains in the ledger of the original account.
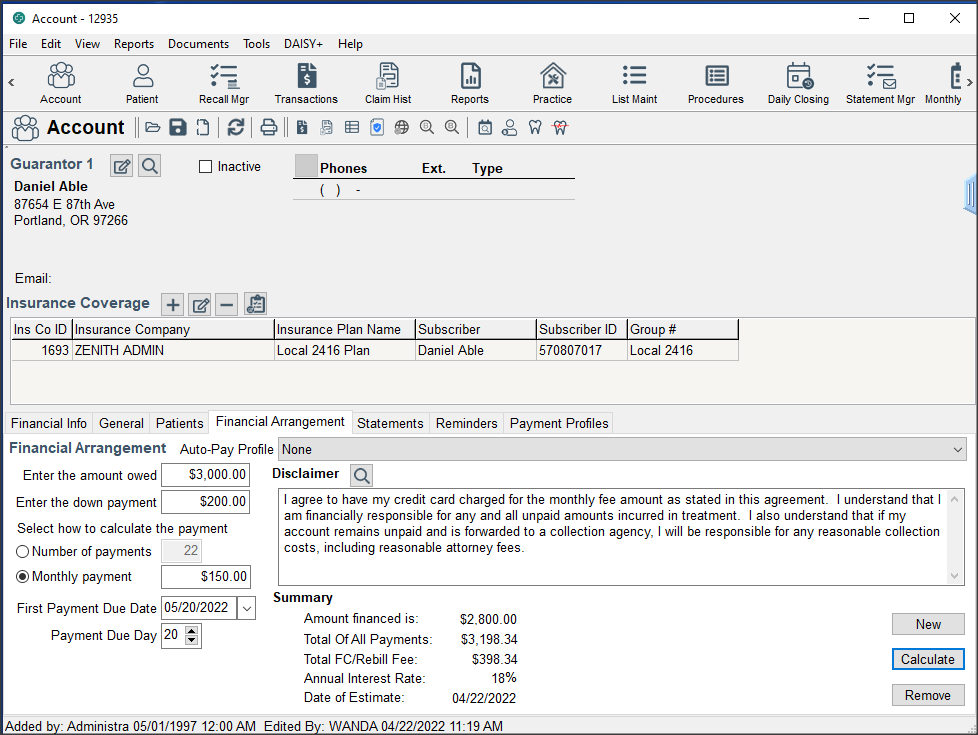
Set up a financial arrangement
When a patient needs to pay for dental services in installments, you can set up a Financial Arrangement worksheet in the Account window to help you determine payment information.
Note: Financial arrangement defaults for the practice are set up in the Financial Info tab of the Practice window.
► To set up a financial arrangement:
- From the DAISY+ toolbar, click
- Search for and select an account, then click OK.
- Click the Financial Arrangement tab.
- If there is an existing financial arrangement, click the Remove button.
- Click the New button.
- In the Enter the Amount Owed text box, type in the total amount owed.
This is the gross amount before deducting the down payment.
-
In the Enter the Down Payment text box, type in the down payment, if any.
In the Summary section, you see that the amount financed is calculated for you; it equals the Amount Owed minus the Down Payment. You can calculate the payment two ways:
- By the amount the patient wants to pay monthly
- By the number of payments a patient wants to make
-
Under Select How to Calculate the Payment, do one of the following:
- To calculate a payment by the amount the patient wants to pay monthly, choose Monthly Payment. Type in the monthly payment amount. Click the Calculate button, then click Yes to save the arrangement.
- To calculate the payment by the number of payments a patient wants to make, choose Number of Payments. In the text box, type in a number of monthly payments. Click the Calculate button, then click Yes to save the arrangement.
If you are assessing interest, the default interest rate or rebill fee will be displayed in the Summary section.
- In the First Payment Due Date and Payment Due Day text boxes (if you don’t want to use the default dates), type in changes.
Note: The monthly payment calculation or the number of payments does not assess interest or a rebill fee for the grace period specified in Practice Settings.
Tip: If you want to charge principal only (no interest), click the General tab in the Account window and uncheck Finance Charges. Then recalculate the financial arrangement.
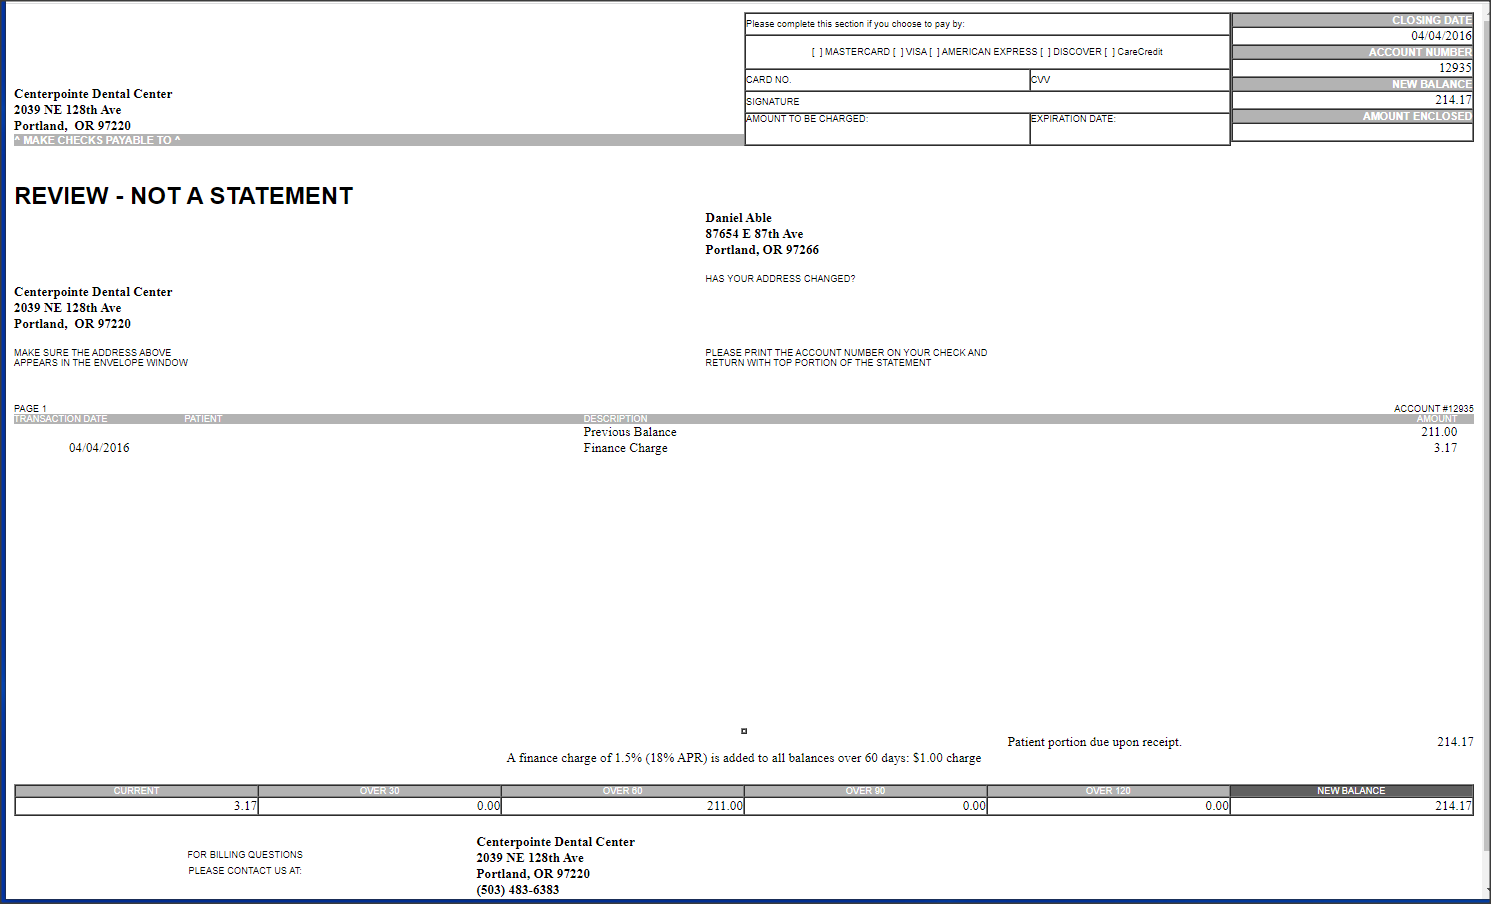
About account statements
When an account’s financial arrangement includes automatic payments, the account’s statements and statement previews include:
- “Auto-Pay” next to the payment type, such as ACH, Visa, or MasterCard
- The sentence “Financial arrangement payment will be automatically billed on next due date,” and the amount of the payment
Tip: If the final payment is less than the regular monthly payment, then the statement will show the correct payment amount.
Subscriber. The person who carries the insurance.
Patient. The person who receives treatment.
Use the Financial Arrangement Summary report
You can filter the Financial Arrangement Summary report (R2113) for all payments, payments made with auto-pay or payments made without auto-pay.
Note: For more information on auto-Pay, see "Set up an auto-pay financial arrangement " .
In the Account window, you run the report from the Reports menu.
On the report you see the following information for accounts with financial arrangements that have auto-pay:
- Last Payment Date
- Next Payment Date
- Last Transaction Status
- Overdue

► To run the Financial Arrangement Summary report:
- From the DAISY+ toolbar, click
- From the Reports menu, select Financial Arrangement Summary, then select one of the following:
- All to include all financial arrangements.
- With Auto-Pay to include only auto-pay financial arrangements.
- Without Auto-Pay to exclude auto-pay financial arrangements.

- In the Print Options window, click Print to print the report.
Note: You can also filter and run the report from the Report Gallery.
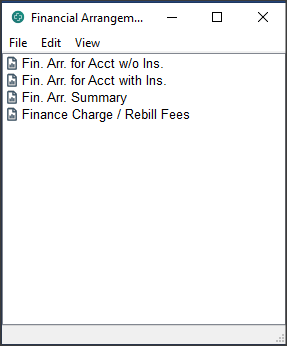
► To run the Financial Summary Report from the Report Gallery:
- From the DAISY+ toolbar, click
- Double-click the Financial Arrangements folder.
- Right-click the Fin. Arr. Summary report and select Properties.
- Click Reset to remove any filtering from the last time you ran the report.
- Click the Auto-Pay tab.
- Choose the filters you want to apply.
In the following example, the filters are set to show all auto-pay payments.
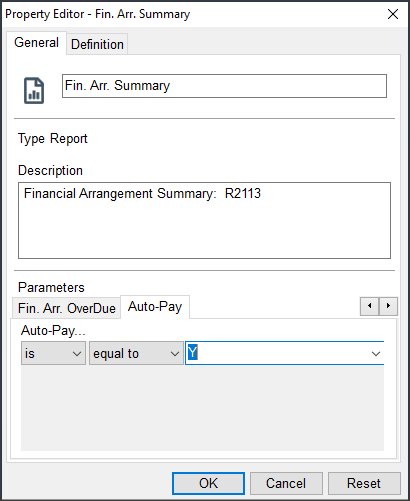
- Click OK.
- In the Financial Arrangements window, double-click the Fin. Arr. Summary report.
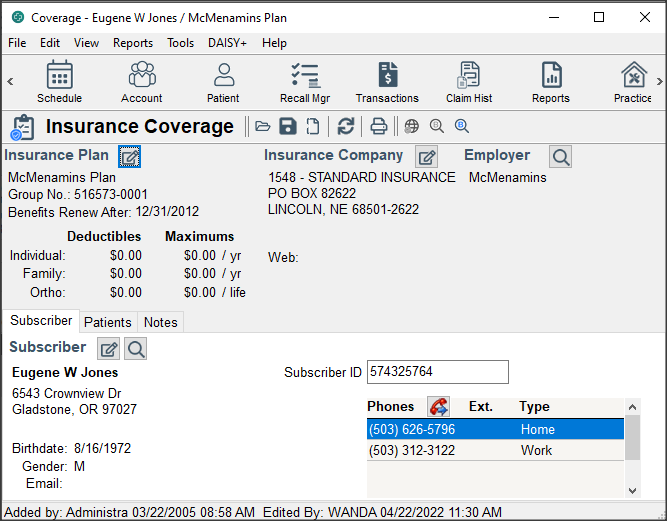
Change patient relationships on insurance coverage
► To change patient relationships on insurance coverage:
- From the DAISY+ menu, select Insurance, then Ins. Coverage.
- Search for and select the subscriber you want and click OK.
- In the Coverage window, click the Patients tab.
You see a list of all patients on this account who are under this coverage. -
In the Patients section, right-click and select Reassign Patient Coverages.

- From the Relation drop-down list, select the patient’s new relationship to the subscriber.
- Click OK.
- Click , then close the Assign Patient Coverage window.
Change the subscriber’s identification number
Because of HIPAA requirements, many insurance plans no longer use Social Security Numbers as identification numbers, so you may need to change some subscriber identification numbers in DAISY+.
► To change the subscriber’s identification number:
- From the DAISY+ menu, select Insurance, then Ins. Coverage.
- Search for and select the subscriber you want and click OK.
- Click the Subscriber tab.
-
In the Subscriber ID text box, type the subscriber’s new ID number.
Note: Use only alphanumeric characters in subscriber identification numbers. Other characters, such as hyphens, slashes, and periods, may cause claims to be rejected or delayed.
- Click , then close the window.
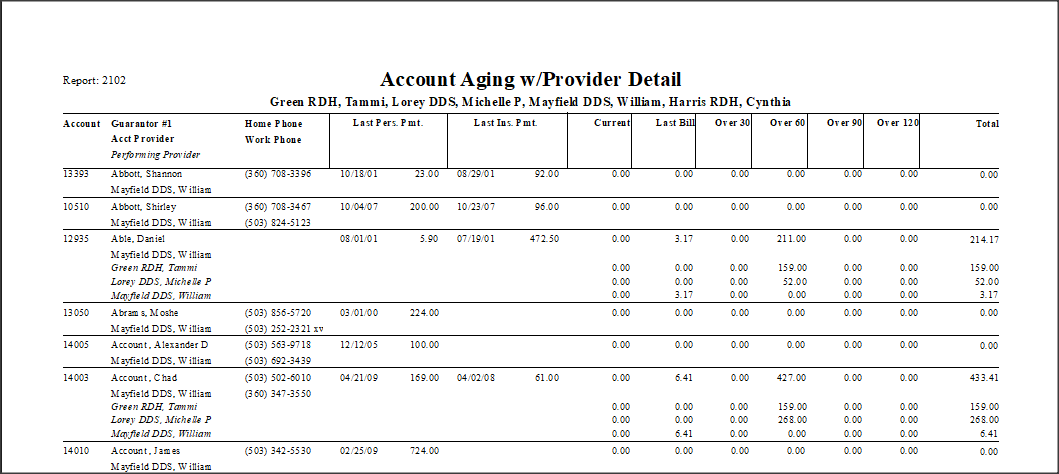
Use the Account Aging w/Provider Detail report
The Account Aging w/Provider Detail report lets you generate an aging report for a provider or a group of providers. This report is available from the Account folder in the Report Gallery, and from the Reports menu in the Ledger, Transactions, and Statement Manager.
Report filters allow you to refine the report by account provider, performing provider, and account balance.
► To view the Account Aging w/Provider Detail report:
- From the DAISY+ toolbar, click to open the Report Gallery.
- Double-click on the Account folder.
-
Double-click on Account Aging w/Provider Detail.
In this example, the report is filtered to show account aging for the provider Richard M. Smith.
Inactivate and Reactivate Accounts and Patients
Inactive accounts and patients can be deactivated so they do not clutter up reports and searches with irrelevant information. When an account or patient is inactivated, it remains in the DAISY+ database as an inactive record and can be easily accessed at anytime. All account and patient history remains attached to the inactive account or patient record.
Accounts and patients can also be quickly reactivated, keeping all account and patient history intact.
- When an account is inactivated, all patients associated with that account are inactivated as well unless they are associated with another active account.
- Double-click on the Account folder.
- If a patient on the account has an appointment scheduled, DAISY+ warns that the appointment will be deleted before the account is inactivated.
- Offices can continue to send statements for inactivated accounts that have balances.
- Inactivated accounts continue to show up in the Accounts Receivable report and in Statement Manager as long as they have a balance.
- Patients that are inactivated do not appear in Recall Manager, even if the recall is still attached to the patient.
- Recall and treatment plan reports are automatically filtered to exclude patients and accounts that are inactivated. However, using the Inactive tab in the Property Editor, report filters can be set to include inactive accounts or patients.
- DAISY+ users who have the “Allow deleting/removing Info?” permission can inactivate and reactivate accounts and patients.
- Deactivation and reactivation activities are logged in the DAISY+ Activity Log report (Report Gallery > System Lists > Activity Log). Log information includes when the activity occurred and who made the change.
Note: Patient and account records can still be deleted.
Inactivate an account
- When you inactivate an account, all patients associated with the account are inactivated as well unless they are associated with another active account.
- If a patient on the account has appointments scheduled, DAISY+ warns you that the appointments will be deleted before the account is inactivated.
- You can inactivate accounts with balances and continue to send statements for those accounts.
Note: You may want to remove the patient’s insurance coverage before you inactivate an account.
► To inactivate an account:
- From the DAISY+ toolbar, click
- Search for and select the account you want to inactivate, then click OK.
-
In the Account window, check the Inactive check box, then click
If no patients on the account have appointments, then the account is inactivated. If any patient on the account has appointments scheduled, DAISY+ warns you that the appointments will be deleted before the account is inactivated.
- Do one of the following:
- Click OK to delete the appointments and inactivate the account.
-
Click Cancel to keep the appointments scheduled and the account active.
If no patients on the account have appointments, then the account is inactivated. If any patient on the account has appointments scheduled, DAISY+ warns you that the appointments will be deleted before the account is inactivated.

Reactivate an account
- When you reactivate an account, all patients on the account are reactivated.
- All account history and history associated with patients on the account remains intact.
► To reactivate an account:
- From the DAISY+ toolbar, click
- In the Search For – Account window, check the Show Inactive check box.
-
Search for the account you want to reactivate.
Inactive accounts are grayed out.
- Select the account, then click OK.
-
In the Account window, uncheck the Inactive check box.
-
Click
All patients on the account are reactivated and all history associated with the account is still attached to both the account and patients.
Inactivate a patient
- If a patient has appointments scheduled, DAISY+ warns you that the appointments will be deleted before the patient is inactivated.
- When you inactivate a patient, DAISY+ grays out the patient’s information in the Account window.
► To inactivate a patient:
- From the DAISY+ toolbar, click
- Search for and select the patient you want to inactivate, then click OK.
-
In the Patient window, check the Inactive check box, then click
If the patient has no appointments, then the patient is inactivated. If a patient has appointments scheduled, DAISY+ warns you that the appointments will be deleted before the account is inactivated.
- Do one of the following:
- Click OK to delete the appointments and inactivate the patient.
- Click Cancel to keep the appointments scheduled and the patient active.
DAISY+ grays out the patient information (except the e-mail address) and makes the Inactive check box name red.
Reactivate a patient
► To reactivate a patient:
- From the DAISY+ toolbar, click
- In the Search For –Patient window, check the Show Inactive check box.
-
Search for the patient you want to reactivate.
Inactive patients are grayed out.
- Select the patient, then click OK.
- In the Patient window, uncheck the Inactive check box.
-
Click
All history associated with the patient is now viewable.
Troubleshooting accounts
How can I get back to the last account I viewed without searching again?
Not only can you reopen the last account without browsing; you can also reopen an account from a list of the last ten accounts you viewed. In the Account window, do the following:
- From the File menu, select Reopen, then select the account you want to reopen.
- In the DAISY+ Central window, under Accounts in the Recent Items tree, double-click the account.
- In the Search For - Account window, click Recent.
How do I indicate in DAISY+ that an account has been turned over to collections?
To indicate an account is in collections, open the Account. Click the General tab. In the Account Options section, check the Collection Account check box.
This action prevents the account from being assessed a finance charge and turns off statements for the account.
Add a patient reminder
Users can add, edit, or delete patient reminders from the Reminders/Tags tab in the Patient window. Each reminder is limited to 60 characters, including spaces.
► To add a reminder for a patient:
- From the DAISY+ toolbar, click
- Search for and select the patient, then click OK.
- In the Patient window, click the Reminders/Tags tab.
-
In the Reminders section, click
- In the Date column, type a different date, if needed.
- Press Tab to move to the Reminder column.
-
Do one of the following:
- Type a reminder for this patient.
- Click the Reminder column, click , select a reminder from the list, then click OK.
- Click , then close the window.
Once the patient reminder is added, the reminder pops up whenever you open a patient-related window for the patient, such as the treatment plan.
Note: Patient reminders are included in the Patient Profile report.
Delete a patient reminder
► To delete a reminder for a patient:
- From the DAISY+ toolbar, click .
- Search for and select the patient, then click OK.
- In the Patient window, click the Reminders/Tags tab.
- In the Reminders section, select the reminder to delete, then click .
- In the Confirm dialog box, click Yes.
Set up automatic reminders for a patient
Whenever you set up an appointment for a patient or you access a patient’s information, you can set up the patient to receive automatic reminders. A patient can be set up to use the practice’s default reminder scheme, or you can select a personal reminder scheme for the patient.
Note: To use Autoremind, first set up the practice’s AutoRemind settings.
Once a patient is set up for automatic reminders, any appointment you set up for the patient is automatically assigned that patient’s default reminder scheme.
Set up the practice’s default reminder scheme for a patient
► To use the practice’s reminder scheme for a patient:
- From the DAISY+ toolbar, click .
- Search for and select the patient you want, then click OK.
-
In the Patient window, click to edit the patient’s personal information.
-
In the Reminder Scheme section, check the Use AutoRemind check box to use the practice’s default reminder scheme for this patient.
Note: For more information about setting up the default reminder scheme for the practice, see "Manage reminder schemes" .
- Click and close the Personal Info window.
Set up a personal reminder scheme for a patient
► To set up a personal reminder scheme for a patient:
- From the DAISY+ toolbar, click .
- Search for and select the patient you want, then click OK.
- In the Patient window, click to edit the patient’s personal information.
- To enable AutoRemind for this patient, check the Use AutoRemind check box.
- In the Reminder Scheme section, uncheck the Use Practice Default check box.
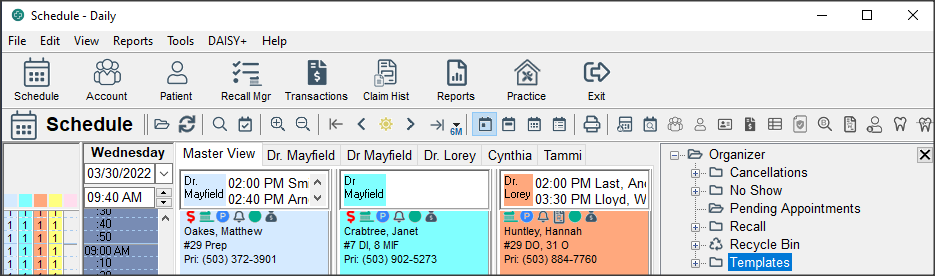
You can use DAISY+ to manage all of your scheduling needs. The Schedule window can display a schedule in four modes: by day, week, month, or as a list of all appointments. In addition, day mode has two types of views: the Master View, which shows appointments for all resources, and individual views for each resource.
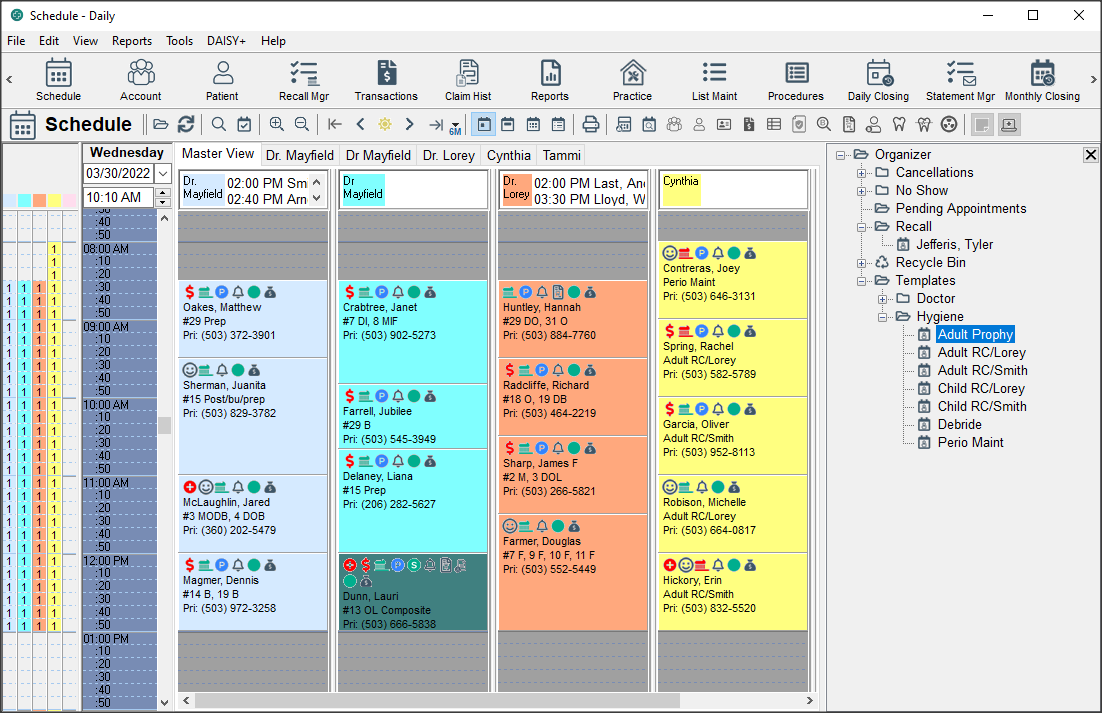
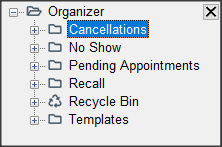
On the far right is the Organizer, where you can organize and store appointment information. You can use the Organizer to:
- Store cancelled appointments
- Store “short call” requests for people who want an appointment but couldn’t get in when they called. You can easily find them if someone else cancels
- Drag appointments you want to delete into the schedule’s recycle bin
- Create and store templates, which are generic appointments that contain all the information required to set up an appointment except the patient's name
Tip: You can also use DAISY+ to schedule your staff meetings.
Tip: If the Organizer is not open in the Schedule window, select Organizer from the View menu to open it.
Open a Schedule
During installation, your schedule resources get set up by provider, by operatory, or both. Some practices need to have more than one schedule. For example, a practice might have more than one office location. With DAISY+, you can set up as many schedules as you need and simply select the one you want to view. You can have more than one schedule open at a time.
► To open a schedule:
- From the DAISY+ toolbar, click
 .
. -
Search for and select a schedule, then click OK.
The resource bar on the left side of the Schedule window helps you schedule resources more efficiently. For example, you might want to stagger appointments.
Each resource has its own column and is represented by a unique color. The number in the colored box indicates that this resource is booked during this time slot and by how much. For example, a 1 in the colored box means the resource is single-booked.
Use the Quick Access toolbar
You can use the Quick Access toolbar to move through the schedule.
| Use this button... | To do this... |
|---|---|

|
View today/this week/this month |

|
View the prior day/week/month |

|
View the next day/week/month |

|
Fast forward button |
.svg)
|
Rewind button |
Change the Schedule mode
You can view the selected Schedule by day, week, month, or as a list of all appointments.
► To change the schedule mode from the Schedule window:
- From the View menu, select one of the following:
- Day for a daily view.
- Week for a weekly view.
- Month for a monthly view.
- List to view a list of all appointments.
Change the Schedule view
In Day mode only, the Schedule window contains two types of views: the Master View, which shows appointments for all resources, and individual schedule views for each resource.
► To change the Schedule view, do one of the following in the Schedule window:
- To view all resources in the schedule, click the Master View tab.
- To view a single resource, click the resource’s individual tab.
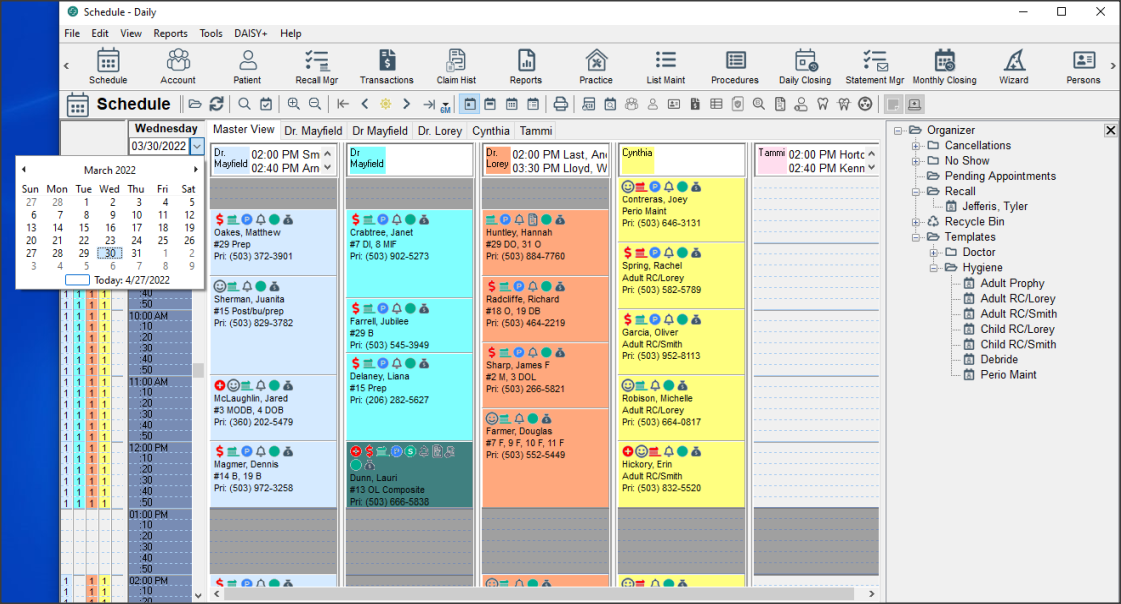
Change the date you are viewing
Depending on the Schedule mode, you can move through the Schedule day by day, week by week, or month by month. In addition, toolbar buttons can move you to special points in the Schedule, such as the date of the last scheduled appointment.
To change the date you are viewing, do one of the following:
- In the upper left corner of the Schedule window, select the date in the date text box, type the new date, then press Tab.
- Click the arrow to the right of the date text box to open the pop-up calendar.
- Click the left and right arrows to scroll by month and year.
- To select a specific day, click on the calendar day.
Use the Quick Access toolbar in the Schedule window
The Quick Access toolbar in the Schedule window makes it easy to navigate through the schedule.
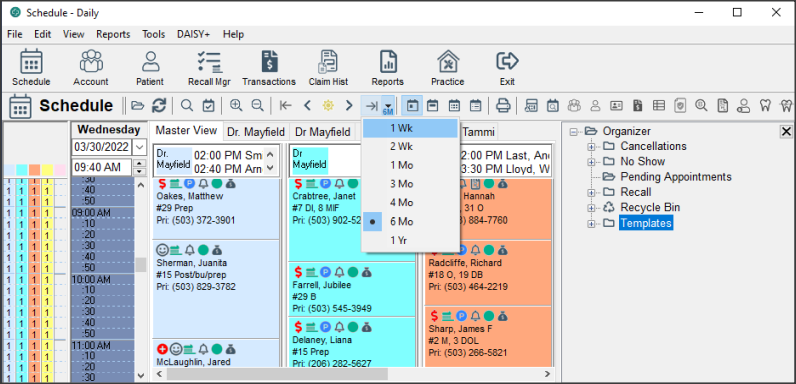
Use the Fast Forward button
Use the Fast Forward button to advance through the schedule in any the following intervals: one week, two weeks, one month, three months, four months, six months, and one year.
► To use the Fast Forward button:
-
Click on the arrow to the right of the Fast Forward button
 and select the “jump” interval from the drop-down list.
The “jump” interval is how much you want to advance through the schedule each time you click the Fast Forward button. The selected interval displays to the right of the button. For example, 6M means the selected interval is 6 months.
-
Click to advance by the selected “jump” interval through the Schedule.
DAISY+ retains the selected “jump” interval until you change it.
Note: If you close and reopen the Schedule, DAISY+ remembers the last “jump” interval you selected.
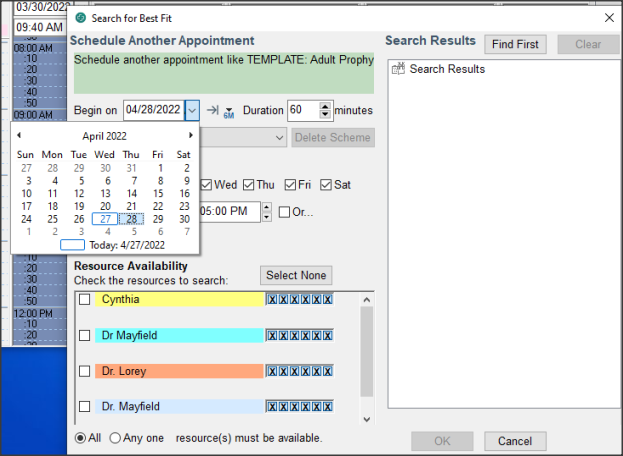
The Fast Forward button is also available in the Search for Best Fit window.
You can use the Fast Forward button in the Search for Best Fit window to select how far ahead to start searching for an opening when you create an appointment from an appointment template. For example, to find the best fit for a prophy appointment, you could set the Fast Forward button’s “jump” interval to “6 Mo” to start the search six months from the current date.
► To use the “jump” interval to start the search for an appointment opening:
- Open the Organizer in the Schedule window.
- Right-click on the template and select Schedule Like… to open the Search for Best Fit window.
-
In the Search for Best Fit window, click the arrow to the right of the Fast Forward button and select the appropriate jump interval from the drop-down list.
The date in the Begin On text box moves forward by the selected interval.
- Open the Organizer in the Schedule window.
- To move the date forward by the selected interval again, click .
Use the Rewind button
Use the Rewind button to reverse your progression through the Schedule since you last opened it. For example, if you moved through the Schedule from May 1st to June 3rd to July 14th, you could “rewind” from July 14th to June 3rd to May 1st.
Note: Once the Schedule closes, the Rewind button resets.
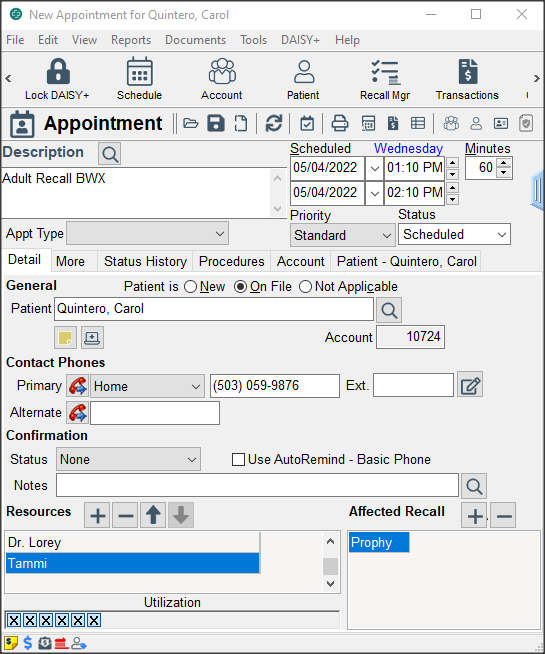
Set up an appointment
DAISY+ gives you a variety of ways to set up an appointment for a patient. If you find yourself scheduling appointments in a hurry, DAISY+ enables you to add an appointment with just the minimum of information. Later you can go back and fill in additional details.
► To set up an appointment:
- From the DAISY+ toolbar, click .
- Click the Master View tab.
-
Scroll down and double-click the starting time slot for the appointment.
The Appointment window opens.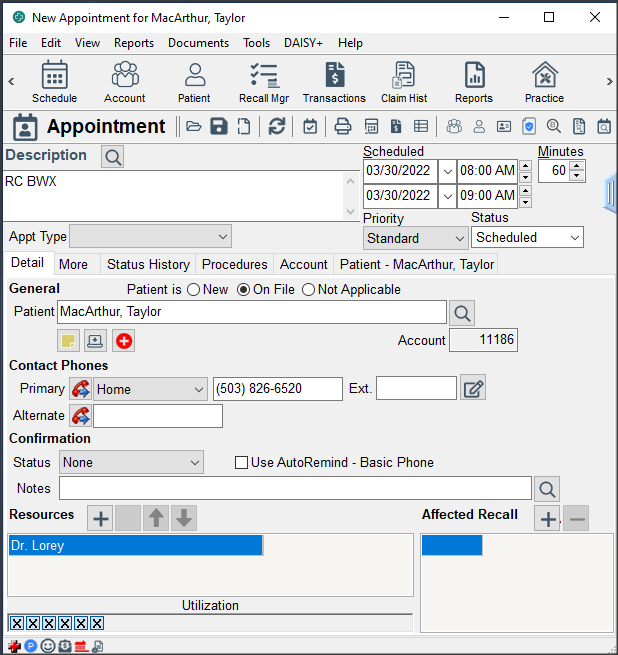
- In the Description text box, type the appointment description.
-
In the Detail tab, do one of the following:
- In the Patient text box, type in a new patient name.
-
Next to the Patient text box, click to search for an established patient. Select the patient, then click OK.
You see the patient's information.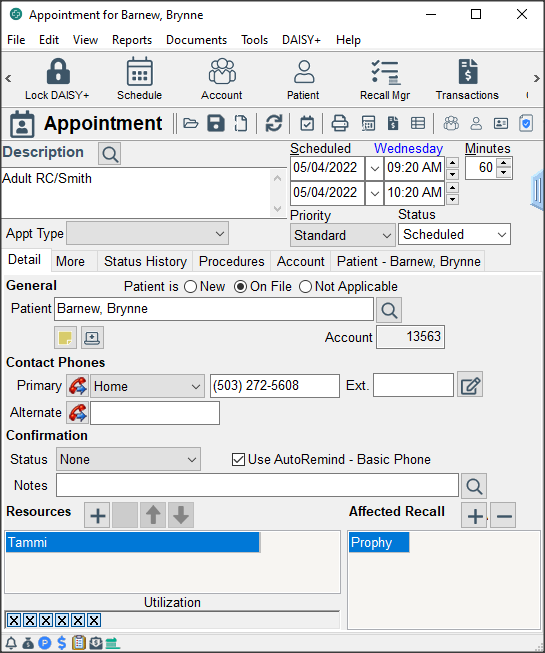
- Do one of the following:
- Enter the patient’s primary contact phone number and other contact information.
- For a new patient, go to step 7.
-
Click the Priority text box and select a priority.
Select Standard for most appointments. You can also select ASAP if a patient wants to come in sooner if something opens up, or Emergency if a patient needs an appointment right away.
-
Click and close the Appointment window.
The appointment is added to the schedule.
Tip: If the patient has cancelled appointments, you can click the red Cancellation link to either open the cancelled appointment or to select from a list of the patient's cancelled appointments. For more information, see "Reschedule a cancelled appointment".
Add AutoRemind to a specific appointment
A specific appointment can be set up to use AutoRemind.
- If the patient is not set up to use AutoRemind, DAISY+ applies the practice’s default reminder scheme to the appointment. For more information, see "Manage reminder schemes".
- If the Use AutoRemind check box is checked in the Patient’s Personal Info window, then all appointments created for the patient will automatically use that patient’s reminder scheme. For more information, see "Set up automatic reminders for a patient".
► To add AutoRemind to a specific appointment:
- From the DAISY+ toolbar, click to open the appropriate schedule.
- In the Schedule window, double-click the appointment to open it.
-
In the Confirmation section, check the Use AutoRemind – scheme name check box.
Scheme name is the name of reminder scheme associated with this patient.
- Click and close the Appointment window.
Note: AutoRemind can also be added to a specific appointment from the Confirm Appointments window.
Find the best fit appointment
DAISY+ helps you find the best fit appointment for a patient. The Schedule window must be open.
Martin Aguila, an established patient, is on the phone and wants to come in for an appointment as soon as possible. You don’t have any immediate openings, so he agrees to have you find the best appointment for now and asks you to call him if something better opens up.
Tip: A scheme is a saved selection of search filters. You can define schemes for the common searches you make for best fit appointments. When you select a scheme in the Best Fit window, DAISY+ automatically chooses the correct search choices for the particular type of appointment you want to find. The scheme can specify the appointment duration, as well as patient and resource availability requirements.
- If the patient is not set up to use AutoRemind, DAISY+ applies the practice’s default reminder scheme to the appointment. For more information, see "Manage reminder schemes".
- If the Use AutoRemind check box is checked in the Patient’s Personal Info window, then all appointments created for the patient will automatically use that patient’s reminder scheme. For more information, see "Set up automatic reminders for a patient".
► To find the best appointment:
- From the DAISY+ toolbar, click .
- If the Schedule is in Day mode, click the Master View tab.
- On the Quick Access toolbar, click

- In the Begin On text box, select a schedule starting date.
-
In the Duration text box, select the appointment duration.
- In the Patient Availability section, do the following:
- Check the check box next to each day the patient is available.
- Select the range of times the patient is available.
- In the Resource Availability section, do the following:
- Check which of the resource schedules to search.
-
Choose which of those checked resources must be available for the appointment.
For example, if all of the checked resources must be available, choose All. If only one needs to be available, choose Any One.
- Click Find First.
- If you don’t like any of the choices, click Find Next.
- Repeat step 9 until you find a suitable date.
- In the search results text box, double-click the day you want.
- Double-click Morning or Afternoon.
-
Click the time you want.
The Schedule window navigates to the time you just selected, so you can inspect the Schedule before adding the appointment. - Click OK.
Note: If you’ve chosen a new combination of search criteria, you will see the Save Search Scheme dialog window. If you want to save the search criteria, type a name in the Scheme Name text box, then click Yes. If you don’t want to save the search criteria, click No. - Click Yes to add the appointment.
DAISY+ opens the New Appointment window for this patient so you can add appointment information.
Add appointment information
When you set up an appointment, you can choose to enter a variety of information. For example, you can:
- Add patient contact information
- Set a priority, such as Emergency for patients who have an emergency, or ASAP for patients who need an appointment sooner if one opens up
- Refine the amount of time the resources will be used
- Indicate lab requirements and pre-medications
- Enter the procedures this patient will receive during the visit
Tip: You can refine how a resource is utilized for an appointment.
For example, a 60-minute hygiene appointment may only require the dentist for the last 15 minutes. You can specify this when you set up the appointment and then schedule the dentist elsewhere during the first 45 minutes.
► To add appointment details:
-
In the Description text box, type the description of the appointment.
- Click the Detail tab.
- Do one of the following:
- Next to the Patient text box, click to search for an established patient. Select the patient, then click OK.
DAISY+ uses existing patient information to fill in appointment details, such as home phone number. - In the Patient text box, type in a new patient name. You’ll also need to enter the patient’s home phone number and other contact information.
- Next to the Patient text box, click to search for an established patient. Select the patient, then click OK.
- From the Priority drop-down list, select a priority.
Use Standard for most appointments. You can also select ASAP for a patient who wants to come in sooner if something opens up, or Emergency for a patient who needs an appointment right away.
You can also add procedures to an appointment. Then, when you check out the patient, the procedures automatically appear as unposted ges in the Transactions window. For more information about the Transactions window, see "Manage financial information".
Tip: To add procedures to an appointment from the patient’s treatment plan, right-click in the procedure text box and select Add Treatment Plan Procedures.
► To add procedures to an appointment:
-
Click the Procedures tab.
- Click the Prov Name column.
- Search for and select the appropriate provider, then click OK.
- Press Tab.
- In the Proc. column, do one of the following:
- Type the appropriate procedure code.
- Click , search for the appropriate procedure code, then double-click code you want.
- When appropriate, fill in the Tooth, Surface, and Quad columns.
DAISY+ automatically fills in the description, fee, and duration for the procedure. - To add another procedure, right-click in the Appointment Procedures text box and select Add.
- Repeat steps 6 through 7 until all necessary procedures are added to the appointment.
Note: If any additional procedures are performed during the appointment, you can add them to the appointment before checkout, or later when you post charges in DAISY+. - Close the New Appointment window, then click Yes to save the appointment.
The appointment is added to the Schedule.
Print a route slip
If your office uses route slips, you can use DAISY+ to print either a blank route slip or one that is for a specific patient.
- If the patient is not set up to use AutoRemind, DAISY+ applies the practice’s default reminder scheme to the appointment. For more information, see "Manage reminder schemes".
- If the Use AutoRemind check box is checked in the Patient’s Personal Info window, then all appointments created for the patient will automatically use that patient’s reminder scheme. For more information, see "Set up automatic reminders for a patient".
► To print a route slip:
- From the Schedule window, do one of the following:
- To print a blank route slip, click an empty area of the Schedule to make sure no appointments are selected. From the Reports menu, select Blank Route Slip.
- To print a route slip for a specific patient, click the patient’s appointment to select it. From the Reports menu, select Appointment Route Slip for patient’s name.
Create an appointment from a template
Common appointment types, such as adult or child hygiene exams, crown preparation, or restorations, can be stored as a template and used as the basis for setting up a patient appointment. You store templates in the Organizer under the Templates folder.
A template must have:
- The description of the appointment
- The number of units (minutes) for that appointment
- At least one resource
You can also add procedures or other information that is typical for this kind of appointment. By using a template, you have less typing to do to create an appointment. And for established patients, you simply search for the patient, and DAISY+ attaches information, such as phone numbers, from the patient’s account.
Note: If any additional procedures are performed during the appointment, you can add them to the appointment before checkout, or later when you post charges in DAISY+.
► To create an appointment from a template:
- From the Schedule window, select View, then Organizer.
- In the Organizer, click the Templates folder to open it.
-
Click on the template and hold the primary mouse button down.
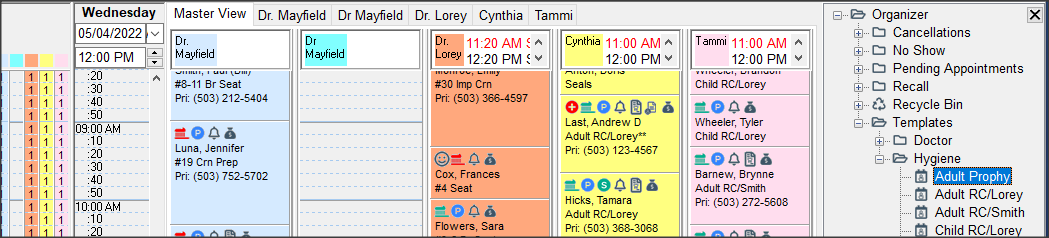
- Drag the template to an open slot in the Schedule window, then release the primary mouse button.
-
Click Yes to create the appointment.
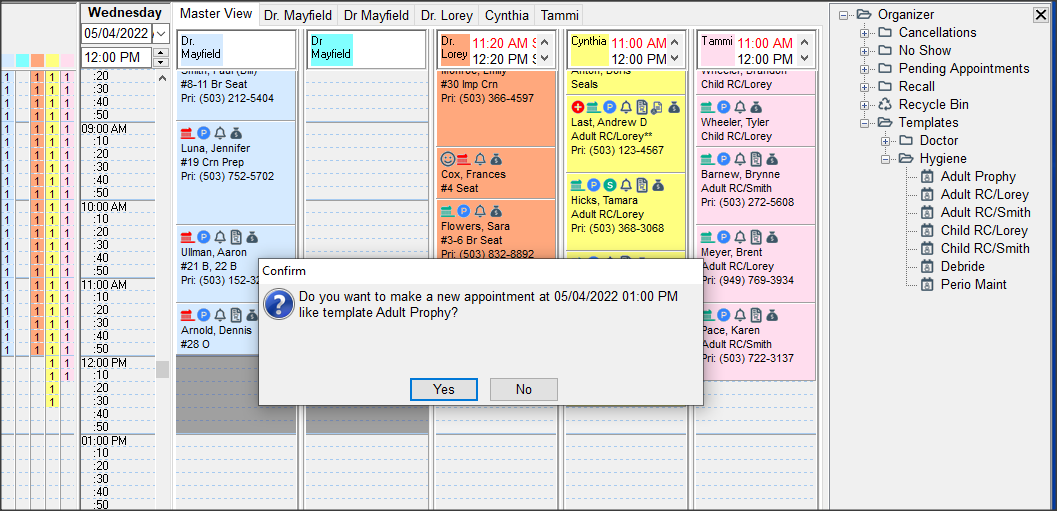
- Double-click on the appointment to open it.
- Click the Detail tab.
-
Do one of the following:
- Next to the Patient text box, click to search for an established patient. Select the patient, then click OK.
- In the Patient text box, type in a new patient name. You’ll also need to enter the patient’s primary contact phone number and other contact information.
- Click the Priority text box and select a priority. Select Standard for most appointments. You can also select ASAP if a patient wants to come in sooner if something opens up, or Emergency if a patient needs an appointment right away.
-
Close the New Appointment window, then click Yes to save the changes.
The appointment is added to the schedule.
Tip: Appointments can be resized to increase or decrease the appointment’s duration. To resize the appointment, rest the mouse pointer on the appointment’s top or bottom border. Click the primary mouse button and drag the border up or down, then release the mouse button and click Yes to save the changes.
Tip: To delete an appointment from the Schedule, right-click the appointment and select Delete. Click Yes to confirm the deletion. The appointment moves to the Organizer’s Recycle Bin.
Troubleshooting appointments
I use Best Fit to search for appointment openings. Sometimes Best Fit goes into a never-ending search and finds no available appointments. I have to click the Stop button to end the search. Why doesn't Best Fit find any available appointment times?
A never-ending search in Best Fit can occur when:
-
The Start Date of the new appointment is beyond the End Date of the resource's availability pattern, so Best Fit will never find an available time for that resource.
For example, it is now April and your resource's current availability ends on May 31st. Your resource has a new availability for summer hours, which begins on June 1st and ends on August 31st. No additional availability patterns have been set beyond summer hours.
You need to schedule six- and twelve-month recall appointments now, but the resource's availability does not extend beyond the summer hours. For Best Fit to find available time slots six and twelve months out, the resource must have availability set to cover the longest period of time that you typically schedule recall appointments. In this case, your resource must have availability set for at least 12 months into the future.
-
You are trying to schedule an appointment that contains more than one resource, and the resources do not share availability.
For example, your patient finds either of two resources acceptable for an appointment. In the Search for Best Fit window under Resource Availability, you searched for available times for both resources. Since these resources do not share common availability, you need to change the Resource Availability option to "Any one" before Best Fit can locate an open appointment time. The default Resource Availability setting "All" only works when the selected resources share the same availability.
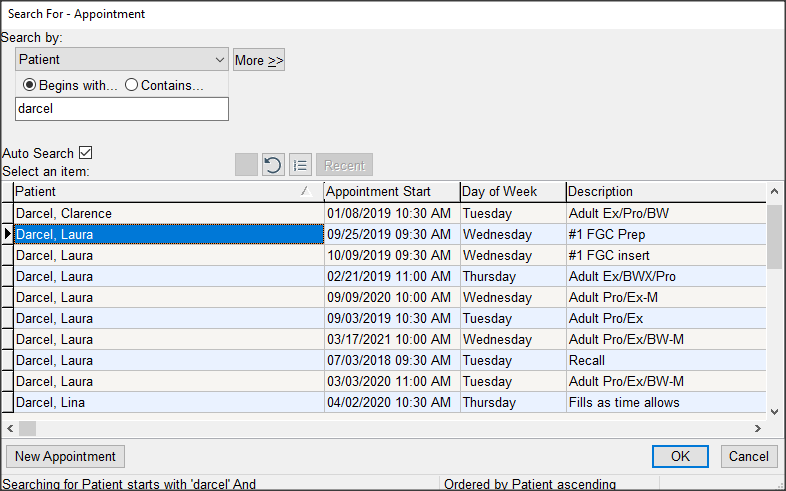
Find a scheduled appointment
DAISY+ makes it easy to locate existing appointments, such as when patients call to find out when they are scheduled.
► To find a scheduled appointment:
- From the DAISY+ toolbar, click
- Search for and select a schedule, then click OK.
- From the File menu, select Open, then Find Appointments.
-
In the Search By drop-down list, select the type of information you want to search by.
For example, select Patient to search by the patient’s name.
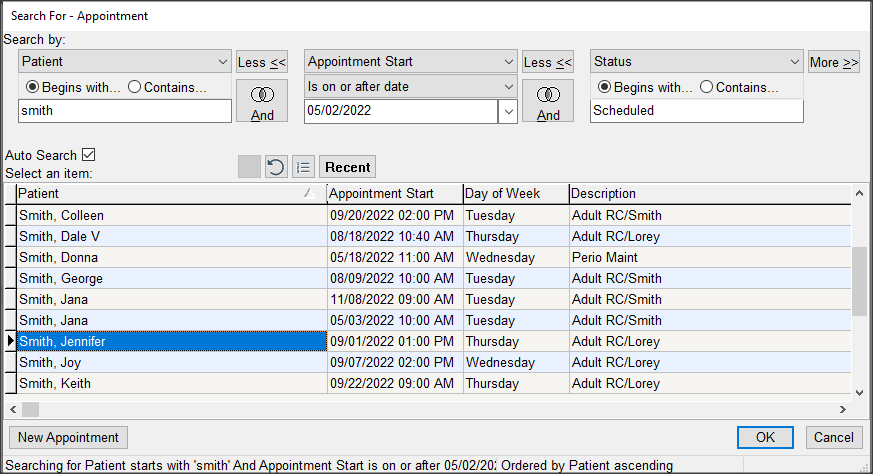
-
If present, choose either the Begins With or the Contains option.
For example, if you want to find Amber Taylor, choose Begins With.
-
Click .
Search results display in the lower half of the window.
Note: To always search automatically without having to click , check the Auto Search check box in the Search window.
-
Double-click on the appointment you want.
The Schedule displays the appointment in its current slot. Notice that the patient’s phone number and other account details are displayed without opening the appointment.
- To open the appointment, double-click on the appointment.
Tip: You can set up DAISY+ to search for future appointments by default. From the DAISY+ menu, select Appointment, then Practice Configuration. Click the Definition tab, then check the Pre-filter Appointment Search for Future check box. Close the window and click Yes to save the changes.
Reschedule an appointment
Once you locate a scheduled appointment, you can reschedule it by:
- Opening the appointment to change its date and time or use Best Fit to find another appointment time slot.
- Clicking on the appointment and dragging it to its new location.
You’ve contacted Susan Taylor and she would like to move her appointment to an earlier time slot on the same day. She’s scheduled for the afternoon, and you want to move her to the morning.
► To reschedule an appointment:
- From the Schedule window, click on the appointment and hold the primary mouse button down.
- Drag the appointment to its new time slot, then release the mouse button.
- Click Yes to move the appointment to its new time.
Track appointment requests
Most offices need to keep track of patient requests to be scheduled if, for example, an appointment slot becomes available. These types of requests can include emergencies, cancellations, recalls, and requests to move an appointment to an earlier date or time if a slot becomes available. You can use the Schedule’s Organizer to store these requests until you can schedule them.
Tom Nielsen, a new patient, just called to cancel his appointment, but he plans to call back later in the week to reschedule. Since he’s a new patient, you’d like to save his appointment information so you won’t need to reenter it when he reschedules. You can store his old appointment in the Organizer‘s Cancellations folder, then drag it to its new time slot on the Schedule when he calls back.
► To store an appointment in the Organizer:
- From the DAISY+ toolbar, click .
- Search for and select a schedule, then click OK.
- From the View menu, select Organizer.
- From the Schedule window, click on the appointment you want to store and hold the primary mouse button down.
-
Drag the appointment to the Cancellations folder in the Organizer window, then release the mouse button.
- Click Yes to move the appointment to the Organizer’s folder.
Tip: To change the procedures attached to an appointment, double-click on the appointment, then click the Procedures tab. Add or delete procedures as needed.
View the status of AutoRemind appointments
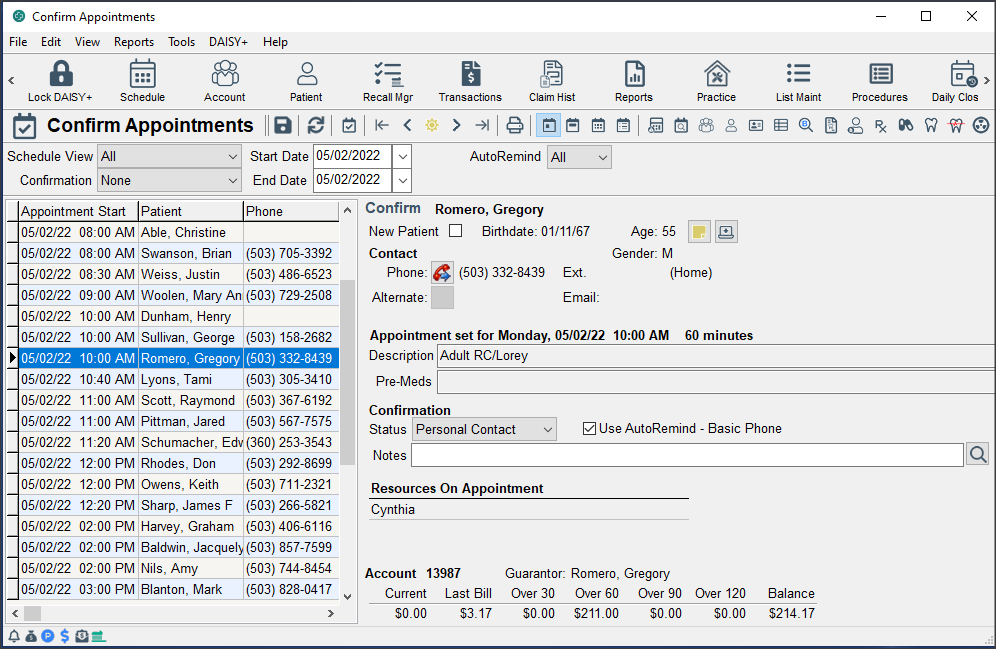
The Confirm Appointments window includes an AutoRemind filter. You can use this filter to easily view the confirmation status of appointments with AutoRemind or just those without. For example, you may want to view the day’s appointments that are not set up with auto-reminders so you can call the patients directly.
► To view the confirmation status of AutoRemind appointments:
-
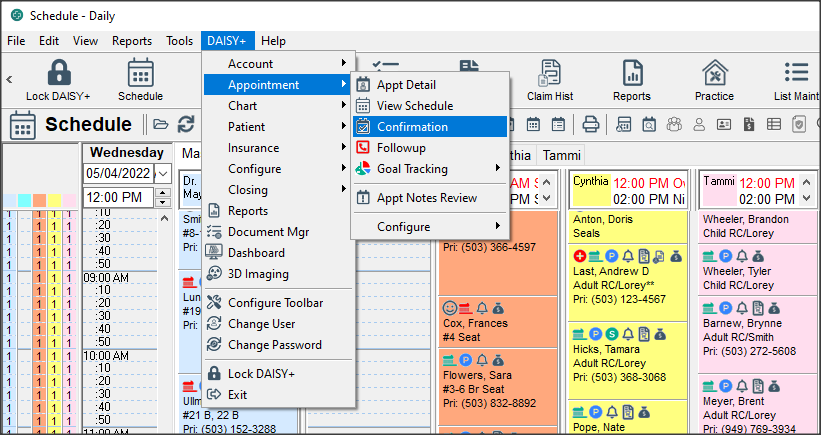
From the DAISY+ menu, select Appointment, then select Confirmation to open the Confirm Appointments window.
- In the AutoRemind drop-down list, do one of the following:
- Select Yes to view the confirmation status of AutoRemind appointments.
- Select No to view the confirmation status of appointments that are not set up for AutoRemind.
-
Select All to view the confirmation status of all appointments.
- From the View menu, select Organizer.
- From the Schedule window, click on the appointment you want to store and hold the primary mouse button down.
-
Drag the appointment to the Cancellations folder in the Organizer window, then release the mouse button.
Check in a patient
DAISY+ helps you see at a glance if a patient has been checked in.
► To check in a patient:
- From the Schedule window, right-click the appointment.
-
Select Check In. You will see a green DOT mark at the top of the appointment.
Check out a patient
If you entered procedures for an appointment, they are automatically transferred as unposted charges into the Transactions window when you check out the patient. For more information about the Transactions window, see "Add a charge".
Note: Patients must be in set up in DAISY+ and associated with the appointment before you can check them out.
► To check out a patient:
- From the Schedule window, right-click the appointment and select Check Out.
DAISY+ displays the procedures that are attached to the appointment. -
Select Check In. You will see a green DOT mark at the top of the appointment.
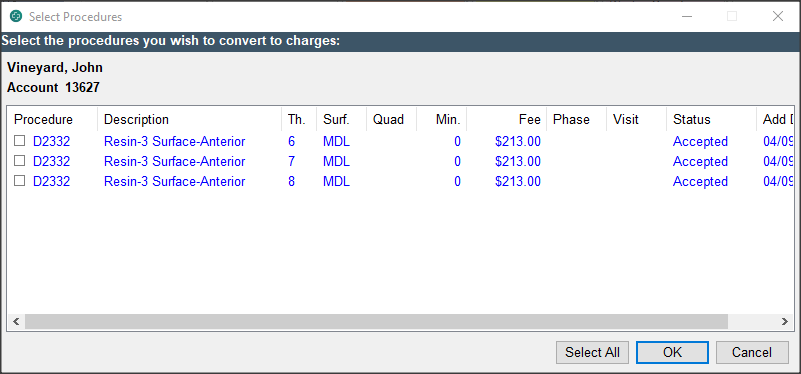
- Check the check box next to each procedure that was completed during this visit.
Note: If the procedures performed on this patient were different from those attached to the appointment, you can adjust them later from DAISY’s Transactions window.
- Click OK.
DAISY+ tells you the charges have been generated. - Click OK.
In the Day view of the Schedule window, the check mark at the top of the appointment changes from green to red and the appointment displays with hatch lines.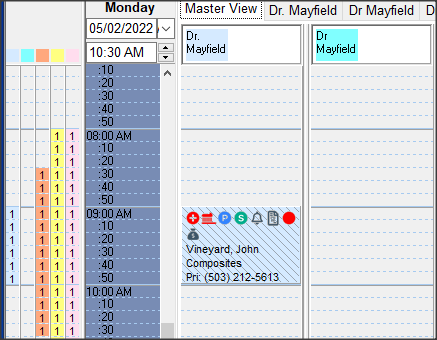
Use Quick Estimate
With Quick Estimate, you can quickly provide patients with verbal estimates without having to create a treatment plan or request a pre-authorization.
You can add procedures from an existing treatment plan, or include charges from the current visit, so you can use Quick Estimate to collect a payment from a patient during checkout. You do not need to enter the charges in DAISY+ first or enter the tooth or tooth surface for a procedure since that information does not affect the estimate.
Quick Estimate is available from the DAISY+ toolbar, as well as the Quick Access toolbar in several DAISY+ windows, such as the Schedule, Transactions, and Recall Manager. Quick Estimate includes the procedures already entered for a patient, but the procedures it includes by default vary depending upon where you access it.
| Click from the Quick Access toolbar in this window... | To automatically include... |
|---|---|
| Transactions | Charges entered for the current date for the selected patient |
| Treatment Plan | Current treatment plan procedures for the selected patient |
| Schedule (pending or checked-in appointment) | Procedures from the selected appointment |
| Schedule (checked-out appointment) | All of the day’s posted or pending procedures from the selected appointment |
| Schedule (Hot-list appointment) | Procedures from the selected Hot-list appointment |
| Appointment | Procedures from the appointment |
| Recall Manager | Charges entered for the current date for the selected patient |
Note: Quick Estimate does not generate a printed estimate. In a pinch, you can print a screenshot of the Quick Estimate window. From the Quick Estimate window, click .
Generate a Quick Estimate for a selected patient
You can generate a Quick Estimate from the DAISY+ toolbar, from an appointment in the schedule, or from an appointment template in the Organizer.
Here’s how to generate a Quick Estimate for a selected patient from the DAISY+ toolbar.
► To generate a Quick Estimate from the DAISY+ toolbar:
- From the DAISY+ toolbar, click
 .
. -
Search for and select the patient’s name, then click OK.
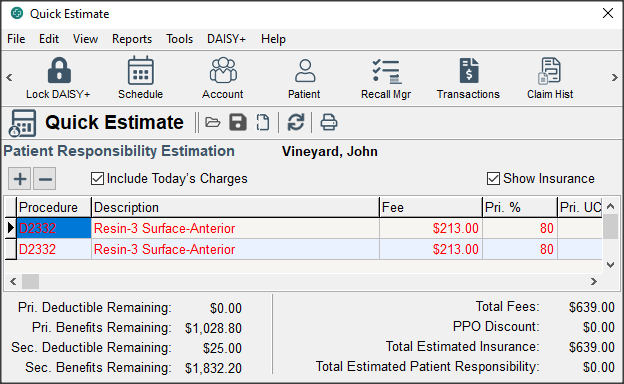
- In the Patient Responsibility Estimation section:
- Click to start entering a procedure.
- Click the Procedure column and search for the appropriate procedure code.
- To remove a procedure, select it and click
 .
. - To include today’s charges, click the Include Today’s Charges check box.
-
To display insurance coverage information, click the Show Insurance check box.
The total amount of fees, as well as the patient’s portion, displays in the lower right corner of the window.
Generate a Quick Estimate from an appointment
► To generate a Quick Estimate from an appointment in the schedule:
- Open the Schedule.
-
Right-click the appointment and select Quick Estimate.
If the appointment is pending or the patient is checked in, Quick Estimate pulls in procedures from the appointment. If the patient is checked out, all of the day’s posted or pending procedures from the appointment are included.
- In the Organizer, click the Templates folder to open it.
- Click the template you want to use.
- On the Quick Access toolbar, click .
-
Search for and select the patient’s name, then click OK.
The Quick Estimate window opens and displays an estimate for the procedures based on the patient’s insurance information.
View the history of an appointment
The Status History section in the Appointment window tracks how many times an appointment has been rescheduled.
► To review an appointment’s history:
- From the DAISY+ toolbar, click .
- Search for and select a schedule, then click OK.
- Search for the appointment, then double-click on the appointment to open it.
-
In the Appointment window, click the Status History tab.
The Status History section shows how many times an appointment has been rescheduled.
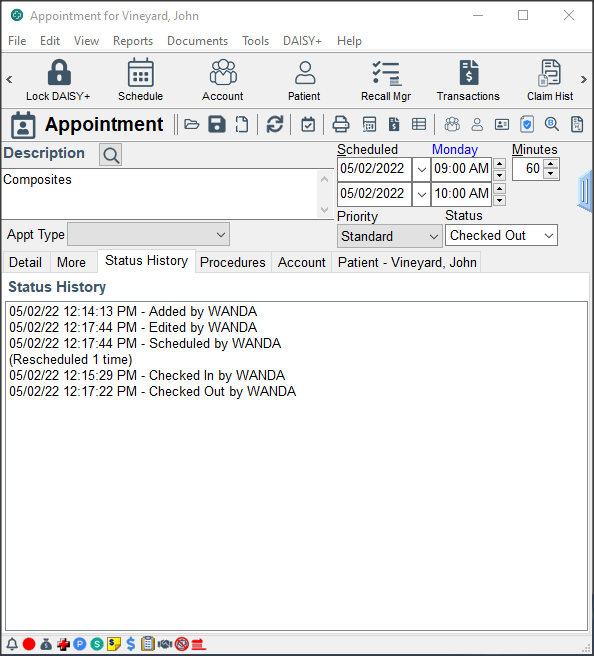
You also see detailed information about AutoRemind confirmations.
Work with treatment plans
Patients can have multiple treatment plans, and treatment plans can be phased. Each phase can include multiple visits. Treatment plan information can be easily reorganized and sorted, and completed treatment can be hidden.
► To review an appointment’s history:
-
In the Treatment Plan window:
- Account and insurance information is stored in the Account and Insurance tab.
-
A Provider drop-down list enables you to select the provider who proposed the treatment plan.
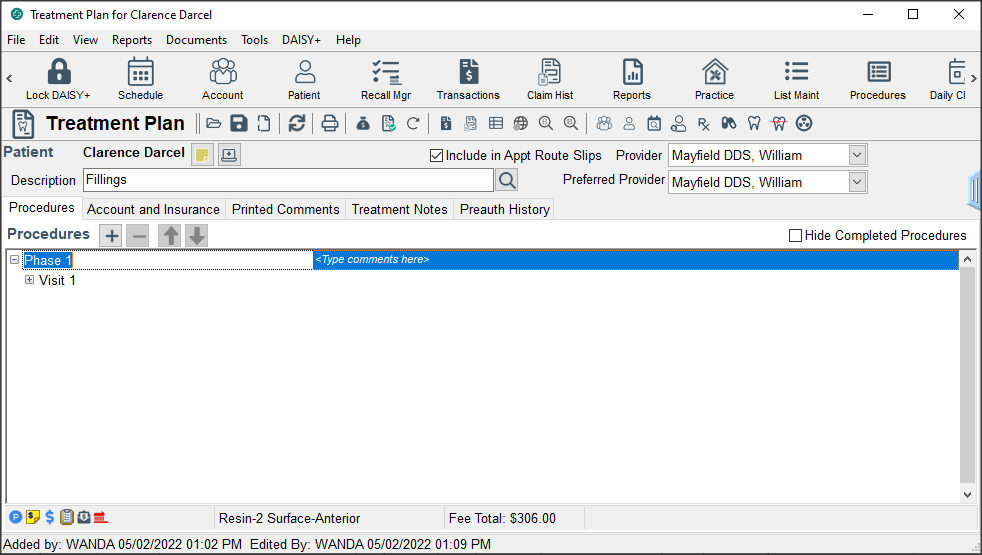
- A Hide Completed Procedures check box enables you to filter out completed procedures.
- Planned treatment can be omitted from the appointment route slip.
- Treatment plan information, such as providers, procedures, teeth, etc. can be sorted by clicking on the column headings.
- Phases, visits, and procedures can be reordered using drag and drop or the new up/down arrows
-
The TP Seq (treatment plan sequence) can be used to indicate the sequential order for procedures in the treatment plan.
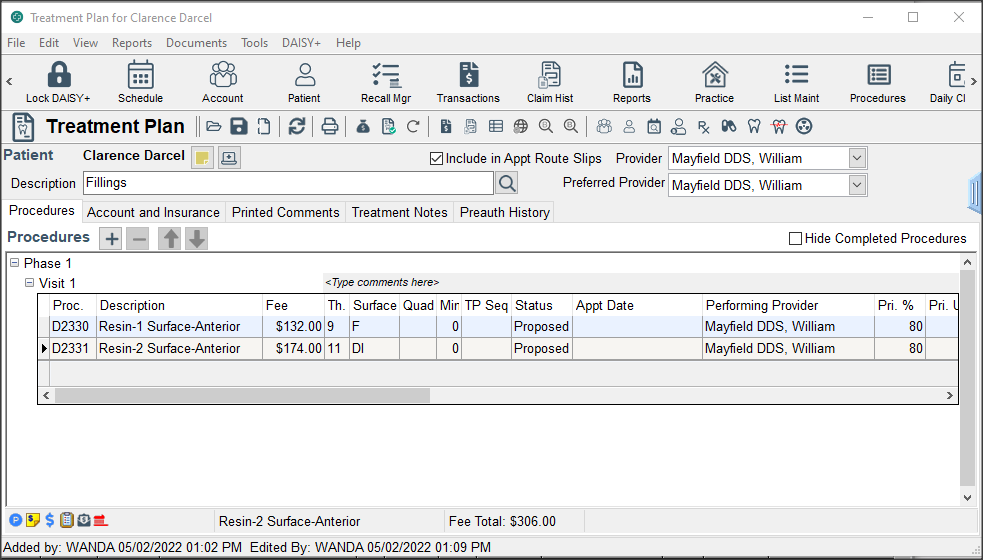
-
The appointment date of scheduled treatment plan procedures shows in the Appt Date column in both the Treatment Plan and the Chart windows. To open the appointment, right-click the appointment date and select Open Appointment.
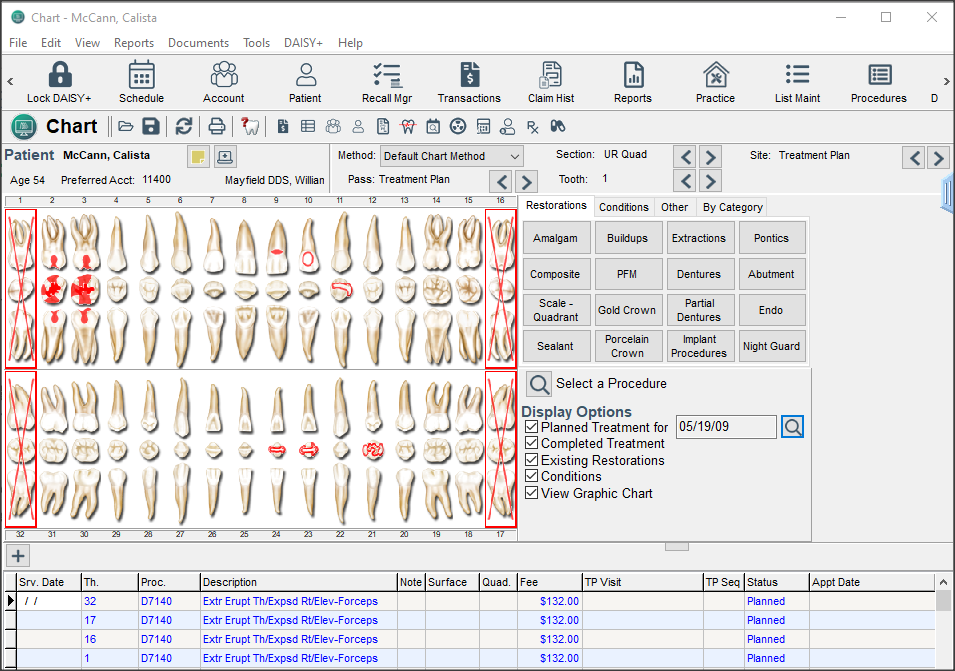
-
The Select Procedures window includes Phase, Visit, and Add Date columns. This window lists the patient’s treatment in order of treatment plan, phase, visit, and procedure. For more information, see "Create a treatment plan".
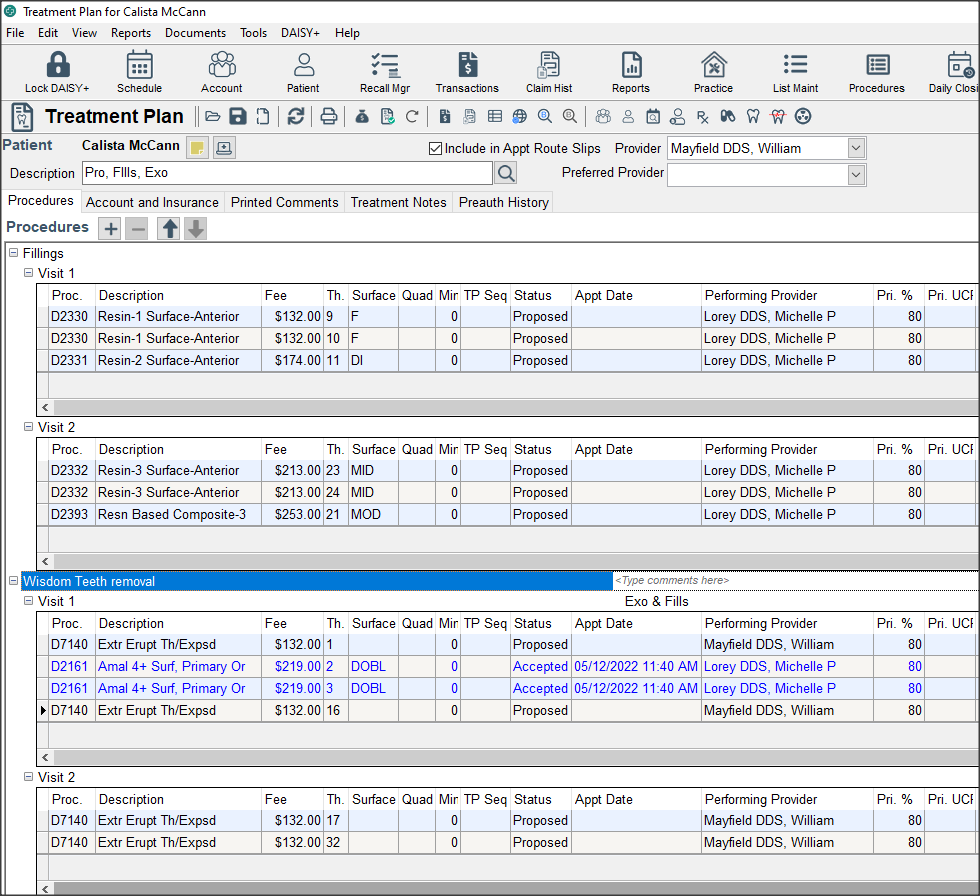
-
Treatment plan reports:
- Under the Reports menu in the Treatment Plan window, menu selections accommodate multiple treatment plans. Each of the main menu selections, Treatment Plan and Treatment Without Fees, includes a variety of selections that enable you to print all phases, all visits, specific phases, specific visits, and specific procedures. For more information, see "Print a treatment plan ".
- The treatment plan report displays the financial and insurance information at the bottom of the report. The printer icon prints the entire treatment plan. To print only parts of the treatment plan, use the Reports menu.
- Printed comments can be any length. Printed comments display below the financial and insurance information.
- Completed treatment does not print on Treatment Plan reports.
- In an office with multiple doctors or multiple locations, regardless of whom is listed as the performing provider, a provider can be selected on the treatment plan. Provider information is pulled from the Provider window.
- The Patient History window shows all planned procedures, regardless of which treatment plan they are attached to.
Create a treatment plan
In this example, the treatment plan requires three visits in two phases. The resulting treatment plan will include fillings and wisdom tooth extractions.
► To create a treatment plan:
- From the DAISY+ toolbar, click .
- Search for and select the patient you want, then click OK.
- Click
 .
. -
Do one of the following:
- If the patient does not have a treatment plan, go to step 5.
- If the patient already has a treatment plan, click to create a new treatment plan.
-
If the patient has two or more treatment plans, the Search For – Treatment Plan window opens. Click New Treatment Plan to create a new treatment plan.
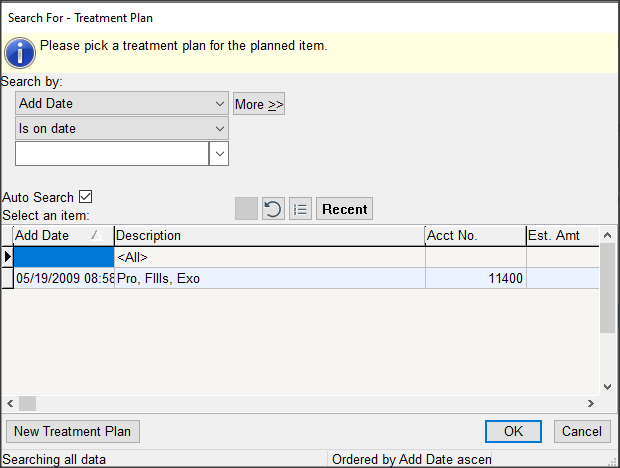
-
In the Treatment Plan window, click the Procedures tab.
In the Procedures section, you see a treatment plan tree at left with two default entries: Phase 1 and Visit 1.
-
In the Description text box, type a name for the Treatment Plan.
For example, type Fillings and Extractions.
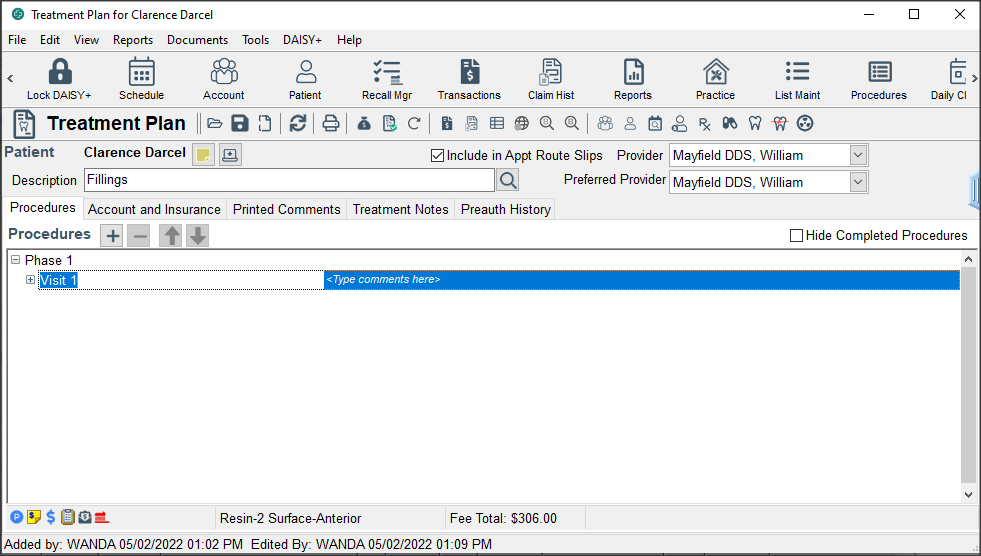
-
In the treatment plan tree:
-
Click the phase label and type a new name for the phase. For example, click Phase 1 and type Fillings.
Note: Renaming the phase is optional, but label names are required for all phases.
-
In the
cell, type an optional comment. 
Note: Comments associated with phases do not print on the Treatment Plan report.
-
Click the visit label and type a name for the visit. For example, click Visit 1 and type Fillings.
Note: Renaming the visit is optional, but label names are required for all visits.
-
-
Click to add a procedure.
You see the procedure entry section. DAISY+ automatically associates the procedures with the first phase and the first visit.
-
In the Proc. column, do one of the following:
- Type the appropriate procedure code.
- Click , search for the appropriate procedure code, then double-click the code you want.
-
When appropriate, fill in the Tooth, Surface, and Quad columns.
DAISY+ automatically fills in the procedure’s description, fee, and duration.
-
To enter additional procedures, repeats steps 8 through 10.
Note: You can also generate treatment plans from the Chart window in DAISY+ Chart. All treatment is initially placed in Phase 1, Visit 1 by default.
- To create another phase, right-click in the Procedures section and select Add Phase.
-
Repeat steps 7 through 11 to finish entering treatment for the first visit of this next phase.
For example, name the next phase Wisdom Teeth Extractions, and enter the information for the extractions visit.
-
To add another visit to the Wisdom Teeth Extractions phase, right-click in the phase’s Procedures section and select Add Visit.
You see the visit added to the treatment plan tree under the appropriate phase.

- Click the visit label and type a name for the visit. For example, click Visit 2 and type Left Side.
- To enter procedures for this visit, repeat steps 8 through 11.
- Click to save the treatment plan.
Modify a treatment plan
► To modify a treatment plan:
- From the DAISY+ toolbar, click .
- Search for and select the patient you want, then click OK.
- Click .
-
Do one of the following:
- If the patient has one treatment plan, the Treatment Plan window opens. Go to step 5.
- If the patient has two or more treatment plans, the Search For – Treatment Plan window opens. Select the treatment plan, then click OK.
-
If the patient has two or more treatment plans, the Search For – Treatment Plan window opens. Click New Treatment Plan to create a new treatment plan.
Note: If the patient does not have a treatment plan, DAISY+ creates a new treatment plan.
You see the Treatment Plan window.

-
Modify the treatment plan as needed.
- To change the provider (which is the default provider associated with this patient’s account), select the provider from the Provider drop-down list. Provider information is pulled in from the Provider window. This provider’s name and address displays on the Treatment Plan report.
- To add treatment plan phases, visits, or procedures, see "Create a treatment plan".
- To edit a procedure, click the appropriate procedure cell, then type or select the new information.
- To delete a procedure, see "Remove treatment plan information".
- To move or reorder treatment plan information, see "Move or reorder treatment plan information".
- Click to save the treatment plan.
Move or reorder treatment plan information
► To move a visit or phase:
- Open the treatment plan.
- Click the phase or visit label name and hold down the mouse button.
-
Drag the phase or visit to the location you want, then release the mouse button.
Visits associated with a phase move with it.
- Click to save the treatment plan.
► To move a procedure to another phase or visit:
- Open the treatment plan.
-
Do one of the following:
- Select the procedure and click the up/down arrow ( ).
- Select the procedure and hold down the primary mouse button. Drag the procedure to the location you want, then release the primary mouse button.
- To move more than one procedure at a time, press the
key and click each procedure you want to select, then either drag and drop the procedures to another visit or phase, or use the up/down arrows ( ) to move the selected procedures.
- Click to save the treatment plan.
Remove treatment plan information
► To remove a phase from a treatment plan:
- Open the treatment plan.
- Right-click the phase label, then select Remove Phase.
-
In the Confirm dialog box, click OK.
All visits associated with the phase are also removed.
Note: At least one phase is required for all treatment plans. To remove the last phase, delete the treatment plan.
► To remove a visit from a treatment plan:
- Open the treatment plan.
- Right-click the visit label, then select Remove Visit.
-
In the Confirm dialog box, click OK.
All procedures associated with visit are also removed.
Note: At least one visit is required for each phase. To remove the last visit, delete the phase.
► To remove a procedure from a treatment plan:
- Open the treatment plan.
- Click to expand the phase and visit tree to view the procedure.
-
Right-click the procedure description, then select Remove procedure code.
Procedure code is the code number of the selected procedure, such as D1204.
Delete a treatment plan
► To delete a treatment plan:
- From the DAISY+ toolbar, click .
- Search for and select the patient you want, then click OK.
- Click .
-
Do one of the following:
- If the patient has one treatment plan, the Treatment Plan window opens. Go to step 5.
- If the patient has one treatment plan, the Treatment Plan window opens. Go to step 5.
- From the DAISY+ toolbar, click .
-
In the Confirm dialog box, click OK.
Note: The treatment plan is not deleted from the database; it is changed to inactive.
Migrate the patient treatment plan to a new account
When a patient is moved to a different account, the patient’s treatment can be migrated to the new account as well. The patient must either be moved to an existing account, or you must create the account before you move the patient.
In this example, the patient will be moved to an existing account.
► To migrate a patient’s treatment plan:
- From the DAISY+ toolbar, click .
- Search for and select the patient’s current account, then click OK.
-
Click the Patients tab.
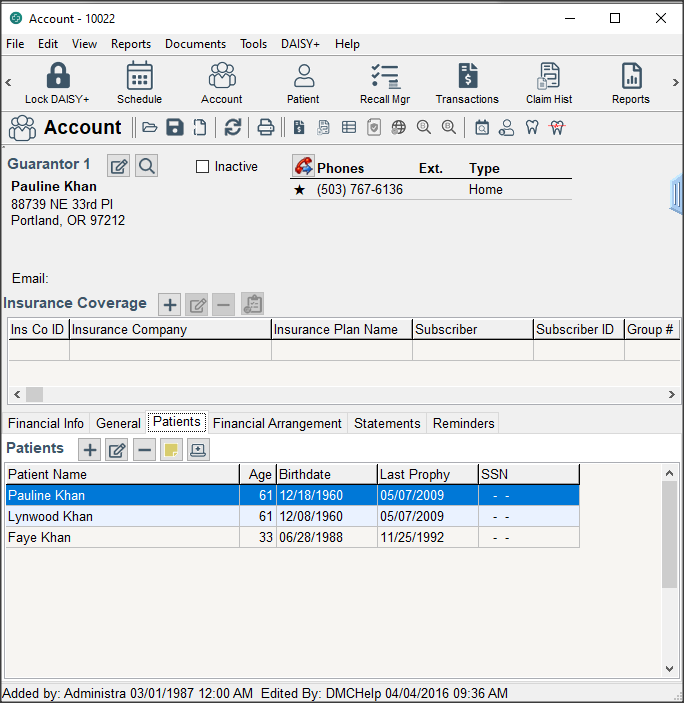
- Select the patient and click .
-
In the Confirm dialog box, click Yes.
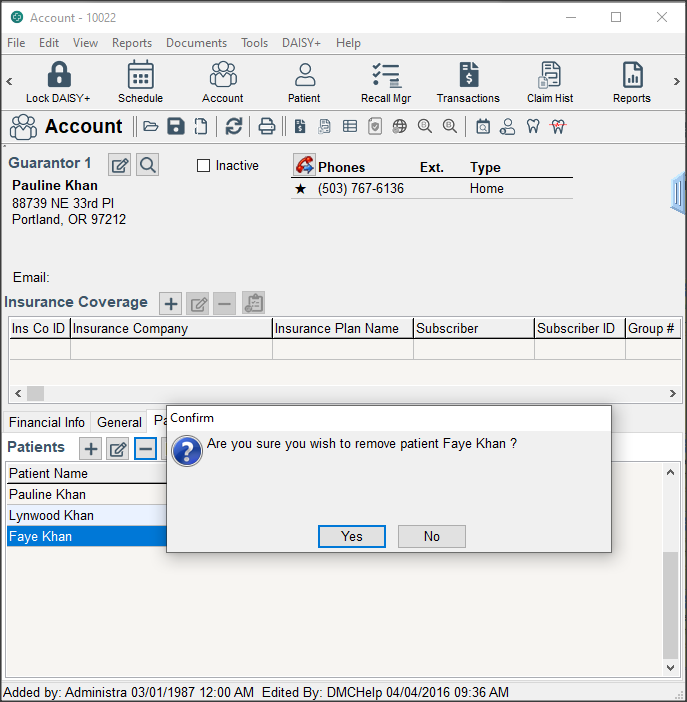
-
In the next Confirm dialog box, click Migrate.
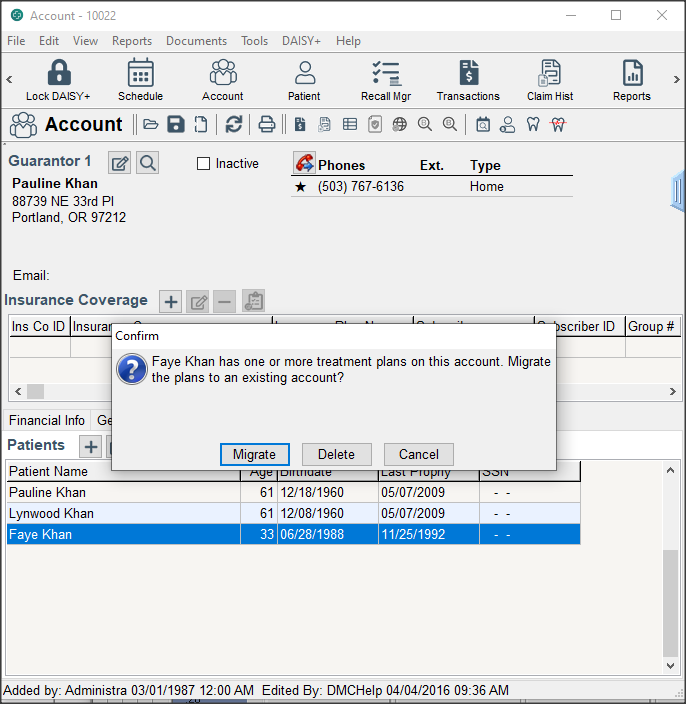
Note: The treatment plan is not deleted from the database; it is changed to inactive.
-
Search for and select the patient’s new account, then click OK.
The patient and all associated treatment plans are moved to the new account.
Manage planned treatment from the patient chart
If a patient has multiple treatment plans, you can choose which planned treatment to display on the patient’s chart using the revised Planned Treatment display option. Tooth graphics and treatment history display treatment associated only with the selected treatment plan.
The Planned Treatment display setting also affects how you enter treatment if the patient has more than one treatment plan.
View planned treatment from the patient chart
If a patient has multiple treatment plans, you can choose which planned treatment to display on the patient’s chart. When you first open a patient chart, the Planned Treatment defaults to
► To display selected treatment for this patient:
- From the DAISY+ toolbar, click .
- Search for and select the patient you want, then click OK.
-
In the Patient window, click
to open a chart for this patient.By default, you see all planned treatment for the patient.
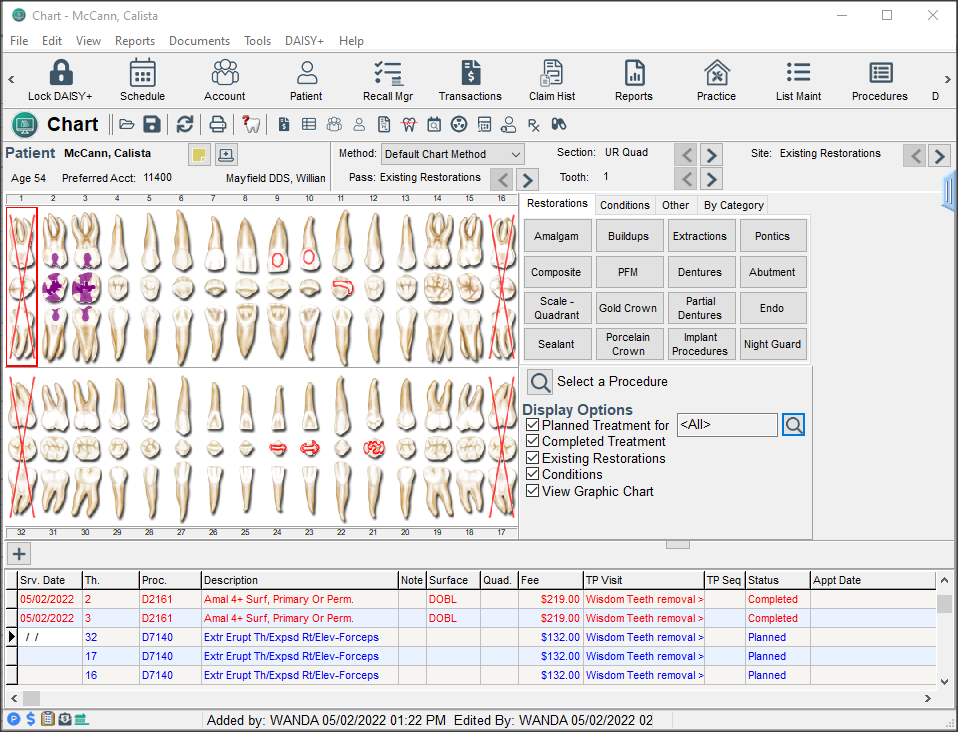
- To the right of the Planned Treatment check box, click .
-
In the Search for –Treatment Plan window, select the treatment plan you want, then click OK.
In the following example, the hygienist selected the patient’s Pro, Fills, Ext treatment plan. You only see the treatment associated with this plan in both the tooth graphics section and the treatment history section of the window.

Modify a treatment plan from the patient chart
The Planned Treatment display setting also affects how you enter treatment if the patient has more than one treatment plan, and the Planned Treatment display option is set to
In this example, the patient has two treatment plans. The dentist wants to add a ceramic crown for tooth 4 to the Crowns and Bridge treatment plan.
► To modify a treatment plan from the patient chart:
- From the DAISY+ toolbar, click .
- Search for and select the patient you want, then click OK.
-
In the Patient window, click
to open a chart for this patient.By default, you see the entire patient’s planned treatment.
-
In the Pass navigation area, click the appropriate buttons to select the Treatment Plan pass.
In this example, the pass has been set to Treatment Plan, and the Planned Treatment display option is set to
by default. 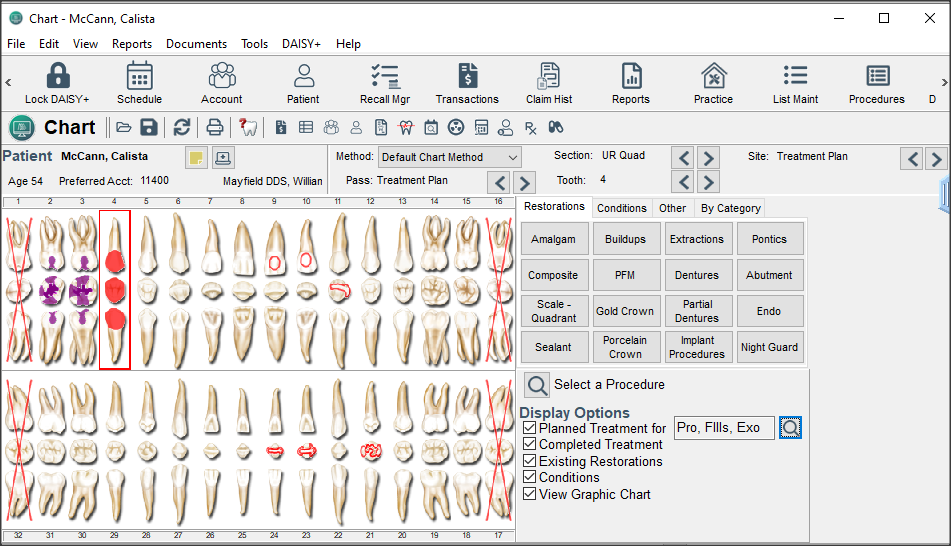
-
Click tooth 4, then click Ceramic Crown.
You see the Search For – Treatment Plan window.
-
Select the treatment plan and click OK.
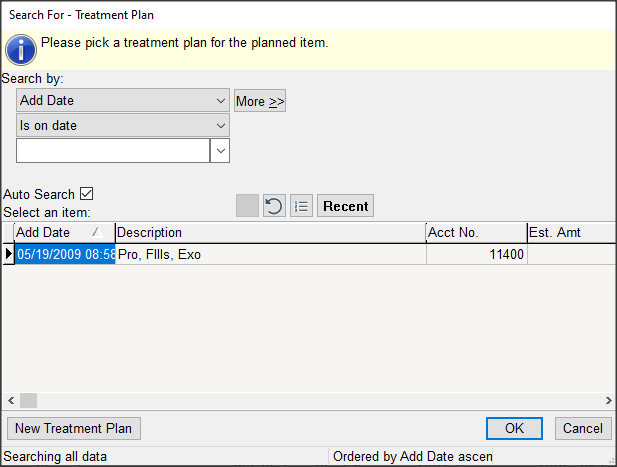
The Planned Treatment display option changes to the selected treatment plan, the tooth graphics section changes to display treatment associated with the plan, and the crown is added to tooth 4.
- Click and close the Chart window
Print a treatment plan
You can print the following with or without individual fees:
- The entire treatment plan
- Individual phases and their associated visits
- Specific visits within a phase
- One or more procedures
Print a treatment plan with fees
In this example, the front office wants to print a complete treatment plan, including all phases and visits.
► To print a complete treatment plan with fees:
- Open the Treatment Plan window.
- Do one of the following:
- Click to print the entire treatment plan.
- From the Reports menu, select Treatment Plan, then select All Phases.
Print a specific phase of a treatment plan
In this example, the front office wants to print a specific phase of a treatment plan, excluding fees. The phase name is Cleaning and Fillings, and the Visit name is Fillings
► To print a specific phase of a treatment plan, excluding individual fees:
-
Open the Treatment Plan window.
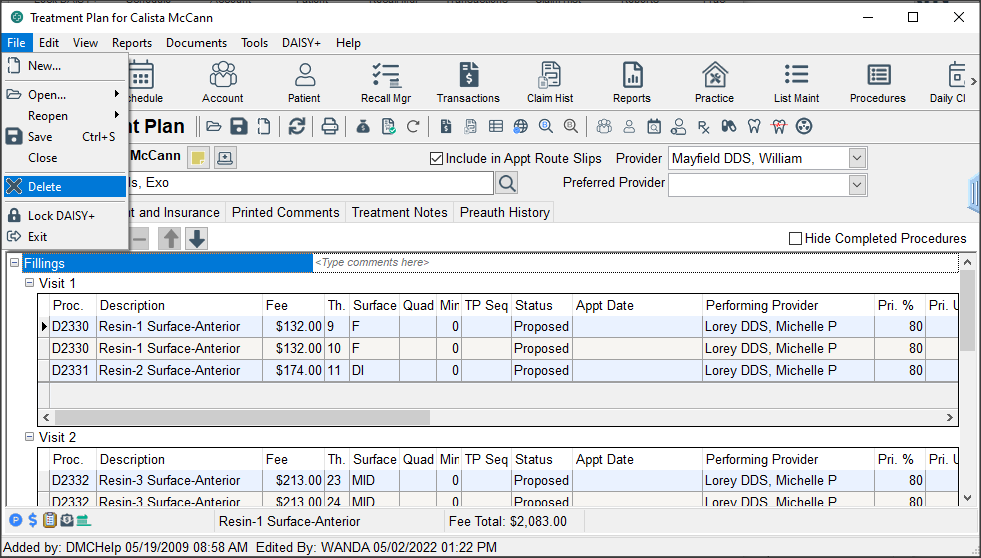
-
From the Reports menu, select Treatment Plan Without Fees, then select phase name, then select visit name.
For example, select the phase name Cleanings and Fillings, then select the visit name Fillings.
- Do one of the following:
- To preview the report first, click Preview, then click to print it.
- To print the report without previewing it, click Print.
Print selected procedures in a treatment plan
In this example, the front office wants to print only selected procedures in a treatment plan, including fees.
► To print selected procedures, including fees:
-
Open the Treatment Plan window.
-
From the Reports menu, select Treatment Plan, then select By Procedure.
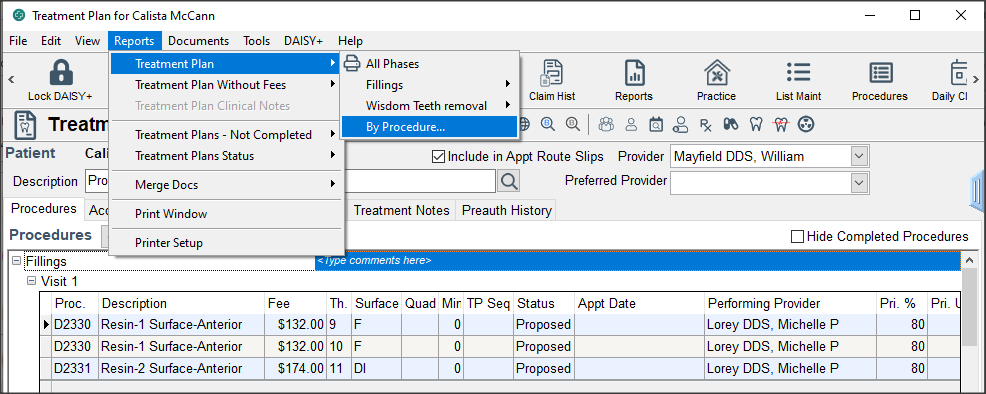
-
Place a check mark next to each procedure to print, then click OK.
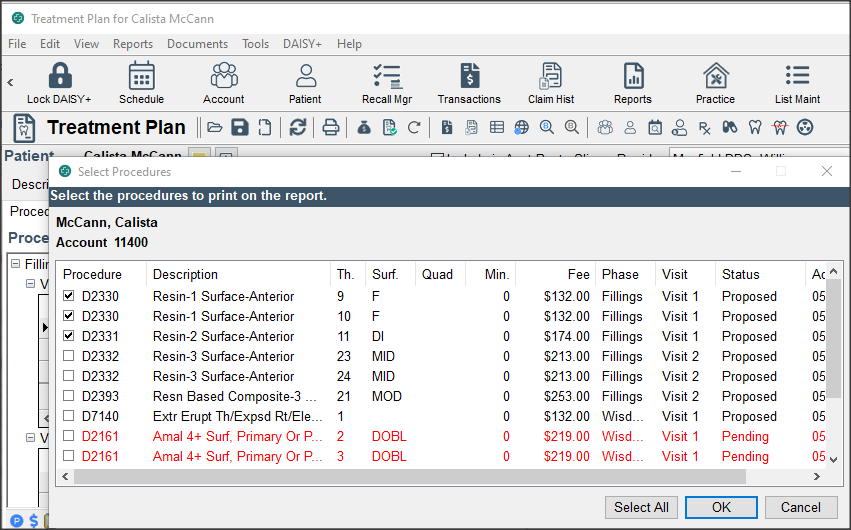
- Do one of the following:
- To preview the report first, click Preview, then click to print it.
- To print the report without previewing it, click Print.
You see the report with the selected treatment plan procedures and fees.
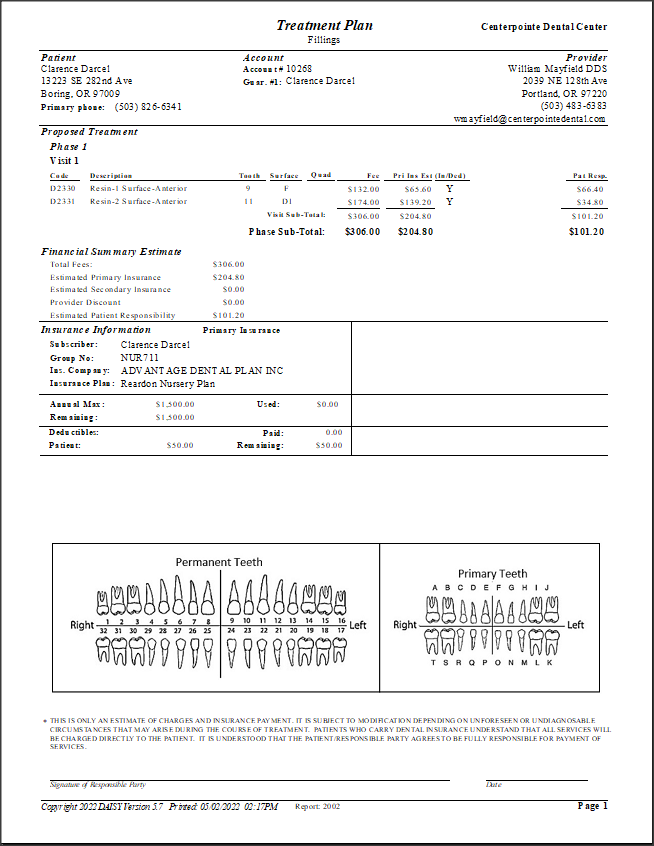
Generate treatment plan reports
You can filter treatment plan procedures by whether or not they are scheduled or unscheduled and whether or not the patient has benefits remaining.
Note: Procedures attached to an appointment have a status of “accepted.”
In addition, the Tx. Plan Proc. Not Done report has three parameter tabs:
- Tx Plan Add Date allows you to filter by the date that unscheduled treatment plans were added.
- Proc. Add Dt allows you to filter by the date that unscheduled treatment plan procedures were added.
- Tx Plan Provider allows you to filter by treatment plan provider.
View scheduled treatment plans
► To view the status of all scheduled treatment plans:
- Open the Treatment Plan window.
- Do one of the following:
- To generate a summary report of scheduled treatment plan procedures, from the Reports menu, select Treatment Plan Status, then select Scheduled.
- To generate a detailed report of scheduled treatment plans, from the Reports menu, select Treatment Plans – Not Completed, then select Scheduled.
You see a report containing all scheduled treatment plans.
View patients with unscheduled treatment plans
► To view a list of patients with unscheduled treatment plan procedures:
- Open the Treatment Plan window.
- Do one of the following:
- To generate a summary report of unscheduled treatment plan procedures, from the Reports menu, select Treatment Plan Status, then select Unscheduled.
- To generate a detailed report of scheduled treatment plans, from the Reports menu, select Treatment Plans – Not Completed, then select Unscheduled.
You see a report containing all unscheduled treatment plans.
Note: Additional treatment plan status reports are available from the Report Gallery under the Treatment Plans folder.
View unscheduled treatment for a range of dates
In this example, the office wants to view all unscheduled procedures planned between 6/1/2010 and 9/30/2010.
► To view a report of patients with unscheduled treatment plan procedures for a range of dates:
- From the DAISY+ toolbar, click
 , then double-click the Treatment Plans folder.
 - Right-click the TX Plan Proc. Not Done report and select Properties.
- Click Reset to remove any filtering from the last time you ran the report.
- In the Parameters section, select the Scheduled? tab.
- Set the filters to Is Equal to N.
- In the Parameters section, select the Proc. Add Dt tab.
-
Set the filters to Is Between, and type the date range.
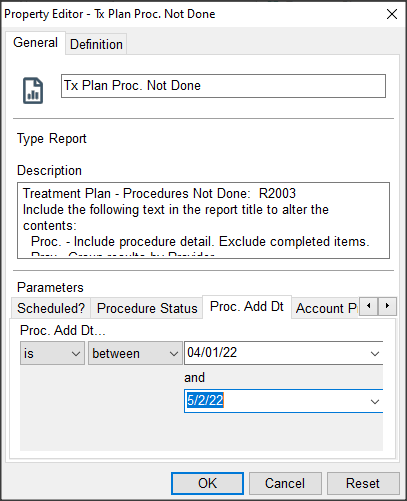
- Click OK to save the filter setting.
-
Double-click the TX Plan Proc. Not Done report.
You see all treatment plan procedures added between 06/01/2010 and 9/30/2010 that have not been scheduled.
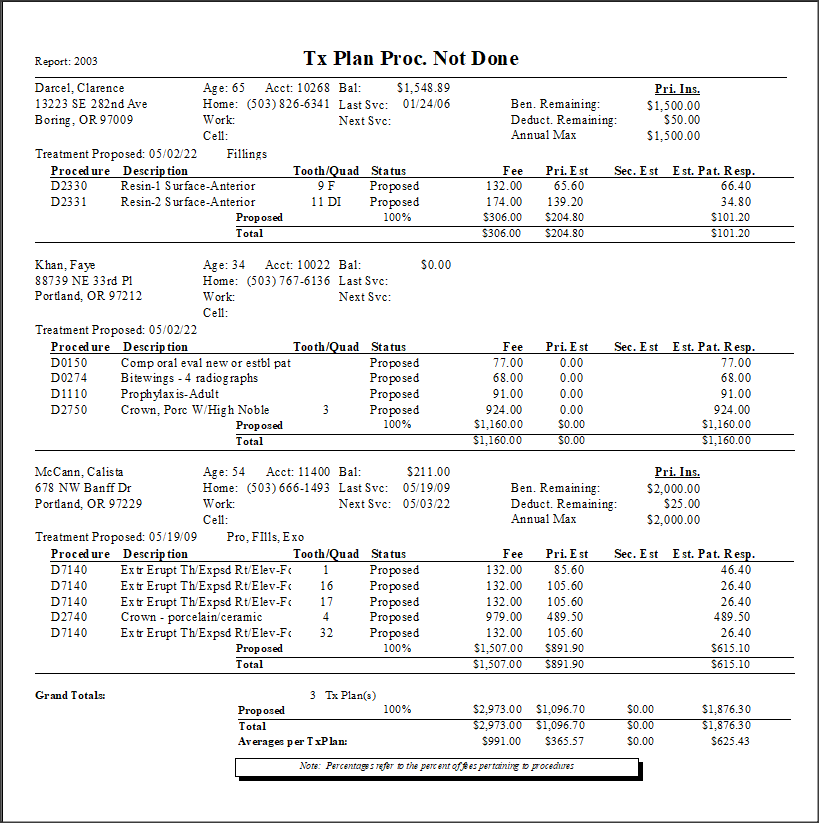
It also shows a patient’s accepted treatment plan procedures, even when those procedures are attached to a canceled or pending appointment.
For example, the following canceled appointment for Calista McCann has one accepted treatment plan procedure attached:
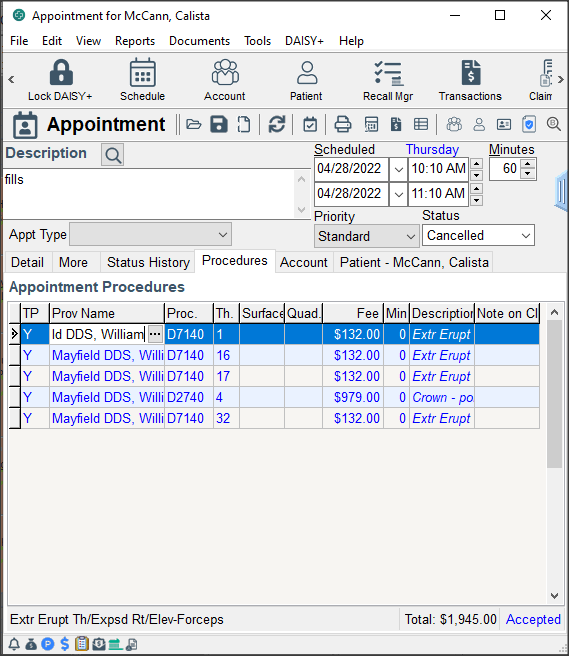
You see that the accepted procedures attached to Christine’s canceled appointment show on Tx Plan Proc. Not Done report (R2003):
View patients with outstanding treatment and remaining benefits
In this example, the office wants to view all patients with outstanding treatment who have remaining benefits.
► To view a report of patients with treatment plan procedures not completed for a range of dates:
- From the DAISY+ toolbar, click , then double-click the Treatment Plans folder.
- Right-click the TX Plan Proc. Not Done report and select Properties.
- Click Reset to remove any filtering from the last time you ran the report.
-
In the Parameters section, select the Pri. Benefits Remain tab.
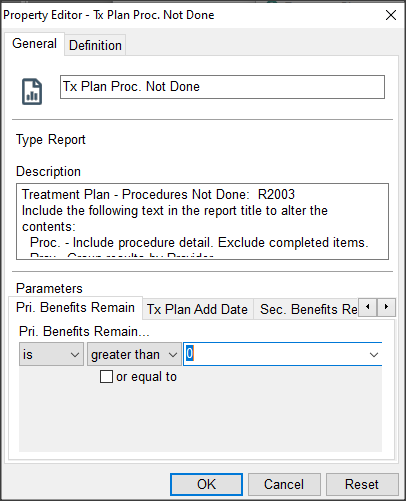
- Set the filters to Is Greater Than 0.
-
In the Parameters section, select the Procedure Status tab.
- Set the filters to Is Equal to Proposed.
- Click OK to save the filter settings.
-
Double-click the TX Plan Proc. Not Done report.
You see all patients with outstanding treatment who have remaining benefits
View account history
When patients call with questions about their accounts, you can find many of the answers in the ledger. For example, some typical questions might be:
- Has my insurance company paid?
- What’s my balance?
- Did you receive my check?
Tip: If an account has a large number of entries, you might want to filter them so only certain entries are displayed.
From the Ledger window’s View menu, select Filter Ledger. Choose the appropriate filters, then click OK.
► To view history for a specific account:
- From the DAISY+ toolbar, click to open the Ledger window.
-
Search for and double-click the account.
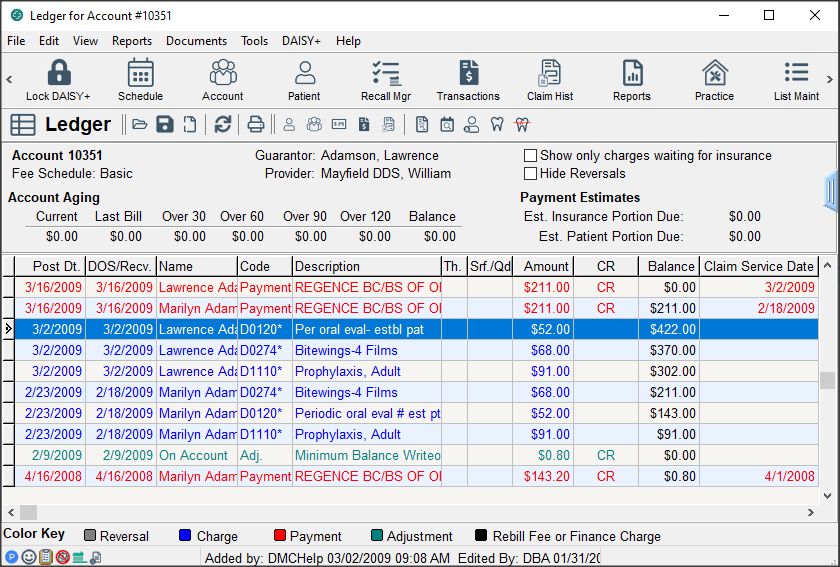
Sort the ledger
In the Ledger window, entries can be sorted either by ascending (oldest to newest transaction) or descending order. Descending order is the default setting.
► To sort the Ledger by ascending order:
- From the DAISY+ menu, select Account, then select Ledger.
- Search for and select the account, then click OK.
- From the View menu, select Sort Ascending.
When this menu option is set to ascending order, the window automatically scrolls to the bottom of the transactions list to keep the focus on the latest entry.
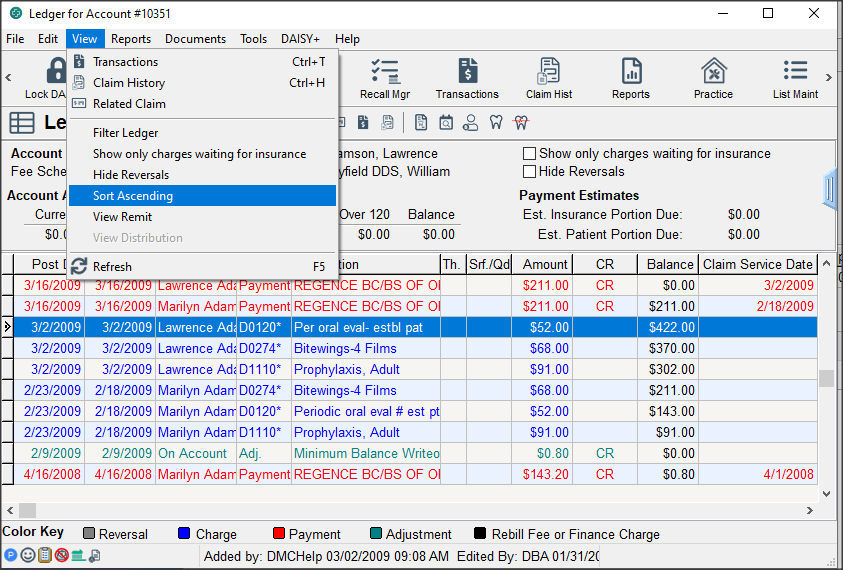
Tip: The Sort Ascending menu option is user specific per workstation.
View a payment distribution from the ledger
Once a distributed payment is posted, you can view the distribution from the ledger.
► To view a payment distribution from the ledger:
- From the DAISY+ toolbar, click to open the Ledger window.
- Search for and double-click the account.
-
Right-click the distributed payment and select View Distribution.

- Click OK to close the View Payment Distribution dialog box.
View remits from the ledger
Once an electronic payment has been posted, you can also view the original remittance from the insurance company in the Ledger and Claim windows.
► To view the original remittance from the Ledger window:
- Open the Ledger window and search for the transaction associated with the EOB.
-
Right-click the transaction and select View Remit to open the remittance.

-
Right-click the distributed payment and select View Distribution.
Manage claims
DAISY+ automatically generates claims each time you post charges. A separate claim is created for each patient for each date of service for each billing provider. Until you process a claim by either running Closing or by printing it, you can still make changes to a claim. For example, you can modify the patient’s insurance coverage, such as:
- Add primary or secondary coverage
- Remove primary or secondary coverage
- Change the subscriber
DAISY+ is commonly set up to automatically put secondary claims on hold so you won’t accidentally bill both insurance companies at the same time. However, should you prefer to do this manually, you can also place individual claims on hold. In addition, you can supply prosthetic and accident information, and add remarks about a claim. For more information, see "Set up a service location address".
View a claim
► To view a claim:
-
From the DAISY+ toolbar, click
 to open the Claim History window.
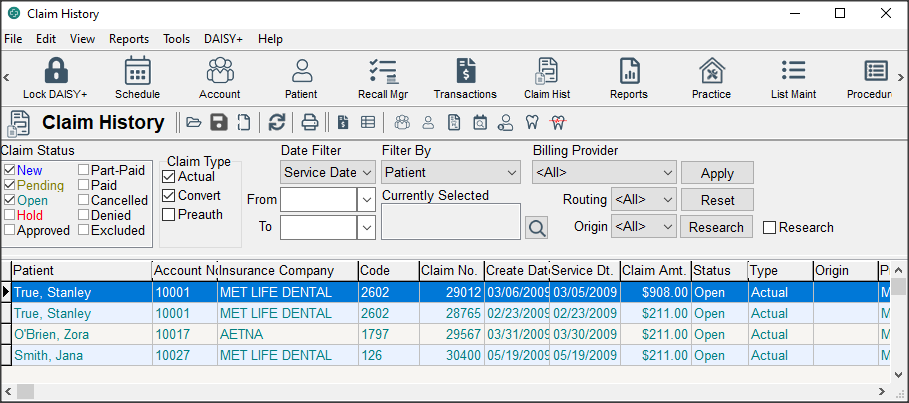
-
In the top half of the Claim History window, set one or more of the following filters to help you find the claim(s) you want:
Under this filter... Do this... Claim Status Check one or more claim statuses. Claim Type Check one or more claim types. Date Filter In the first drop-down list, select a type of date. For example, select Service Date.
In the From and To drop-down lists, select a starting and ending date.
Filter By Select the type of information to search by. For example, select Patient.
Click . Search for and select the item you want, then click OK. Your choice displays under Currently Selected.
Billing Provider From the drop-down list, select the provider who is billing the insurance company. Routing From the drop-down list, select the routing method for the claim, such as Send or Print. Origin From the drop-down list, select the origin of the claim, such as Rebill or Ledger. - Click Apply.
-
In the search results, double-click the claim you want to view.
In the following example, you see an Open claim for Nick Smith.
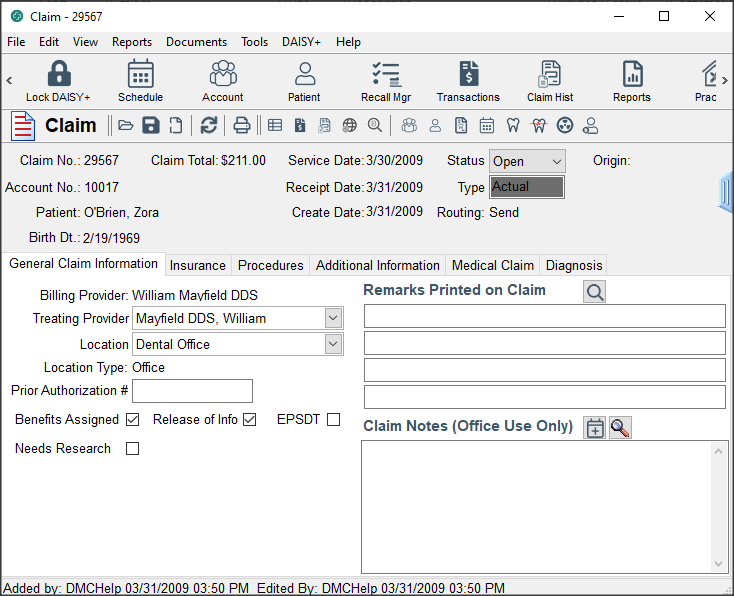
-
Make the appropriate changes to the claim.
For example, if a claim is denied by the patient’s insurance company, change the status to Denied.
- Click , then close the Claim window.
DAISY+ is commonly set up to automatically put secondary claims on hold so you won’t accidentally bill both insurance companies at the same time. However, should you prefer to do this manually, you can also place individual claims on hold. In addition, you can supply prosthetic and accident information, and add remarks about a claim. For more information, see "Set up a service location address".
Resend claim information
Sometimes you need to resend claim information to an insurance company. For example:
- The patient didn’t provide insurance information when the charges were originally posted.
- The patient gave inaccurate insurance information.
- Insurance information was accurate, but the insurance company did not receive the claim.
Rebill and new ledger claims take existing claim information, modify it if needed, then bill or rebill the appropriate insurance company.
- The Rebill Claim option generates a duplicate of the original.
- The New Ledger Claim option generates a revised claim that includes any changed account or insurance information.
Rebill an insurance claim
A rebill claim creates a duplicate of the original.
Tip: To select more than one procedure, press CTRL while you click the primary mouse button.
► To rebill a claim:
- From the DAISY+ toolbar, click to open the Claim History window.
- Search for the claim that needs rebilling.
- Right-click on the claim, and select New Rebill Claim.
- Select the procedures that need rebilling or click Select All to select all the procedures.
-
Click OK.
The Claim window opens so you can review the New Claim in detail.
Note: The original claim status is automatically cancelled when the rebill claim is created.
Your rebill claim gets transmitted to DMC during the next Data Exchange.
Create a ledger claim
A ledger claim generates a revised claim that includes any changed account or insurance information. For example, you posted charges for a patient who did not initially have insurance, or the claim was billed to the wrong insurance company.
Tip: You can also access the Ledger from the Quick
Access toolbar in the Claim window. Click ![]() to access ledger information for the specific account.
to access ledger information for the specific account.
► To create a ledger claim:
- From the DAISY+ toolbar, click and open the Ledger window.
- Search for and double-click the account.
- Right-click and select New Ledger Claim.
- From the Patient drop-down list, select the appropriate patient.
- Select the procedures to include with the new claim or click Select All to select all the procedures.
- Click OK.
-
In the Confirm dialog box, click Yes to view the claim; otherwise click No.
Note: Remember to cancel the original claim once the ledger claim is created.
Your new ledger claim gets transmitted to DMC during the next Data Exchange.
Send primary and secondary claims simultaneously
Even if DAISY+ is set up to automatically hold your secondary claims, you may occasionally need to override the auto-hold setting to send both claims at the same time. Both types of claims will be sent during Daily Closing.
Override the auto-hold on claims that are batch posted
► To batch post and override the secondary claim auto-hold:
- From the DAISY+ toolbar, click to open the Transactions window.
- Click the By Type button.
- From the Show Summary For drop-down list, select the Charges transaction type.
- Right-click in the Transactions window and select Post Charges.
- To post the charges, click Yes.
- From the DAISY+ toolbar, click .
-
In the Claim History window, search for the claim that you want.
The claim should have a status of New.
- Double-click the claim to open it.
- In the Claim window, click the Insurance tab.
-
To the right of the Other Carrier section, uncheck the Hold check box.
Note: The Hold check boxes in the Claim window only display when the claim status is New.
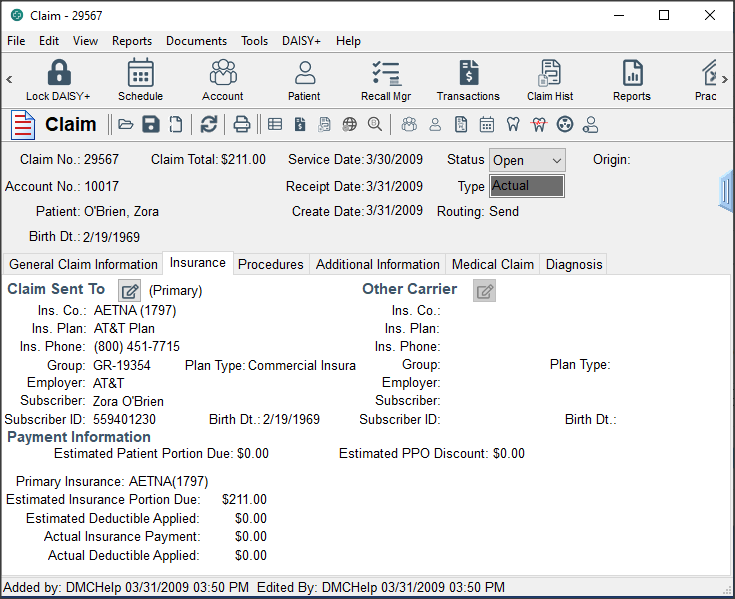
- Click to save the change.
- Close the window.
Override the auto-hold on individually posted charges
► To individually post charges and override the secondary claim auto-hold:
- From the DAISY+ toolbar, click .
- Click the By Account button.
- Click the Charges tab.
- To view a patient’s charges, click the patient’s name in the Accounts/Patients tree.
- Click to post the charge(s).
- In the confirmation window, click Yes to open the claim.
- Click the Insurance tab and then to the right of the Other Carrier section, uncheck the Hold check box.
- Click to save the change and then close the window.
Use the New Claim Summary report
Note: If a patient’s insurance coverage isn’t entered, a claim won’t be processed for that patient.
You can also see if the patient has both primary and secondary insurance.
Once the primary pays, DAISY+ tells you if you have a secondary claim on hold. DAISY+ automatically releases the secondary claim when the primary is paid. The secondary insurer can now pay the difference.
Tip: If a patient has a secondary insurance claim on hold, DAISY+ displays in the RC column in the Transactions window when you enter the payment from the patient’s primary insurance.
Note: A New Claim Summary report must be generated after posting, but before you run Closing. Daily Closing clears the file from which this report is generated.
► To run a New Claim Summary report:
- From the DAISY+ toolbar, click to open the Claim History window.
- Click Reports and select New Claim Summary.
- Do one of the following:
- To preview the report first, click Preview, then click to print it.
- To print the report without previewing it, click Print.
Work with claim history
Use the Claim History window to view a list of current claims, as well as claim history. You can sort by claim status, type, date, billing provider, routing method, and claim origin.
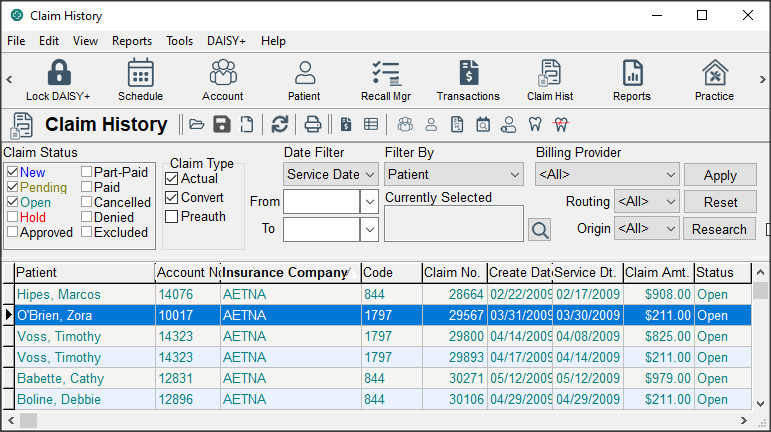
The columns in this window can be moved and resized. You can then sort any column into ascending or descending order. Also, filtering options at the top of the window enable you to pare down the claims list so it is more manageable.
- To sort a column into ascending or descending order, click the column heading.
-
To change filtering options, in the Claim Status section check the type of claims you want to view. Uncheck the ones you don’t want to view.
This claim status... Means... New Unprocessed claim Hold Processed claim not yet sent to the insurance company Open Processed clain sent to the insurance company and awaiting a response Pending Secondary claim that was on hold and is ready to be sent to the insurance company, or for an unprocessed rebill Paid A payment has been posted for the claim Part-Paid Claim that requires additional payments Approved Pre-authorized claim Denied Claim denied by the insurance company Cancelled Claim that you chose to cancel Excluded Claim that is no longer needed -
Note: These changes apply only to the specific user on the specific computer.
Research a claim
If any claim payments in an electronic remittance required additional research, you can filter for those claims in the Claim History window, and continue the research process.
► To view claims marked for research:
- Open the Claim History window.
-
Click
 .
.
You see only those claims that are marked for research.
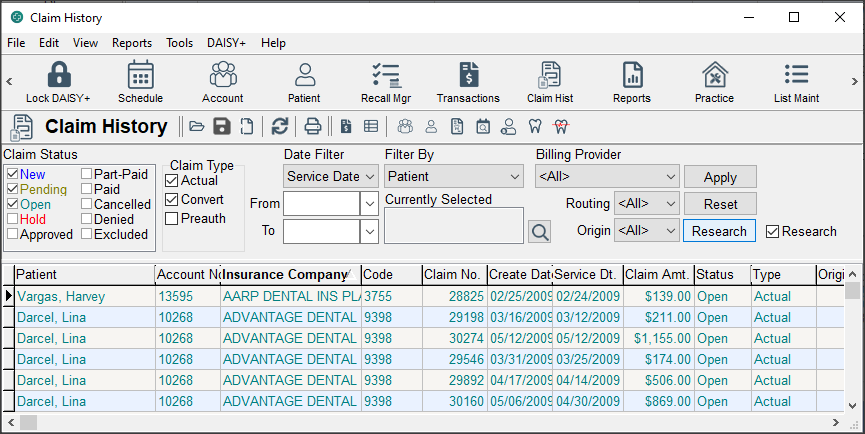
-
Double-click the claim you want to view.
The Claim window opens. The information you typed earlier in the Reason for Research dialog box now shows in the Claim Notes section of the Claim window.
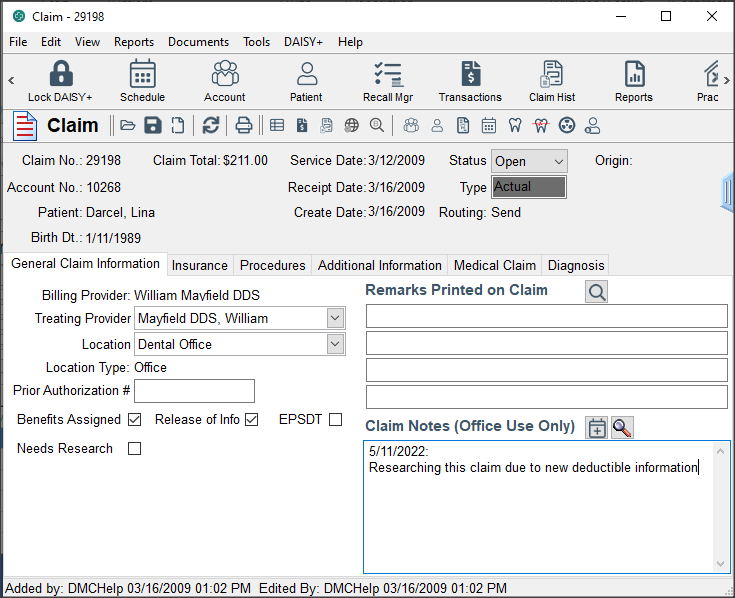
- When you finish researching the claim, uncheck the check box in the claim’s Research column.
- Click to save your changes.
Troubleshooting claims
How do I determine if services from a previous date were billed to a patient’s insurance?
If a transaction in the ledger has an asterisk in the Code column, then the charge has been billed to the patient’s insurance.
► To determine if a service has been billed:
- From the DAISY+ toolbar, click Post and select .
- Search for and double-click the account.
- Locate the appropriate charge and check the Code column for an asterisk.
- To view the transaction’s claim history, right-click it and select Open Related Claim.
The information in the Claim History window doesn’t seem to be in any particular order. Can I rearrange it?
Yes. The columns in this window can be moved and resized. You can then sort any column into ascending or descending order. Also, filtering options at the top of the window enable you to pare down the claims list so it is more manageable.
- To sort a column into ascending or descending order, click the column heading.
-
To change filtering options, in the Claim Status section check the type of claims you want to view. Uncheck the ones you don’t want to view.
Note: These changes apply only to the specific user on the specific computer.
I submitted a claim for a patient, but the claim was denied because the patient is no longer eligible for that coverage. However, the patient has new insurance. What should I do?
If the patient has new insurance that is valid for the visit you billed, you need to:
- Update the patient’s insurance information.
- Change the original claims status to Cancelled.
- Create a new ledger claim. A ledger claim can pull in procedures from previous claims and attach them to the new claim. For information about setting up a ledger claim, see the “Manage Claims” chapter in the Getting Started Guide.
Estimates on statements and quick statements, as well as your receivables, depend on the accuracy of claims in DAISY+. Always remember to change the original claim’s status to Denied or Cancelled if it will never be paid.
My claim rejection report says “Claim has a missing or invalid provider number.” What does this mean?
Because of HIPAA regulations, some insurance carriers have decided to create a Provider ID number that needs to be included (in addition to or instead of the traditional Tax ID number or Social Security Number) on all dental claims. If you receive this message, then you need to change the Provider ID information in DAISY+.
Most DAISY+ reports are stored in the DAISY+ Report Gallery, but you can run many of DAISY+’s most common reports from the Reports menu in the appropriate DAISY+ window. For example, common daily reports related to posting, such as the Transaction Analysis report or the Unposted Transactions report, can be run from the Transactions window. Common reports, such as route slips or the daily schedule, can be run from the Reports menu in the Schedule.
These common reports can be run without setting filters. Other reports are run from the Report Gallery. For more information, see "Define the scope of a report".
Whenever you run a report, you can choose to preview it first or send it directly to the printer. You can also export generated reports into other file formats, such as Microsoft Word (.doc) and Excel (.xls), and Adobe Acrobat (.pdf).
About the Report Gallery
Most DAISY+ reports are stored in the Report Gallery. Each folder in the gallery houses reports or documents that pertain to the title of the folder. For example, the Account folder contains account reports, such as Account Aging. You can run any of these reports directly from the Report Gallery.
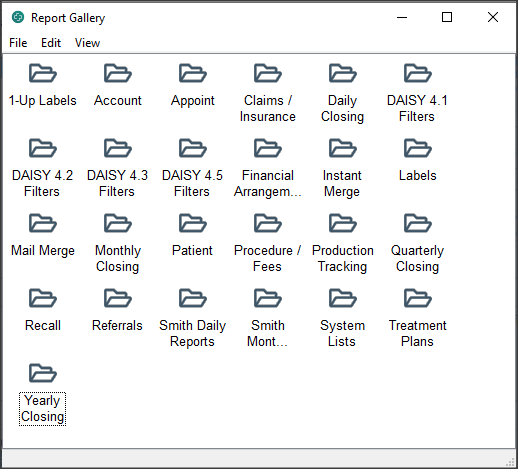
Note: A few reports, such as the Visit Summary, can only be accessed from the Reports menu in specific DAISY+ windows.
Tip: If you have a set of reports that you run on a regular basis, such as those you run at the end of each day, you can set up a special folder and place copies of those reports in the folder.
Tip: If you have Microsoft Word, you can also merge patient and account information into Mail Merge documents. For more information, see "Use Mail Merge".
Reports in the Report Gallery are organized as follows:
| This folder... | Contains... |
|---|---|
| Account | Account status reports, particularly financial status, such as account aging and history. |
| Appoint | Appointment reminders, details, lists. |
| Claims/Insurance |
Reports an office typically runs at the end of each day. For example, a transactions report, new accounts receivables. The Aging Report by Provider Summary must be run and printed every day if you use it for balancing your accounts. The details of this report cannot be recreated once you have posted new payments, charges, and adjustments. |
| Financial Arrangements | Reports to help you with accounts (insured and uninsured) that have financial arrangements. |
| Instant Merge | Mail Merge documents that you want to access from Account or Patient window Report menus. |
| Labels | Several kinds of print labels (patient address, chart, recall, and referral). |
| Mail Merge |
All Mail Merge documents. Be sure to set filters prior to running a Mail Merge document to avoid generating letters for every account or patient in the system. |
| Monthly Closing | Reports an office typically runs at the end of each month. For example, Aging by Provider Summary, Statement History, Finance Charges, and Minimum Balance Write-off. |
| Patient | Reports and forms associated with patient information. For example, route slips, prescription forms, patient list reports. |
| Procedures/Fees | Reports about procedures or fees entered into the system. For example, the Fee Schedules report lists all procedures and their associated fees. |
| Production Tracking | Reports that show the amount of charges each provider has produced for a specific time period, such as day, month, or year. The Activity Analysis report breaks down this activity by procedure code. |
| Quarterly Closing | Reports an office typically runs at the end of each quarter. |
| Recall | Recall reports, and recall cards and labels. The Recall by Patient report can show you recall status for all patients. |
| Referrals | Reports that show the number of patients that were referred to you, referred by you, and by what means. You can also print labels for doctors to whom you refer patients. |
| System Lists | Reports that show the contents of system lists found under the Lists menu of DAISY+. |
| Treatment Plans | Reports about the treatment plans in your system. For example, you can view outstanding treatment plans, or treatment plan status by provider. |
| Yearly Closing | Reports an office typically runs at the end of the year. |
Run a pre-filtered report
The filters on reports you run from the Reports menu in DAISY+ are preset and unchangeable. Should you need to use different filter settings for any of these reports, you can change the filters and run the report from the Report Gallery. For more information see "Define the scope of a report".
The following procedure illustrates how you can run a report from the Account window. From there you can print information about the account you are currently displaying, such as financial arrangements, account profile, statement history, and a visit summary.
Tip: To cancel a report while it is generating, click on the DAISY+ Report Viewer toolbar.
► To run a pre-filtered report from the Account window:
- From the DAISY+ toolbar, click .
- Search for an select the account, then click OK.
- From the Reports menu, select the report you want to run.
- Do one of the following:
- To preview the report first, click Preview, then click to print it.
- To print the report without previewing it, click Print.
- If your DAISY+ database is large, the report may take a minute or two to generate.
Define the scope of a report
Each report has a number of changeable properties (also called filters) that you can define, so you can select the information you want reported. You can set one or more filters for a report. When you install DAISY+, the properties of each report are preset to the most common settings.
On some reports you don’t need to set filters. However, if no filters are set, the report will include information you may not want to see. For example, if you don’t filter the Account Aging report, you’ll see all accounts including those with a zero balance.
► To define the scope of a report:
- From the DAISY+ toolbar, click .
- Double-click on the appropriate reports folder.
-
Right-click on the report you want and select Properties.
For example, if you right-click on the Account aging report, you see:
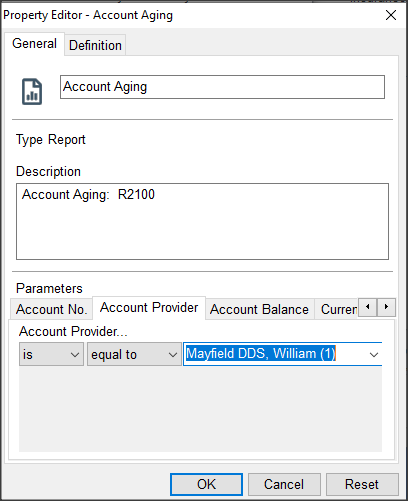
- Click Reset to remove any filtering from the last time you ran the report.
-
Click a tab and choose the filters you want to apply.
For example, click the Account Provider tab. Now you can select the filters you want. In the previous example, the filter selected is Account Provider Is Equal To Smith DMD, Jane [1].
- To set more filters, repeat step 5.
- Click OK.
Tip: To cancel a report while it is generating, click on the DAISY+ Report Viewer toolbar.
Run a report from the Report Gallery
When you run a report, it automatically displays first on your screen so you can review the contents, then you can choose to print it.
► To run a report from the Report Gallery:
- From the DAISY+ toolbar, click to open the Report Gallery.
- Double-click on the appropriate reports folder.
- Double-click on the report you want to run.
- To print the report, click .
Archive a Report Gallery folder's reports
Reports can be stored in the DAISY+ document archive directly from the Report Gallery. For example, if you have a folder of reports that you print everyday, you can easily run and archive all of the reports in that folder to the practice.
► To archive all of the reports in a Report Gallery folder:
- From the DAISY+ toolbar, click to open the Report Gallery window.
- Double-click on the folder that contains the reports.
- For each report, do the following:
- Right-click on the report and select Properties.
- Set the properties for the report to generate the correct information when the report runs.
- Click OK.
-
Right-click on the folder to archive and select Archive.

-
Select the document type you want to use for all of the archived reports, then click OK.
You see an information dialog box showing you the progression as each of the reports are archived.
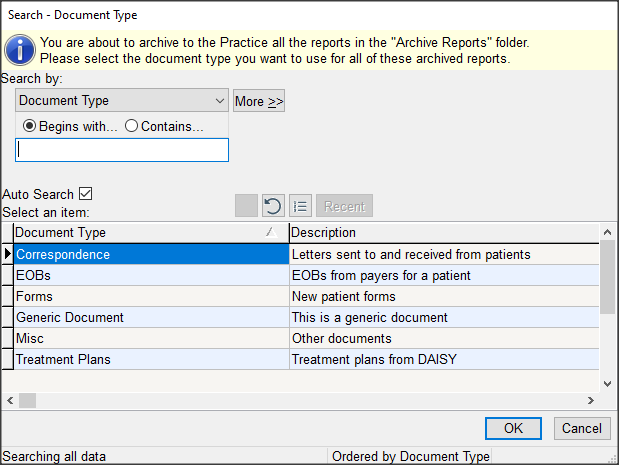
-
When done, click OK.


-
Note: For more information about the DAISY+ document archive, see "Use Document Manager".
Use Mail Merge
You can use Mail Merge to easily merge information from DAISY+ into a Microsoft Word document. DAISY+ provides you with a variety of common Mail Merge templates that you can use to merge with information from DAISY+’s Account and Patient windows. For example, you can generate a customized welcome letter for all new patients during the current month.
You can also create your own Mail Merge documents and access them from the Report Gallery in the Mail Merge folder. And, if you store these Mail Merge documents in the Instant Merge folder inside the Account or Patient subfolder, you can access them from the Reports menu in the Account or Patient windows, and from the Transactions window in the By Account view. For example, you may want to generate consent letters from the Patient window.
Create a Mail Merge document
If you want to use more merge documents than are provided in DAISY+, you can create your own Mail Merge document.
Note: You must have Microsoft Word installed on your system to create a Mail Merge document.
Tip: If you don’t know which template to search for, you can view a list of all available templates:
In the Select Merge Template search window, click .
► To create a Mail Merge document:
- From the DAISY+ toolbar, click .
- In the Report Gallery, double-click the Mail Merge folder to open it.
- In the Mail Merge folder, right-click and select New, then Merge Document.
-
In the Select Merge Template search window, search for and select the appropriate template to use for your merge document, then click OK.
For example, select Continuing Care. The document you want displays in the Mail Merge folder.
Note: If you already have a document based on the same template, the name of the new icon will have a number after it in parentheses to indicate that you have that number of letters based on the same template. For example, Continuing Care (2).
- Right-click the icon you want and select Properties.
- Set the appropriate filters, then click OK.
- Double-click the new icon. The document opens in Microsoft Word.
-
If you need to make changes or add text, edit the document.
Note: You can also bring in variable data such as the patient’s first name, last name, and address. For example, in Word 2003, click the Insert Merge Field button on the Word toolbar and select the merge field you want to include.
- From the Word menu bar, select File, then Save.
- Close the Word window.
Make a Mail Merge document available from the Reports menu
If you want a document to be available as an Instant Merge document so it can be accessed from the Reports menu, copy it into the appropriate subfolder in the Instant Merge folder.
► To make the document available from the Reports menu in a DAISY+ window:
- From the DAISY+ toolbar, click .
-
In the Report Gallery, double-click the Instant Merge folder.
You see the Account, Patient and Insurance Coverage folders.
- Double-click the folder that corresponds with the window from which you want to generate a merge document.
- Add the document to the appropriate folder.
- Close the Report Gallery windows.
- Set the appropriate filters, then click OK.
Generate a Mail Merge document
You can create merge documents from the Report Gallery and access them from the Reports menu in the Account and Patient windows, as well as the Transactions window from the By Account view.
Note: You must have Microsoft Word installed on your system to create a Mail Merge document.
Generate a document from the Report Gallery
► To generate a Mail Merge document from the Report Gallery:
- From the DAISY+ toolbar, click Reports.
- In the Report Gallery, double-click the Mail Merge folder to open it.
- Right-click the icon you want and select Properties.
- Set the appropriate filters, then click OK.
-
Double-click the document you want to use.
The merged letters open in Microsoft Word. Use the arrows in Word’s Merge toolbar to view each letter.

- To print the letters, do one of the following:
- To print the letters one at a time, use Word’s print function. From the File menu, select Print.
- To print the entire group, close the report in Word. In the Mail Merge folder, right-click the report and select Print.
Generate a document from a DAISY+ window
If you want a Mail Merge document to be available from the Account, Patient, or Insurance Coverage windows, copy it into one or more of the appropriate subfolders (Account, Patient, or Insurance Coverage) in the Instant Merge folder.
► To generate a Mail Merge document from the Report Gallery:
- In the appropriate window, click Reports and select Merge Docs, then select a document.
-
In the Print Options window, select one of the following:
Choose this option... To do this... Preview Preview the report and optionally print it from the Preview window. Print Print the report. Cancel Cancel the report.
Generate a Mail Merge document for a selected group
You can send personalized documents to a selected group, such as a form letter to all patients whose accounts show no activity for the last seven months.
► To generate a Mail Merge document for a selected group:
- From the DAISY+ toolbar, click Reports.
- In the Report Gallery, double-click the Mail Merge folder to open it.
- In the Mail Merge folder, select the icon of the document you want, then right-click and select Properties.
- In the Property Editor window, click the General tab.
- Click the Reset button to reset all the filters.
- In the Parameters section, click each tab and select the filter settings you want (or leave them as is) to filter the patients you want to include.
- When finished setting filter parameters, click Apply, then click OK.
- Double-click the icon of the document to generate the personalized letters. The generated letters open in Microsoft Word.
-
Use the arrows in Word’s Merge toolbar to view each letter.

- To print the letters, do one of the following:
- To print the letters one at a time, use Word’s print function. From the File menu, select Print.
- To print the entire group, close the report in Word. In the Mail Merge folder, right-click the report and select Print.
Generate a referring provider envelope
A new Mail Merge template enables you to create a #10 business envelope addressed to a referring provider.
► To generate an envelope for a referring provider:
- From the DAISY+ menu, select Configure, then select List Maintenance.
- Click the Referring Providers tab.
- Do one of the following:
- To select a referring provider, click to open the Search For – Referring Provider window, and select the provider.
- To add a new referring provider, click and type the name and address of the referring provider, then click .
-
From the Reports menu, select Merge Docs, then select Referring Provider Envelope.
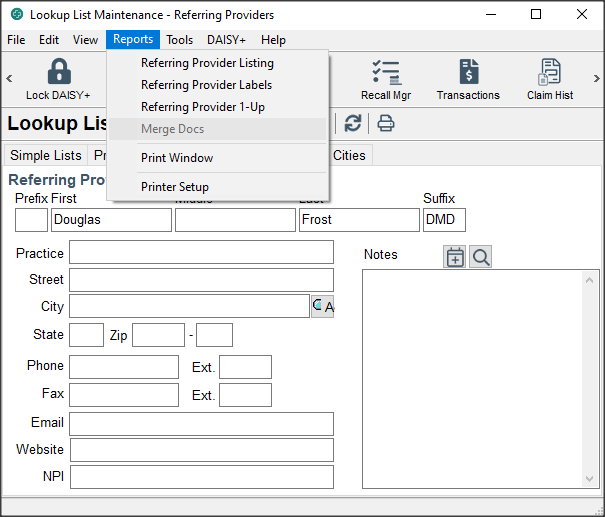
- In the Print Options window, do one of the following:
- Click Preview to preview the envelope in Microsoft Word.
- Click Print to print the envelope.
Closing is usually the last activity you perform at the end of your day. This activity runs backups and generates claims and statement files to send to DMC.
Run Daily Closing
During most of the month, you run a Daily Closing which includes:
- A Quick Backup
- Generation of a claims file
- Transmission of claims and statement files to DMC
When needed, you may also generate interim statements called QuickStatements.
Note: To minimize problems during Closing, close all other programs and allow all print jobs to complete before you start the Closing process.
Why you need to run daily backups
The information you enter into DAISY+ is stored in only one location — a computer in your office.
DAISY+ does not have a duplicate copy of your database. If your disk drive fails, your backups are the only way you can recover your database.
► To run Daily Closing:
-
From the DAISY+ toolbar, click
 .
.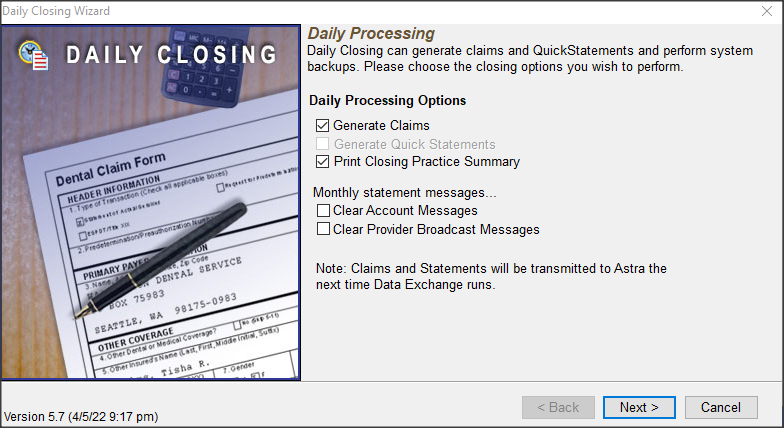
DAISY+ automatically checks the Send Claims check box. If you have no claims, DAISY+ simply creates an empty claims file.
- If you’re sending QuickStatements, check the Send QuickStatements check box.
- If you want to clear all account statement messages after other Closing activity completes, check the Clear Account Messages check box.
- Click Next.
-
In the Backup Options section, choose Quick Backup.
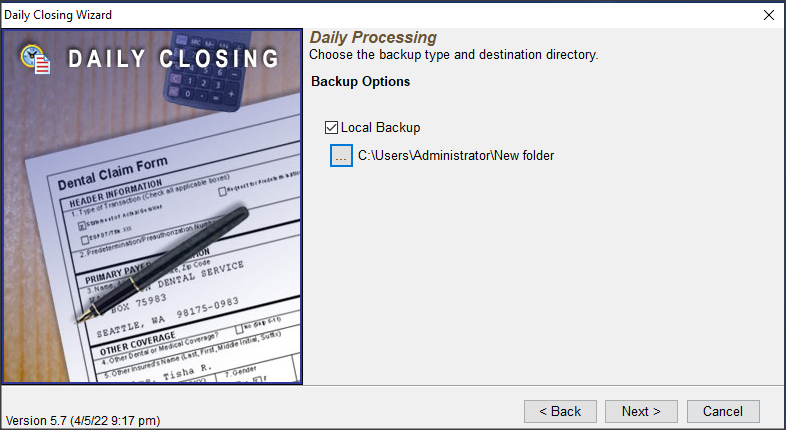
-
In the Backup Directory section, check your backup’s destination path, then click Next.
The drive letter should always be set to the removable disk or tape drive on your system and the pathname set to the DMC directory. For example, D:\DMC.
-
Review your selections, then click Process.
DAISY+ checks your database, performs a backup, then generates claim and statement files and places them in your DAISY+ Outbox.
Use the Closing Practice Summary report
The Closing Practice Summary report provides a snapshot of all of the practice’s financial transactions since the last Daily Closing. This report is generated and archived automatically during Daily Closing. The report can be accessed and printed from the Documents panel in the Practice Settings window and in the Document Manager window.
Use the Closing Practice Summary report
► To view the Closing Practice Summary report:
- From the DAISY+ menu, select Configure, then Practice Config.
-
Click the “handle” on the right-side of the Practice window to open the Documents panel.
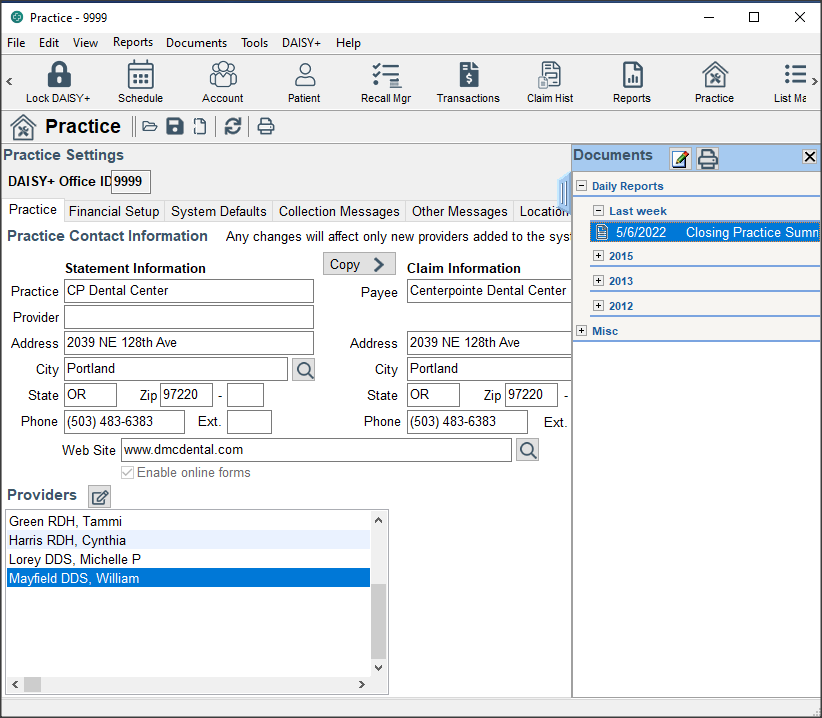
- Navigate through the tree to the appropriate document folder, then double-click the Closing Practice Summary report you want to view.
-
Double-click the report.
You see a summary of what happened since the last closing, including:
- Previous accounts receivable balance
- Charges by provider and charge reversals
- Payments by type and payment reversals
- Adjustments by type
- Finance charges and rebill fees
- Minimum balance write-offs
- Ending accounts receivable balance
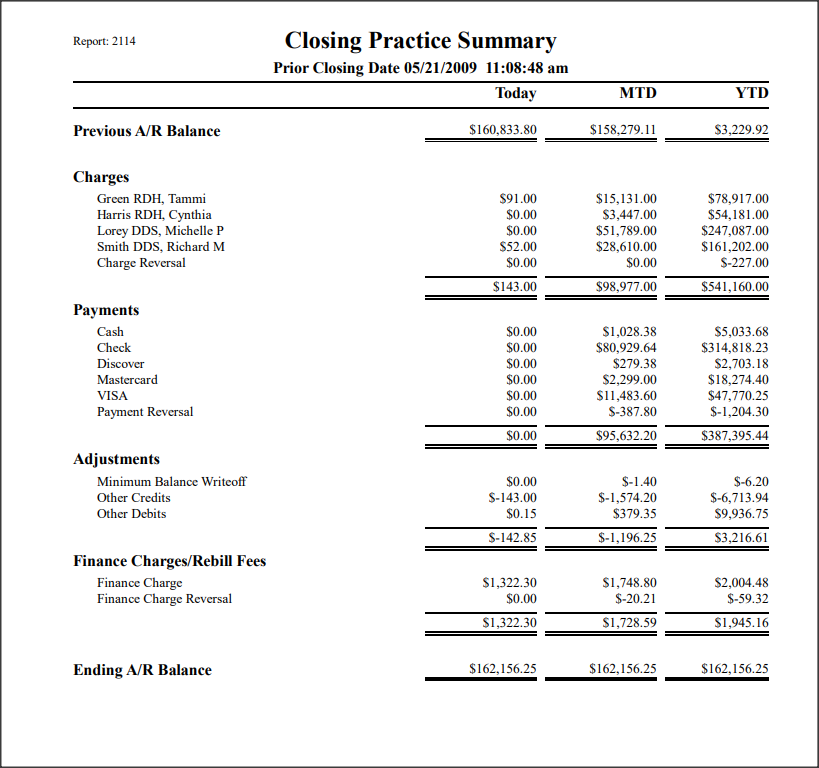
- From the DAISY+ menu, select Configure, then Practice Config.
Print the Closing Practice Summary report during closing
The Closing Practice Summary report can be optionally printed from the Daily Closing dialog box.
► To print the Closing Practice Summary report during closing:
- From the DAISY+ menu, select Closing, then Daily Closing.
-
Check the Print Closing Practice Summary check box.
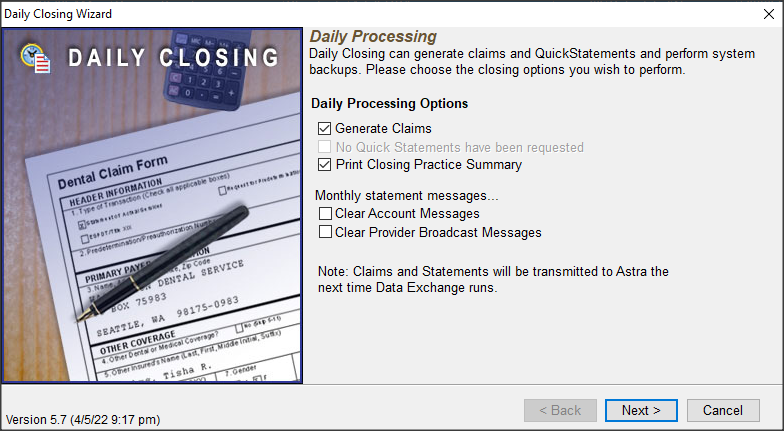
Note: The Print Closing Practice Summary option will be grayed out if no financial transactions have been posted since the last closing.
- Check any other Daily Process Options that apply to the practice.
- Click Next.
- In the Backup Options section, choose the appropriate type of backup.
- Click Next.
-
Review your selections, then click Process.
DAISY+ processes the Daily Closing and then archives and prints the report on the default printer.
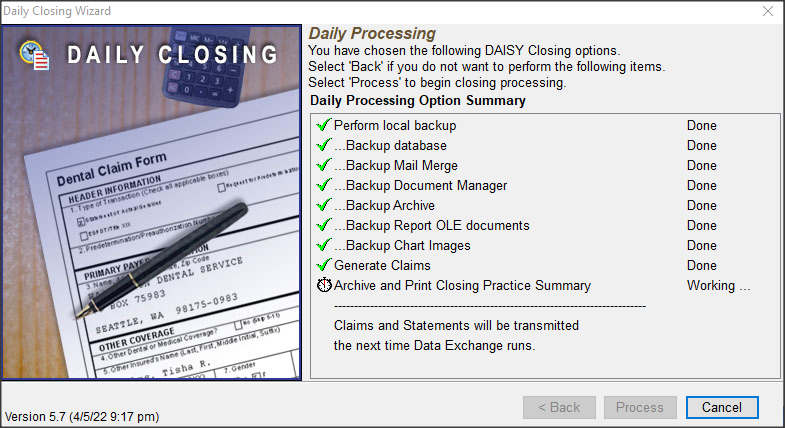
Transmit Closing files to DMC
If you keep your computer running overnight, Data Exchange, which transmits the claims and statement files to DMC, will automatically run at the scheduled time set up for your system. To use Data Exchange, you must have an Internet connection.
Tip: If the Data Exchange icon is not in the task bar, you can start it another way.
From the DAISY+ menu, select Closing, then select Data Exchange.
► To transmit immediately, do the following:
- To run Data Exchange, double-click
 on your Windows task bar in the lower right corner of your Desktop.
 -
In the DMC Data Exchange window, click Go Now!
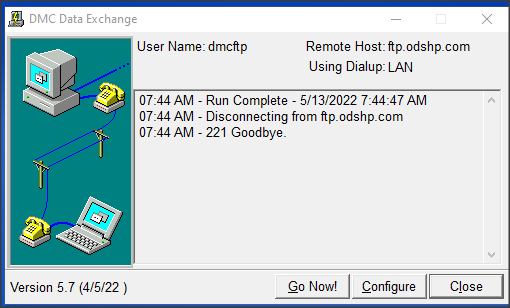
You may want to minimize this window when Data Exchange completes.
-
From the DAISY+ menu, select Closing, then Outbox to verify that your Outbox is now empty.
If your Outbox is not empty, your claims and statements were not sent to DMC. Try sending the files later on or contact DAISY+ customer support.
Important: You must successfully complete a Data Exchange before your claims and statements can be received at DMC.
Run Monthly Closing
You run Monthly Closing once a month. This closing includes:
- A Full Backup
- Generation of a claims file
- Generation of monthly statements
- Account aging and finance charge assessments
- Transmission of claims and statement files to DMC
Note: DAISY+ won’t permit you to run monthly closing more than once every 20 days. To run monthly closing sooner, contact DAISY+ customer support for instructions.
► To run Monthly Closing:
-
From the DAISY+ menu, select Closing, then Monthly Closing.
Send Claims and Send Statements are automatically selected.
- If appropriate, check one or more of the following:.
- If you want to clear all account statement messages after other Closing activity completes, check the Clear Account Messages check box.
- If you want to clear all provider-specific account statement messages after other Closing activity completes, check the Clear Provider Broadcast Messages check box.
- Click Next.
- In the Backup Directory section, check your backup’s destination path, then click Next.
-
Review your selections, then click Process.
DAISY+ checks your database, performs a backup, then generates claim and statement files and places them in your DAISY+ Outbox.
If you keep your computer running overnight, Data Exchange, which transmits the claims and statement files to DMC, will automatically run at the scheduled time set up for your system.
- To transmit immediately, double-click on your Windows task bar to run Data Exchange.
- In the DMC Data Exchange window, click Go Now! This window closes when Data Exchange completes.
-
From the DAISY+ menu, select Closing, then Outbox.
If your Outbox is not empty, your claims and statements were not sent to DMC. Try sending the files later on or contact DAISY+ customer support.
Important: You must successfully complete a Data Exchange before your claims and statements can be received at DMC.
Review claim and statement receipts
Check your Inbox in the DAISY+ Central window at the beginning of every workday to review your electronic claims status reports. Your Inbox also contains DAISY+’s Business Matters newsletter and other files.
Electronic claim status reports include the number of claims accepted electronically, along with their dollar amount, and the number of claims rejected and their dollar amount.
Always review the electronic claims status reports. After you review them, you can safely delete these reports from your Inbox.
Details about rejected claims, which contain information about why the claims were rejected, such as an invalid subscriber ID number, or an incorrect birth date, will be sent in the next report. A contact phone number for the insurance carrier is also included.
Important: You must successfully complete a Data Exchange before your claims and statements can be received at DMC.
Tip: If your DAISY+ Central window is not displaying the Inbox, then do the following:
From the View menu, select Inbox. A check mark indicates that the item is selected.
Tip: If the Data Exchange icon is not in the system tray, you can start it another way:
From the DAISY+ menu, select Closing, then select Data Exchange.
Note: If DAISY+ is installed on a server, the Data Exchange icon only displays on that computer.
► To open an electronic claims status report:
- Open the DAISY+ Central window.
-
In the Inbox section, double-click the report file.
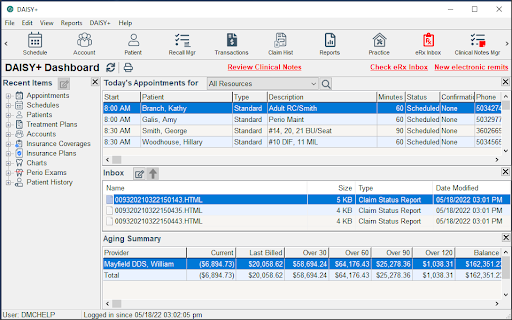
Troubleshooting Closing
I get a “Receipts not found” message when I try to run Daily Closing. What should I do?
This message is generated by the Receipt Checker program, which monitors your DAISY+ Inbox for receipt files. This program runs each time you run Closing. If it detects that you have not received receipts for one or more claim, statement and recall card files (generated by Recall Manager), it sends this message to alert you about a potential problem.
Note: Receipt Checker will only generate this message for missing receipt files associated with claim, statement, and recall card files that were created over four days (96 hours) ago.
These things may interfere with retrieving your receipts:
- Files were deleted from your DAISY+ Outbox so they were not sent to DMC.
- Problems connecting to the Internet prevented Data Exchange from working correctly, so you could not receive DAISY+ receipts.
- Incorrectly configured firewall software (e.g. Norton Personal Firewall, Norton Internet Security) interfered with Data Exchange, even if your Web browser and e-mail application functioned normally.
If you receive this message then:
- Claim, statement and recall card files may not have been sent and are still in your DAISY+ Outbox. If this is the case, run Data Exchange (click Go Now). Wait 15 to 30 minutes for DMC to produce a receipt file, then run Data Exchange again to retrieve the receipt file(s).
- The files may have been transmitted to DMC and the receipts are available but have not been retrieved. Run Data Exchange and click Go Now to retrieve the receipt file(s).
Tip: To minimize the chances you’ll receive the “Receipts not found” message, always run Data Exchange:
- In the morning to retrieve files at DMC.
- After Closing to transmit claim, statement and recall card files to DMC.
What should I look for if an insurance claim is rejected?
- The insurance company may no longer use the Social Security Number (SSN) for the Subscriber ID number.
- If the Subscriber ID is the person’s Social Security Number, you may have included dashes, such as 316-24-9585. Make sure the ID number is entered exactly as it appears on the patient’s insurance card. Most insurance companies will only accept the SSN without dashes.
- If a person has multiple insurance plans, you may have entered the wrong Subscriber ID for one of the plans.
- Check for a valid subscriber birth date.
- Gender is required for some electronic claims. Make sure gender has been specified.
Manage recall
Recall helps you make the most of your resources because it keeps patients coming back for routine treatment. For example, recall can be updated each time a person comes in for a recare appointment.
In DAISY+, you can choose how much you want to automate patient recall:
- Hands-free Recall is DAISY+’s highest level of recall management. When you use DAISY+ to set up an appointment, you can indicate what type of recall will be performed during that appointment. Whenever you make a change to the appointment, such as cancelling, rescheduling, or checking out the patient, the patient’s recall information is automatically updated in DAISY+.
- Auto-create Recall. You can use this DAISY+ feature to automatically set up a patient for recall when you enter a charge associated with a recall procedure for this patient for the first time. After that, DAISY+ updates the patient’s recall whenever you enter charges associated with a recall procedure.
- Manual recall setup. If your office wants to be selective about who gets put on recall, you can still use DAISY+ to update recall for those selected patients. First, you manually set up a patient for recall. After that, DAISY+ updates the patient’s recall whenever you enter charges associated with a recall procedure.
No matter which recall method you use, DAISY+ warns you if you schedule a recall appointment before the patient is due, and also warns you if a patient is overdue for a recall.
Manually set up a patient for recall
Use this procedure if you prefer to be selective about who gets set up for recall. If you have Auto-create Recall enabled, skip to "Update a patient’s recall". If you use Hands-free Recall, skip to "Add a recall type to an appointment".
Sun Valley Dental Clinic uses DAISY+ to track patient recalls. However, since its staff often schedule cleanings for patients who reside in the area only during the summer months, they prefer to select who they set up for recall.
► To manually set up a patient for recall:
- From the DAISY+ toolbar, click .
- Search for and select the patient, then click OK.
- Click the Recall tab.
- Click .
-
Select the recall type you want to set up for this patient, then click OK.
The recall type is added for this patient.
Note: For information about setting up recall types, see "Set up recall card messages ".
-
From the Notification Method drop-down list, optionally select a notification method.
Indicate the method that the patient prefers to be notified. Otherwise, the practice’s default notification method is used.
This notification type... Means this... Preview Preview the report and optionally print it from the Preview window. Phone Call the patient Card Print a postcard Label Print a label to attach to an envelope or hand-written card None Patient does not need or want a recall reminder - Click and close the Patient window.
Update a patient’s recall
If you use Auto-create Recall, use this procedure to automatically set up a patient for recall. You also use this procedure to update recall for patients who are already set up for recall.
Tip: To determine if your practice is set up for Auto-create Recall, open any DAISY+ window. From the DAISY+ menu, select Configure, then Practice Configuration.
Click the System Defaults Tab. In the Patient Recall Options section, Auto-create Recall is enabled if the Auto-Create Recall check box is checked.
However, if you use Hands-free Recall skip to "Add a recall type to an appointment".
► To update a patient’s recall:
- From the DAISY+ toolbar, click .
- Click the By Account button.
- Click the Charges tab.
- To view the patient’s transactions, do one of the following:
- If the patient is listed in the Accounts/Patients tree on the left-side of the window, click the patient’s name.
- If the patient is not listed, right-click in the Accounts/Patients section and select Select a Patient. Search for the patient, then double-click the patient name.
-
Type or select the charge that has been set up as a recall type.
In this example, D1110, a prophy procedure, has been set up as a recall type.
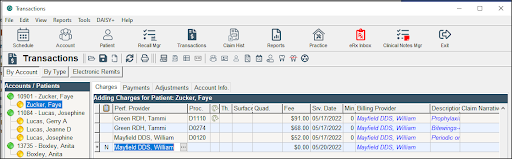
- Double-click in the column to open the Patient window.
- Do one of the following:
- If the patient isn’t set up for this type of recall, you’ll be asked if you want to set it up. Click Yes to set up the patient.
- If the patient is set up for recall, you’ll be asked to update the recall type. Click Yes to update recall for this patient.
In the Patient window, DAISY+ inserts the charge date under the Last Recall column and calculates the period and minutes based on the information stored for this recall type.
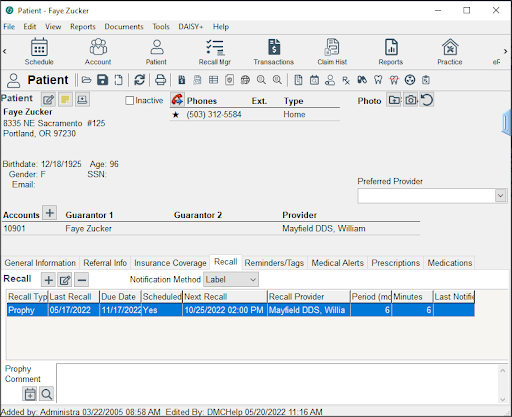
Note: The Due Date indicates when the patient is due, but the Next Recall date may vary because of patient or appointment availability.
Add a recall type to an appointment
If you’re using Hands-free Recall, use this procedure to manage a patient’s recall from the Schedule. With this method, you specify which recall type applies to an appointment. Then, whenever you make a change to the appointment, such as canceling, rescheduling, or checking out the patient, the patient’s recall information is automatically updated in DAISY+.
If you aren’t using Hands-free Recall, see "Update a patient’s recall".
► To add a recall type to a scheduled appointment:
- From the DAISY+ toolbar, click .
-
Search for the scheduled appointment.
Note: For more information on finding a scheduled appointment, see "Find a scheduled appointment".
-
Double-click on the appointment.
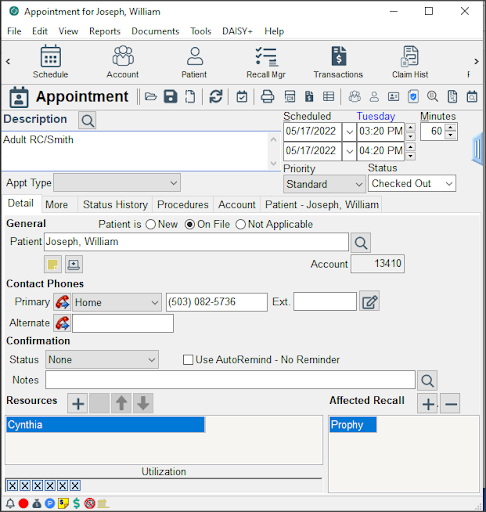
- In the Affected Recall section, click .
- Search for and select the recall type, then click OK.
Use Recall Manager
Recall Manager enables you to generate a list of recall cards, then send the list to DMC via the Internet. Recall Manager selects patients based on the recall information stored in DAISY+. DMC prints the recall cards and mails them to your patients.
Note: You must use DAISY+ to track patient recall if you want to use Recall Manager.
► To use Recall Manager to notify your patients, you need to complete the following steps in this order:
- Generate a preliminary list of patients whose recall is due or past due.
- From this list, select those patients who should receive recall cards and include appropriate recall card messages.
- Print a Recall Card Audit report.
- Send the recall list to the DAISY+ Outbox. The recall cards are sent to DMC during the next Data Exchange.
Generate a recall list
Recall Manager selects patients based on the information stored in DAISY+ under the Recall tab of the Patient window. Before you produce the recall list, you choose options that help Recall Manager generate a preliminary list of patients whose recall is due or past due. Some of these options are the Next Recall date, the Recall Type, and whether the patient is already scheduled for a recall appointment.
To generate the recall list, Recall Manager uses information stored in DAISY+’s Patient window under the Recall tab. For more information, see "Manage recall".
Note: Each time you run Recall Manager, the Start Date and End Date are automatically set to the start and end of the next calendar month, respectively. The other filter settings are set to All. Anyone whose next recall date falls within this date range is automatically displayed in the Search Results text box.
Tip: You might want to generate two lists: one with pre-scheduled appointments, and one without, so you can customize your recall messages and card styles to reflect the needs of each group.
► To generate a recall list:
- Log in to DAISY+.
-
From the DAISY+ toolbar, click
 .
.You use the filters in the Filter Scheme section of the Recall Manager window to generate the recall list.
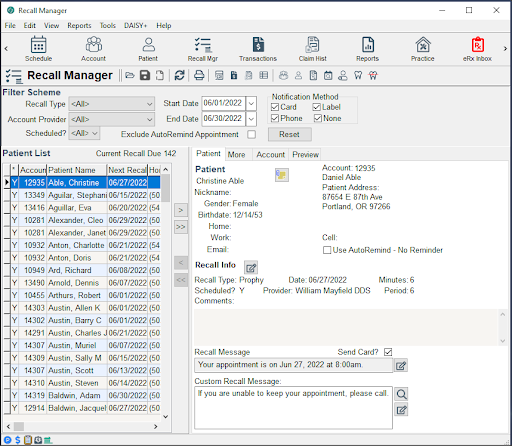
Tip: Sort the search results by Home Phone to determine if patients with different names live at the same residence. Then you’ll only need to send one card or make one phone call about recall if they all come in at the same time.
-
Under Filter Scheme, select options from one or more of these recall filters:
Use this filter... To do this... Recall Type Select a specific recall type. For example, Prophy. Or select All to include all recall types. Account Provider Select a specific provider or select All to include all providers. Scheduled? Choose Y to select those recall patients with pre-scheduled appointments. Choose N to select those recall patients without scheduled appointments. Select All to include both. Start Date Select all patients whose next recall date falls on or after this date. End Date Select all patients whose next recall date falls on or before this date. Notification Method Select all patients with this notification method. -
Note: Although you can select more than one item at a time from a table in DAISY+, you cannot do a multi-select in Recall Manager.
-
Tip: To ensure that all patients whose recall is due or past due are included in the preliminary recall list, select all notification methods.
-
Click Apply.
A list of patients (whose next recall falls within the filter settings you selected) is displayed in the search results text box on the left.
The recall list you just generated can be sorted different ways to help you work with the results. You can sort by account number, patient last name, home phone, or next recall date.
-
To sort the recall list, click the appropriate column heading in the recall list.
For example, to sort by Home Phone, click the Home Phone heading.
-
To deselect a patient from the list, double-click on the patient name.
In the asterisk column, the Y changes to an N, indicating that the patient will not be included in the list of those who will receive recall cards.
Review the recall list
The various tabs in the Recall Manager window give you additional information about each of the patients in the recall list. You can use this information to exclude patients who no longer use your services, have an outstanding balance, or for some reason should not receive a recall card.
| Use this tab... | To do this... |
|---|---|
| Patient | View the patient’s demographic information, such as name, phone, current recall type and account number. Also edit this patient’s recall information and the messages you want included on the recall card. |
| More | View the patient’s medical alerts, prescriptions, tags, and reminders. Also add a note about the patient. |
| Account | View the patient’s account status, such as current balance, account options, and insurance information. |
| Preview | View the patients who are selected to receive a recall card and the information that will be included on each card. Also select the card style that will be sent. |
Change a patient’s recall information
► To generate a recall list:
- From the recall list, select a patient.
- Click the Patient tab.
- In the Description section, click .
-
Change the recall information, then click OK.
Note: Changing the recall information here does not affect any appointment information in the Schedule. If you use DAISY+ for appointments, always make these changes in the Schedule. Once made, they will automatically be updated in Recall Manager.
Create the recall card list
After you review the recall list, you are ready to create the recall card list.
► To create a recall card list:
-
From the Recall Manager window, click the Preview tab.

- To empty the preview list, click , then click OK.
- Do one of the following:
- To add a patient to the preview list, click the patient name in the patient list, then click . Repeat this step until all the patients you want to receive a recall card are in the preview list.
- To add all patients from the patient list to the preview list, click .
-
From the Card Style drop-down list, choose a card style.
Note: All patients in the list will receive this card style.
To view the card you’ve selected, as well as other card options, click next to the Card Style drop-down list.
You must be connected to the Internet to view these cards.
-
To print a Recall Card Audit report, from the Reports menu select Print Audit.
DAISY+ recommends that you always print an audit report. This report contains a list of the patients who will receive these cards, along with the messages on each card.
Note: Always run the audit report before you click Send in the Recall Manager window, otherwise this information will not be available in the Recall Card Audit Report.
-
Click Send to generate the cards.
The cards will be sent for processing the next time you transmit to DMC.
Set up an insurance plan
Insurance plans help you track plan benefits, such as deductibles and maximums. Plans are distinguished by a group number and employer name. Benefit information is unique to each plan. If another patient comes in with that same plan, you won't need to reenter plan information when you set up the new patient’s account.
► To set up an insurance plan:
- From the DAISY+ menu, select Insurance, then Ins. Plan.
-
In the Search For – Insurance Plan window, search for the plan.
If you don’t find it, go to step 3 to set up a new plan.
-
Click New Insurance Plan.
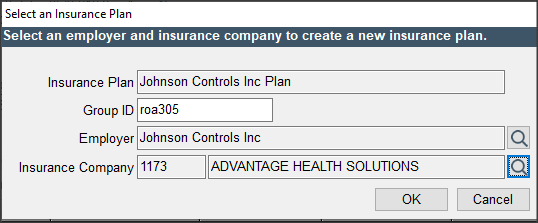
- In the Group ID text box, type in the plan’s group ID number.
- Next to the Employer text box, click and do one of the following:
- Search for and select the employer associated with the plan, then click OK.
- If the employer is new, click New Employer to open the Employer window. Add the employer’s information, click , then close the window.
DAISY+ automatically adds a plan name that is a combination of the employer’s name and the word “Plan” to the Insurance Plan text box.
- Next to the Insurance Company text box, click .
-
Search for and select the insurance company associated with the plan, then click OK.
Note: If the insurance company is not listed, you’ll need to contact DMC to obtain a valid insurance company code.
DAISY+ opens the Insurance Plan window.
- In the Benefits section, under Reset By, choose one:
- Calendar Year to reset benefits at the beginning of the year.
- Benefit Year to reset on a given date.
From this window, you can also edit the insurance plan name, set up plan benefits and coverage for each category of procedures, enter benefit exceptions for specific procedures, track participating providers, and add notes about the plan.
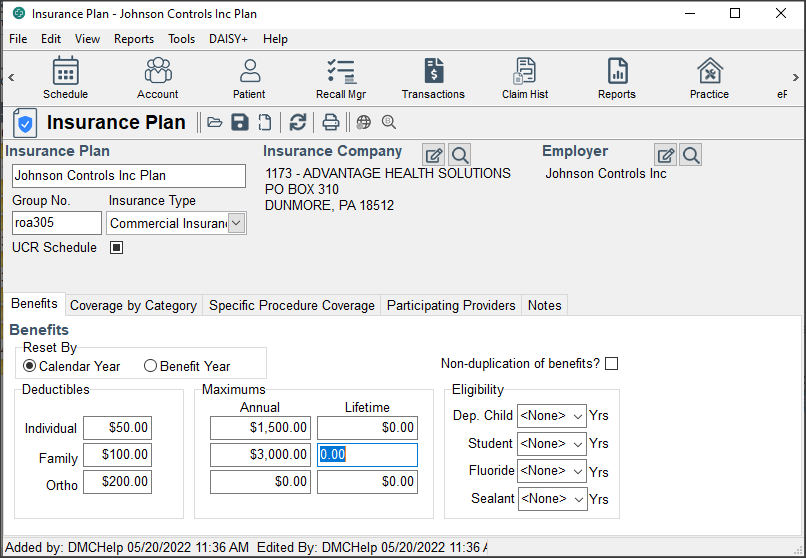
Use this tab... To do this... Benefits Enter the plan information, including deductibles, maximum benefits, and eligibility rules. (Add insurance plan benefits ) Coverage by Category Enter the insurance plan percentages for each category of procedures. Set up insurance plan percentages ) Specific Procedure Coverage Enter benefit exceptions for specific procedures. Participating Providers Enter the names of providers who have signed a participating provider agreement for this plan. Plan Notes Enter free-form notes about the plan.
Add insurance plan benefits
Tip: To prevent duplicate benefit payments, some insurance companies have agreements that define how benefits are applied when secondary insurance is available.
To have DAISY+ consider non-duplication of benefits when it calculates a treatment plan or a Quick Estimate, check the Non-duplication of Benefits check box.
► To add plan benefits:
- From the DAISY+ menu, select Insurance, then Ins. Plan.
- Search for and select the plan you want to view.
- Click the Benefits tab.
- Click each Deductible or Maximum Benefits text box that you want to change and type the information.
- For each Eligibility Rule, type or select the number of years.
- Click , then close the window.
Set up insurance plan percentages
Insurance plan percentages are used to estimate benefits in treatment plans.
► To set up plan percentages:
- From the DAISY+ menu, select Insurance, then Ins. Plan.
-
Search for and select the plan you want to view.
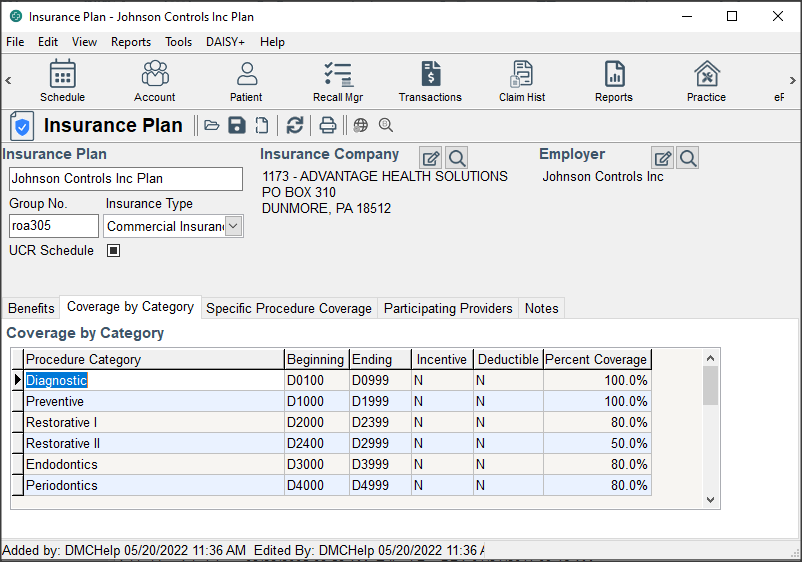
- Click the Coverage By Category tab.
- If the plan provides an incentive or deductible for a procedure, click the appropriate Incentive or Deductible column, then type or select Y from the drop-down list.
- For each procedure category, click the Percent Coverage column and type the percentage of coverage the plan provides.
- Click , then close the window.
Change insurance company information
DAISY+ comes pre-loaded with all insurance companies currently receiving claims from DAISY+. However, sometimes you may need to change the address, phone number, Web site addresses or other company information.
Important: When you change insurance company information in your database, this information does not automatically change at DAISY+. Please notify DAISY+ before you make changes. Contact us at 1-800-368-6401 outside of Portland or (503) 243-3966 locally. Wait for the welcome message and make the appropriate selection.
Note: The insurance company code determines which company will receive the insurance claim. You cannot change this code.
Tip: If an insurance company’s Web sites are added to DAISY+, you can connect to them from the Quick Access toolbar in the Account, Patient, Insurance Coverage, Insurance Plan, Insurance Company and Claim windows.
- Click
 to access the company’s Web site.
 - Click
 to access the company’s benefits information Web site.
► To change insurance company information:
- From the DAISY+ toolbar, click
 .
. - Search for and select the company you want to view.
- Click the Contact Info tab and type the changes.
- Click the Internet Websites tab.
- Optionally, type the company’s main Web site address and benefit information Web site address.
- Click , then close the window.
Change insurance coverage information
When you set up an account, you specify the insurance coverages, if any, for each patient listed on the account. From the Coverage window, you can change patient or subscriber details, add or remove patients from the coverage, or add notes about a coverage.
Note: Removing a patient from the coverage does not remove the patient from the account.
Tip: You cannot remove the last patient associated with a coverage from the Coverage Window. To remove the last patient, delete the coverage from the Coverage window.
Tip: You can also change coverage information from the Account window. Click in the Insurance Coverage section of the window.
► To change coverage information:
- From the DAISY+ menu, select Insurance, then Ins. Coverage.
-
Search for and select the subscriber you want and click OK.
Tip: You can also change coverage information from the Account window. Click in the Insurance Coverage section of the window.
-
Click the appropriate tab, then change the information.
Use this tab... To do this... Patients View and edit patients who have this coverage. You can only change information in the Relationship and Priority columns.
From here you can right-click to:
Add patient to or remove patients from the coverage
Reassign patient coverages
Subscriber Show information about the person who is the employee or member on the insurance plan, and assign or change the Subscriber ID number. Notes Type a note about the plan. - Click , then close the window.
Add an insurance company and code
Sometimes you may not find an insurance company name and code in DAISY+ when you want to add it to an account.
If you can’t find the correct insurance company name and address in DAISY+, then verify that you have the correct insurance information. You may need to call the patient or the insurance company. If the information is correct, then go to the Web site and check DAISY+’s master insurance list.
Important: When you change insurance company information in your database, this information does not automatically change at DAISY+.
Note: The insurance company code determines which company will receive the insurance claim. You cannot change this code.
Before you add a new insurance company name and code to DAISY+, you need to complete the following steps in this order:
- Check for the correct name and code in the insurance list on the DAISY+ Web site.
- If the correct name and address is listed, download the latest version of the DAISY+ insurance table.
-
Install the DAISY+ insurance table.
The new code is included in your insurance company table.
Check for the insurance company name on the DAISY+ Web site
- Check for the correct name and code in the insurance list on the DAISY+ Web site.
- If the correct name and address is listed, download the latest version of the DAISY+ insurance table.
-
Install the DAISY+ insurance table.
The new code is included in your insurance company table.
► To add plan benefits:
► To change coverage information:
- From the DAISY+ menu, select Insurance, then Ins. Plan.
- Search for and select the plan you want to view.
- Click the Benefits tab.
- Click each Deductible or Maximum Benefits text box that you want to change and type the information.
- For each Eligibility Rule, type or select the number of years.
- Click , then close the window.
Access insurance company Web sites
For each insurance company, you can store Web site addresses in DAISY+ for the company’s home page and its eligibility lookup page, if they are available. Then you can access those Web pages from within DAISY+’s Insurance Company window.
► To set up quick access to insurance company Web sites:
- From the main toolbar, click .
- Search for and select the company you want to view.
-
Click the Internet Websites tab.
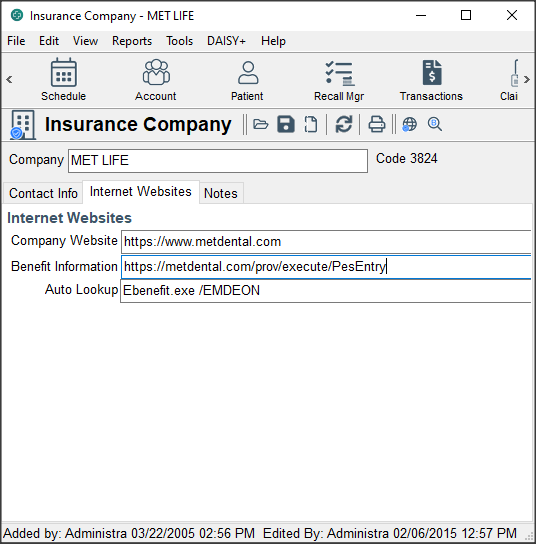
-
In the Company Website text box, type the insurance company’s home page Web address.
For example, for the Met Life dental site, type: https://www.metdental.com.
-
In the Benefit Information text box, type the insurance company’s eligibility lookup address.
For example, for Met Life dental eligibility lookup site, type:
https://www.metdental.com/prov/execute/PesEntry
-
Click , then close the window.
You can access these Web links from the Insurance Company, Account, and Patient windows in DAISY+.
- To access the insurance company’s home page from DAISY+, open one of the appropriate DAISY+ windows and click .
- To access the eligibility lookup page from DAISY+, open one of the appropriate DAISY+ windows and click .
Note: If the
icon is grayed out, then quick access to the insurance company’s home page is not set up. If the icon is grayed out, then quick access to their eligibility lookup page is not set up.
Make online eligibility inquiries
Online eligibility inquiries through Emdeon are available via the Request Benefit Information icon ( ![]() ) on the Quick Access toolbar from the following DAISY+ windows:
) on the Quick Access toolbar from the following DAISY+ windows:
- Account
- Patient
- Schedule
- Appointment Detail
- Treatment Plan
- Insurance Coverage
The Request Benefit Information icon is active only if the company that provides the patient’s insurance coverage participates in Emdeon’s electronic eligibility inquiry program, otherwise the icon is grayed out.
Inquiry requests are sent via the Internet and are processed within approximately six seconds.
Note: The format of eligibility information may be different for each insurance company.
When the first patient on the day’s appointment schedule is checked for benefits, DAISY+ automatically checks all the other patients with appointments scheduled that day who are eligible for online benefit checking. DAISY+ caches the results for seven days. Caching of eligibility information enhances the performance of online inquiries.
The cache is emptied for a specific patient after the seven-day period or if any of the following events occur:
- The subscriber ID for the coverage changes.
- The insurance company on the plan changes.
- The insurance is removed or deleted from the patient record.
- The group number is changed.
- Participating provider information is changed on the plan.
Here is an example of an eligibility inquiry initiated from the Patient window.
► To make an online eligibility inquiry from the Patient window:
- From the DAISY+ toolbar, click .
- Search for and select the patient, then click OK.
-
In the Patient window, click
.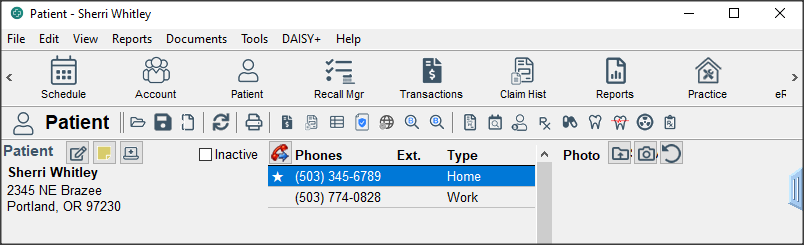
Your default web browser opens and the inquiry begins. You see the results in the browser window.
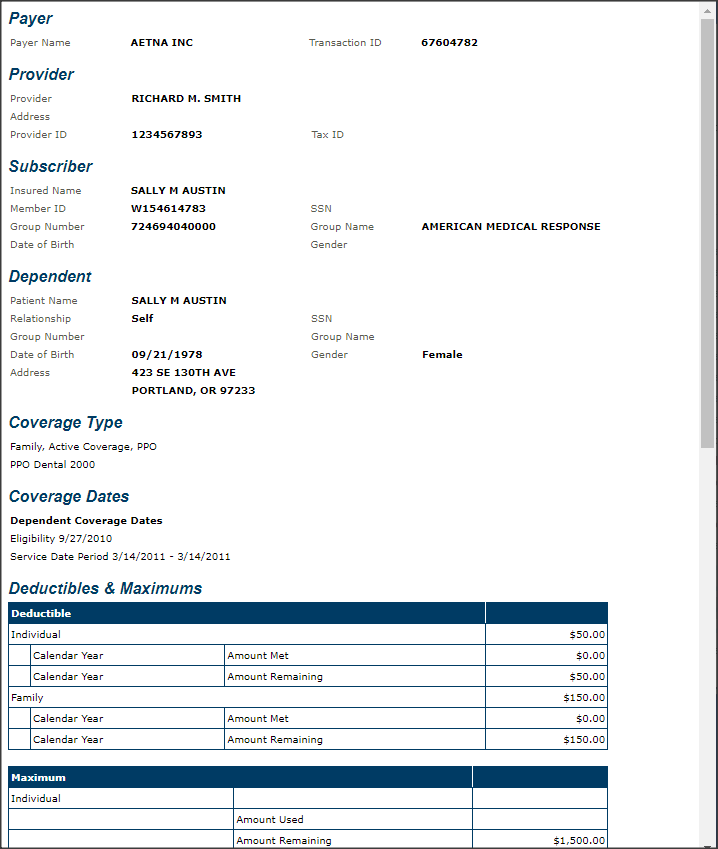
In DAISY+ windows that have multiple patients listed, such as the Account or Insurance Coverage, select the patient to check his or her eligibility.
Here is an example of an eligibility inquiry that is initiated from the Account window. The guarantor is Rhonda Vineyard and the inquiry is for John Vineyard.
► To make an online eligibility inquiry from the Account window:
- From the DAISY+ toolbar, click .
- Search for and select the account, then click OK.
-
In the Account window, select the patient, then click
.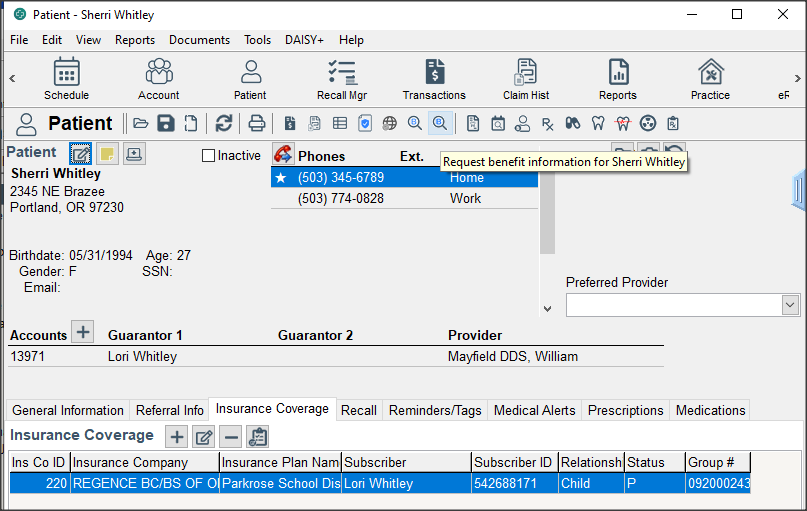
Your default web browser opens and the inquiry begins. You see the results in the browser window.
Note: If you are interested in subscribing to this service, contact DAISY+ Sales at 503.765.3471 or daisysales@dmcdental.com.
Frequently asked questions - Insurance Plans and Benefits
How can I change the way patients are assigned to Insurance Coverage without removing and re-adding the insurance?
- Open the Account, Patient, or Insurance Coverage window.
- From the Edit menu, select Reassign Patient Coverage.
- Make the appropriate changes, then click OK.
- Click and close the window.
Use Statement Manager
Statement Manager enables you to conveniently complete all of your month-end closing preparations in a single DAISY+ window. With Statement Manager, you can:
- Specify which accounts should receive statements
- Track which accounts have been reviewed
- Preview individual account statements for accuracy
Statement Manager selects accounts with a balance less than zero or greater than the minimum balance write-off that have not received a QuickStatement since the last month-end closing. These accounts display in an account list that you can filter, sort, and view in greater detail.
To help you select and review accounts in the list in preparation for month-end closing, you can define schemes for common searches you need to make during month-end closing preparations or use schemes provided by DAISY+. A scheme is a saved selection of search filters.
You can preview the account statement to ensure that the statement messages and estimates are accurate and appropriate. Once you’ve confirmed that an account is accurate and should receive a statement, you can indicate that it has been reviewed so you won’t duplicate effort.
After completing month-end preparations in Statement Manager, you run DAISY+’s monthly closing to generate the statements and then run Data Exchange to send them to DMC for printing and mailing directly to patients. For more information on month-end closing, see "Run Monthly Closing".
► To open Statement Manager:
- Log in to DAISY+.
- From the DAISY+ toolbar, click
 . You see the Statement Manager window.
Note: When the All Accounts scheme is selected, you can still change filter settings, but those changes are only temporary. The All Accounts scheme reverts back to its original settings the next time it is selected.
When you open Statement Manager the first time, the account list defaults to the filter settings in the All Accounts scheme. The All Accounts scheme selects all accounts that can receive a statement (those with a balance less than zero or greater than the minimum balance write-off that have not received a QuickStatement since the last month-end closing).
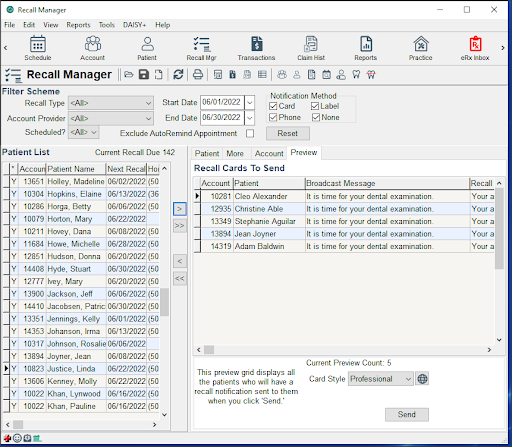
To help you select and review accounts in preparation for month-end closing, define your own schemes for common searches made during month-end closing preparations or use any of these schemes provided by DAISY+:
| Choose this scheme... | To do this... |
|---|---|
| All Accounts | Select all accounts with a balance less than zero or greater than the minimum balance write-off that have not received a QuickStatement since the last month-end closing. |
| Reviewed Accounts | Select only those accounts that have been marked Reviewed. |
| Changed Since Review | Select those accounts that have changed since they were marked Reviewed. |
| Credit Balance Accounts | Select accounts with a balance less than zero. |
| Delinquent Balance Accounts | Select accounts with a balance older than 90 days. |
You can also select specific filters options for one-time use or to set up a custom scheme. For information on setting up custom schemes, see "Set up custom schemes".
| Choose this filter setting... | To do this... |
|---|---|
| Balance | Select accounts based on the specified balance. The default amount is $0.00. |
| Credit Balance | Only select accounts with a credit balance amount. |
| Accounts with Financial Arrangement | Only select accounts with a financial arrangement. |
| Accounts that have (or do not have) claims | Select accounts with (or without) outstanding claims based on treatment performed within a specified number of days. |
| Accounts that have (or do not have) insurance (or personal) payments | Select accounts with (or without) insurance (or personal) payments within a specified number of days. |
| Account Provider | Select accounts that belong to a specific account provider. The default setting is |
| Accounts with a Balance | Select accounts with an aged balance over a specified number of days (30, 60, 90, and 120). The default setting is |
| Statements | Select accounts that are set (or not set) to receive month-end statements or QuickStatements. |
| Insurance | Select accounts with (or without) insurance coverage. The default setting is |
| Review | Select accounts that are (or are not) marked as Reviewed. The default setting is |
| Est on Stmt | Select accounts that have (or do not have) estimated patient and insurance portions due printed on their statements. The default setting is |
Generate an account list
► To generate an account list:
- Open Statement Manager.
- Do one of the following:
- From the Scheme Name drop-down list, select the appropriate scheme.
- In the Filter Scheme section, select one or more statement options for groups of accounts, then click Apply.
The results are displayed in the account list section of the window. This list can be sorted different ways to help you work with the results. For example, you can click on the Account column heading to sort alphabetically by guarantor name, or click on the Balance column heading to sort by the account balance instead.
Note: Each selected filter item restricts the search to fewer accounts.
Set up custom schemes
To use the same filtering methods every month, save your filter settings in a scheme and assign it a unique name. For example, you may want to set up schemes that identify accounts with credit balances, outstanding insurance payments, or debit balances that are flagged not to receive a statement.
► To create a scheme:
- Open Statement Manager.
- From the Scheme Name drop-down list, select
. -
Type the name of the scheme.
Note: The scheme name cannot be edited. To reuse a scheme name, you must delete the existing scheme (with all its filter settings) and create a new one.
- Select the filters for the scheme.
-
Click Save, then click Yes to confirm.
The new scheme automatically generates an account list that reflects its filter settings.
View account details
The right side of the Statement Manager window displays details for an individual account, such as the account guarantor, the current financial status, and any insurance associated with the account.
Use the Options section to specify whether a statement gets generated and when, what messages get attached and other items that affect statement output.
| Choose this option... | To do this... |
|---|---|
| Send Statement | Send a monthly statement to the account’s guarantor. |
| Finance Charges | Incur fees on the account’s outstanding balances when monthly closing runs. |
| Collection Messages | Add collection messages to the account statement. |
| Ortho Account | Add an Ortho tab to the Account window. This indicates the account is reserved for patients who receive orthodontic treatment. |
| Request QuickStatement | Generates a QuickStatement during daily closing. |
► To view account details:
- Open Statement Manager.
- Do one of the following:
- From the Scheme Name drop-down list, select the appropriate scheme.
- In the Filter Scheme section, select one or more statement options for groups of accounts, then click Apply.
-
In the Account List section, select the account whose details you want to view.
The right side of the Statement Manager window displays details for an individual account. In the following example, Christina Babcock’s account is selected. Her account details are displayed on the right side of the window.
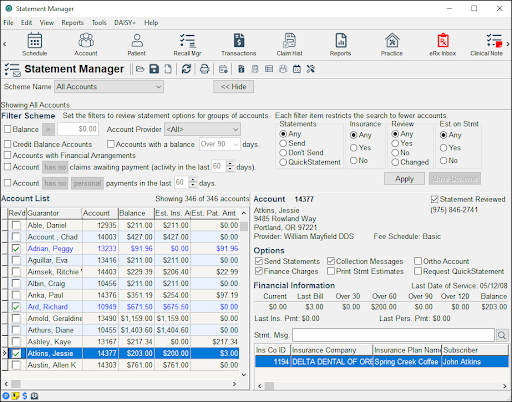
Once you’ve confirmed that an account is accurate and should receive a statement, you can mark it as reviewed. The account remains flagged until:
- DAISY+ generates a statement for the account
- End-of-month closing completes
Note: You can also flag accounts as reviewed from the Transactions and the Account windows. Marking an account Reviewed creates an entry in Account Notes that lists the date and user who made the selection.
- In the Account List section, under the Rev’d column, check the check box next to the reviewed account.
Tip: You can change the positions of account details in the Statement Manager window.
From the View menu, select one of the following:
Align Right Account Info to display account details on the right side of the window
Align Bottom Account Info to display account details at the bottom of the window
Hide Account Info to hide account details altogether
Answer “Ask A Dentist” questions
Document Manager enables you to store and manage electronic copies of documents associated with your practice—safely and securely.
You can use Document Manager to:
- Reduce the amount of paper documents you must store. Document Manager helps you decrease the costs associated with filing and storing paper documents.
- Enhance office efficiency. Your staff can access documents from any computer, and multiple people can look at the same document even if they are in different offices or cities. Plus, a tidy office and efficient staff make your practice more attractive to patients.
- Store a variety of file formats, including Word, Excel, and PowerPoint files, as well as PDF, HTML, WAV or MP3. Print documents can be scanned into DAISY+. Documents can be attached to patients, providers, accounts, or the practice. Documents received in advance of a patient, for example, can be stored ahead of time and attached later.
- Ensure that confidential information is protected and reviewed appropriately. You can capture and use digital signatures to verify the integrity of documents. Ensure that only authorized staff can access the appropriate documents. You can also flag documents for attention during the review process or tag them as a clinical note.
How It Works
With Document Manager, documents can be attached to patients, providers, accounts, or the practice. Documents can be attached in any of the following ways:
- Import a file into DAISY+
- Scan a printed document
- Archive a DAISY+ report
- Scan a printed Archive a mail merge
Documents added from the Patient window, for example, are attached to the selected patient. Once a document is attached to the patient, it can be accessed from any window that is patient-related, such as the Chart, Perio Exam, Patient and Appointment windows.
However, documents attached to a patient are not, for example, accessible from the patient’s Account window. To access the document from the Account window, you must attach another copy to the patient’s account.
Documents can be added to the DAISY+ archive either from the Document panel on many DAISY+ windows, or from the Document Manager window.
Note: For more information about the Document panel, see "About the Document Panel". For more information about the Document Manager window, see "Manage archived documents".
Documents are stored in the DAISY+ document archive. Because this archive is part of your DAISY+ system, documents stored there are automatically backed up along with your DAISY+ database.
About the Document Panel
The Document Panel lists all documents associated with a window.
To view attached documents, you click on the blue “handle” on the right side of the window.
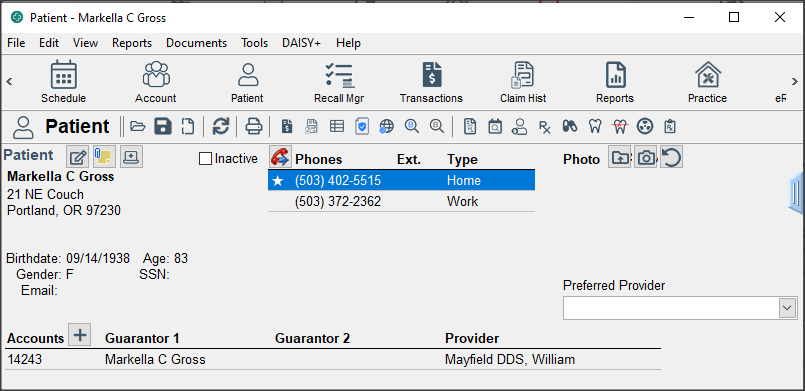
Note: Only windows that support attachments display a handle, even when no documents are currently attached.
For example, click the handle in the Patient window to open the Document panel and view the documents attached to the selected patient, such as a consent form, patient registration form, health history form, or treatment plan.
Documents in the Document panel can be sorted into folders either by Document Type or Document Date.
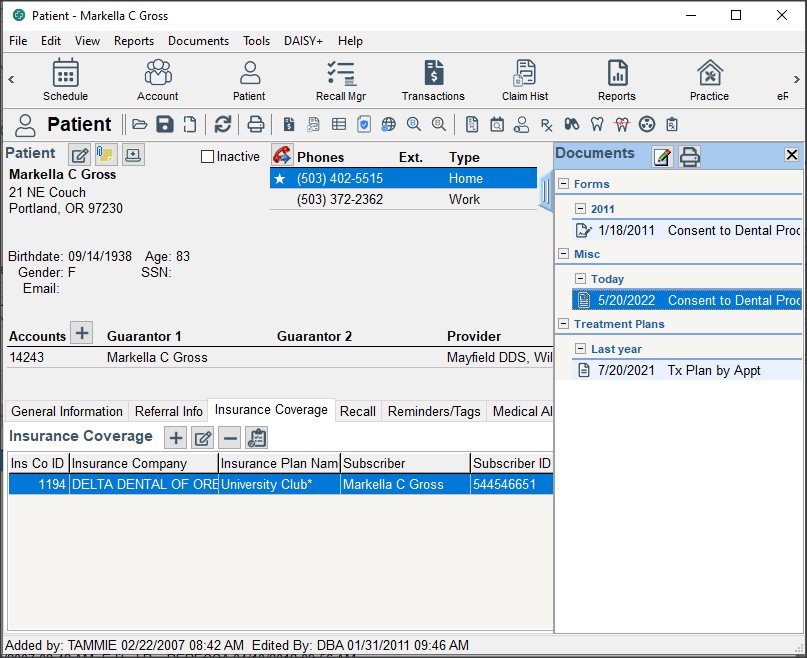
To view all of the documents stored in the DAISY+ document archive, open the Document Manager window and search for the document you want. For more information about the Document Manager window, see "Manage archived documents".
Import a document file into the DAISY+ archive
Use the Import File option to attach a file to patients, providers, accounts, or the practice. You can import:
- Documents including PDF or Word files
- Email messages saved as a file
- Images, including JPG, PNG, or TIF formats
- Spreadsheets
- PowerPoint presentations
- Audio files such as WAV or MP3
- HTML files
- Executables files, including those with .com, .exe, or .bat extensions, cannot be imported into DAISY+.
Note: Files larger than 200 MB cannot be imported. When you import files larger than 10 MB, you will receive the warning “This file is larger than 10 MB. Performance may be slow when archiving large files.”
In this example, the receptionist is attaching a referral notice to the patient’s record that arrived via email. She’s saved the referral notice to a folder.
► To import a document file into the DAISY+ document archive:
- From the DAISY+ toolbar, click and search for the appropriate patient.
- Click the “handle” on the right-side of the Patient window to open the Document panel.
-
Right-click in the Document panel and select Import File.
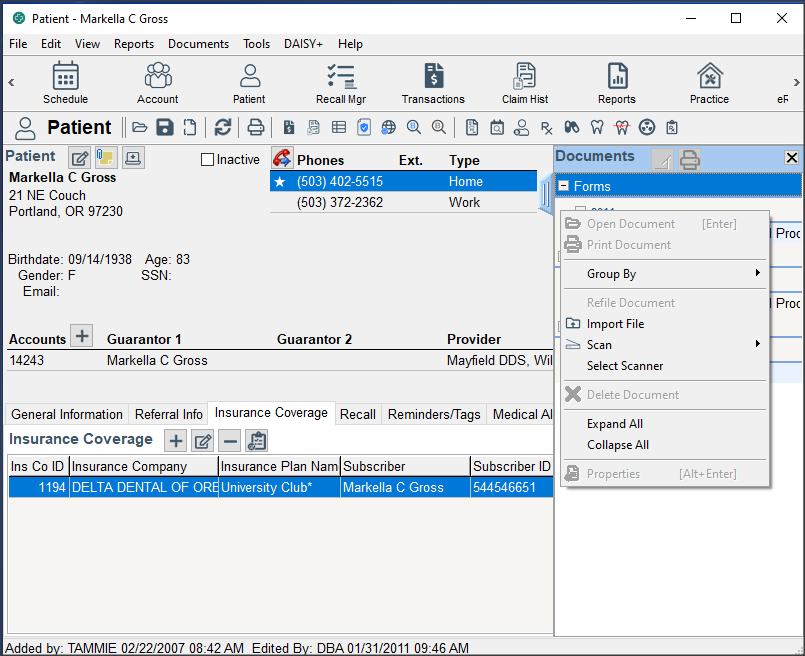
- Navigate to the folder that contains the file to import.
-
Double-click on the file.
The Document Properties dialog box opens.
-
In the Description text box, type a description of the document.
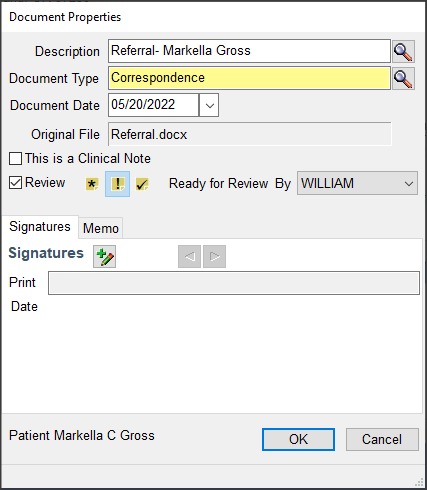
- Next to the Document Type text box, click to open the Search – Document Type dialog box.
-
Select the Document Type.
For example, if the document is a referral letter, select Correspondence.
Note: For more information about Document Types, see "Manage document types".
-
If the document is a clinical note, then check the Clinical Note check box.
For example, a letter from a specialist that you want to become part of the patient’s clinical record. If the document needs to be reviewed, do the following:
-
Check the Review check box.
-
In the Status section to the right of the Review check box, click the appropriate status button.
This status button… Does this… In Progress
Indicates that the document is incomplete. The document is usually assigned to the person who has archived it. Ready for Review
Indicates that the document is ready for review. This is the default setting. You can pick who will be the reviewer in the Ready for Review drop-down list. This list includes all users, even those who are not authorized to review documents.
If an unauthorized person tries to review it, they see a dialog window that says, “A valid reviewer and password is required to save Reviewed items.”
Reviewed
Indicates that an authorized user reviewed the document and “signed off” on it. - From the Ready for Review drop-down list, select the reviewer.
Note: Documents can also be assigned for review later on from either the Document panel or the Document Manager window. To assign a document for review, right-click on the document in the Documents list and select Properties. Check the Review checkbox, select the Review Status, then click OK.
-
-
To add a non-clinical note about the document, click the Memo tab, and type a message in the Memo text box.
Note: The memo does not show up when you print document.
- Click OK to close the Document Properties dialog box.
-
You see the Info dialog box confirming that the file was successfully archived and attached to the patient.
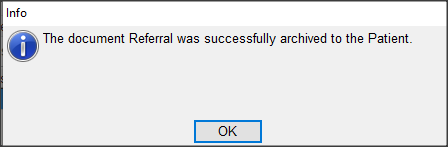
-
Click OK to close the Info dialog box. The attached document is now listed in the Document panel.
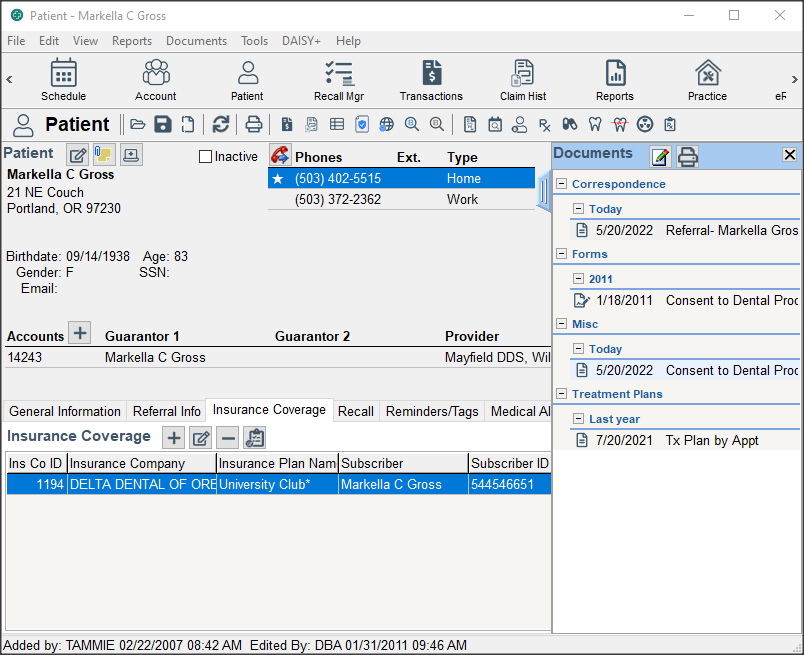
Scan a document into DAISY+
Use the Scan option to scan black and white or color documents, including print documents and photos, directly into the DAISY+ document archive.
Note: Any TWAIN-compliant scanner should be 100% compatible. Contact DAISY+ customer support for specific recommendations.
In this example, the office manager is scanning in a new patient form to attach to the patient’s record. This office uses the Visioneer Strobe XP 300 scanner.
► To scan a print document into DAISY+:
- From the DAISY+ toolbar, click and search for the appropriate patient.
- Click the “handle” on the right-side of the Patient window to open the Document panel.
-
Right-click in the Document panel and select Scan, then select the item type.
For example, select Document.
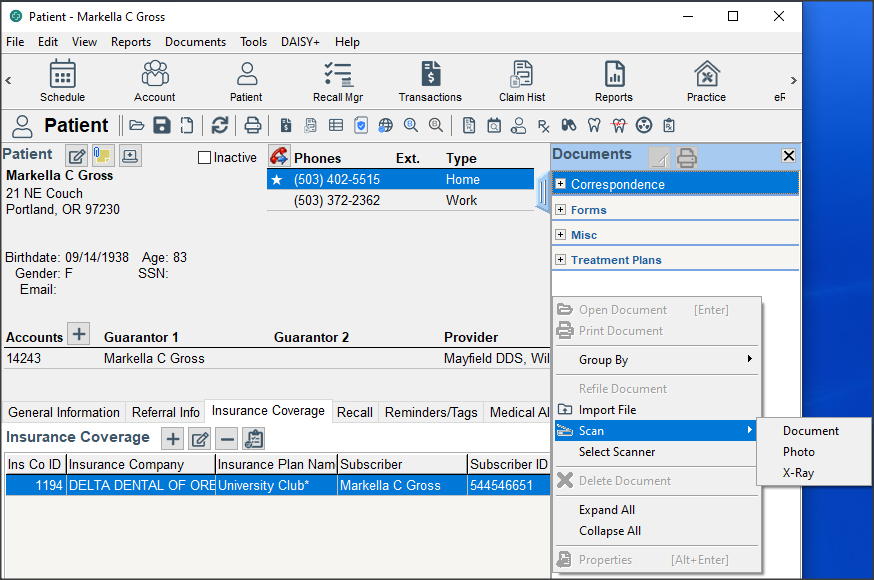
-
Insert the document into the scanner, then click Scan.
- When scanning is complete, click Done.
-
In the Scan Document window, preview the scanned document, then close the window.
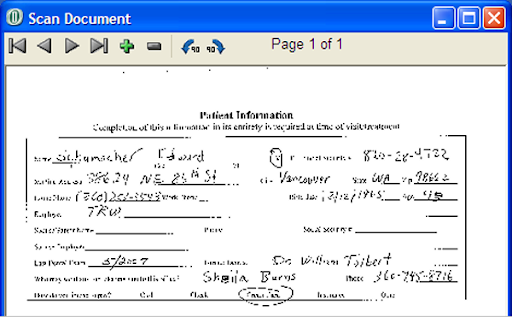
The Document Properties dialog box opens.
-
In the Description text box, type a description of the document.
For example, type New Patient Form.
- Next to the Document Type text box, click to open the Search – Document Type dialog box.
-
Select the Document Type, then click OK.
You see the Info dialog box confirming that the scanned document was successfully archived and attached to the patient.
-
Click OK to close the Info dialog box.
The scanned document is now listed in the Document panel.
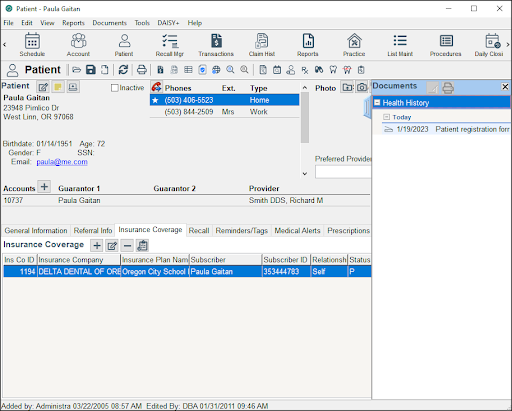
Archive a DAISY+ report
With Document Manager, you can archive a copy of any DAISY+ report. For example, you can use this feature to store a signed copy of a treatment plan, or to archive daily and monthly closing reports.
In this example, Dr. Jones wants to archive an Activity Analysis report for future reference. He will attach this document to the practice.
► To archive a DAISY+ report from the Report Gallery:
-
From the DAISY+ toolbar, click .
Note: Reports generated from the Report menu in any DAISY+ window can also be archived. For more information, see "Capture an electronic signature and archive the signed document".
- Navigate to the appropriate reports folder, then double-click the report you want to run.
-
At the top of the Report Viewer window, click
 .
.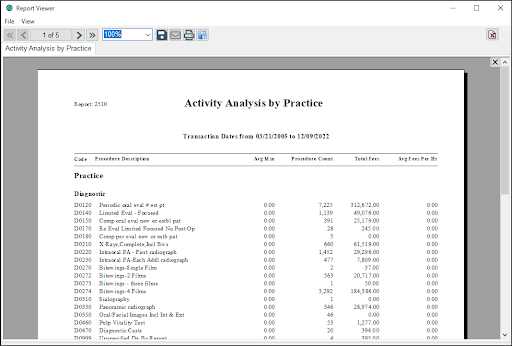
-
In the Select Link Type dialog box, choose where to attach the report, then click OK.
In this example, Dr. Jones wants to attach the report to the practice.
Note: Use the Unfiled option to link the archived document later from the Document Manager window. For example, if your office receives a referral letter before the new patient arrives, archive it now and link it to the patient once the new patient’s record is created in DAISY+.
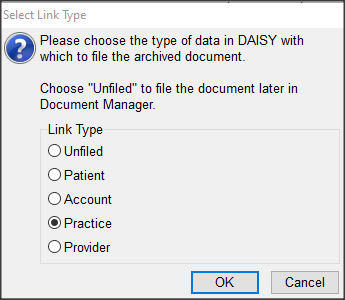
The Document Properties dialog box opens.
- In the Description text box, type a description of the document.
- Next to the Document Type text box, click to open the Search – Document Type dialog box.
- Select the Document Type, then click OK.
-
Click OK to close the Document Properties dialog box.
You see the Info dialog box confirming that the file was successfully attached to the practice.
- Click OK to close the Info dialog box.
-
Close the Report Viewer window.
The archived report can now be accessed from the Practice window.
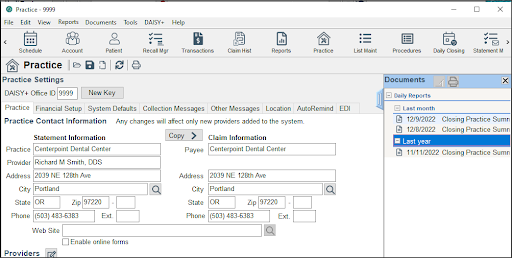
Archive a Mail Merge document
DAISY+ Mail Merge enables you to merge patient information into a Microsoft Word document. With Document Manager, you can store copies of correspondence created with Mail Merge in the DAISY+ document archive.
In this example, the office manager is going to send a collection letter to Luke Kuhn and wants to keep a copy of the letter in Luke’s account.
► To archive a document created with Mail Merge:
- From the DAISY+ toolbar, click .
- Search for the appropriate account, then click OK.
-
From the Reports menu, select Merge Docs, then select the appropriate Mail Merge template.
For example, select Collect Letter 1.
-
In the Print Options window, click Preview.

The document opens in Microsoft Word.
- Review and print the document from Word.
-
Do one of the following:
- If using Microsoft Word 2003, click
 in the menu bar.
 - If using Microsoft Word 2007, click the Add-Ins tab, then click DAISY+ Archive.
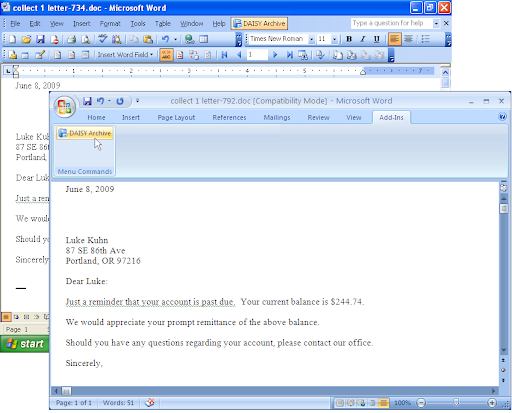
The Document Properties dialog box opens.
- If using Microsoft Word 2003, click
- In the Description text box, type a description of the document.
- Next to the Document Type text box, click to open the Search – Document Type dialog box.
- Select the Document Type, then click OK.
-
Click OK to close the Document Properties dialog box.
You see the Info dialog box confirming that the file was successfully archived to the account.
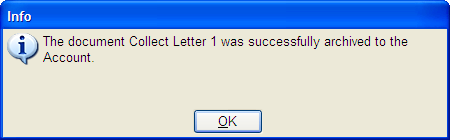
- Click OK to close the Info dialog box.
Print a document to the DAISY+ Document Archive
DAISY+ installs a special printer on your computer called “DAISY+ Document Archive”. Anything you print to this printer is automatically stored in the DAISY+ document archive. For example, you can print web pages, screen shots, e-mails, and non-merge documents to this printer and have them attached to a patient, account, provider, or practice.
This printer can be selected from the Print dialog box in any Windows application, including Word, Excel, and Internet Explorer.
In this example, the receptionist wants to archive a Word document to the practice.
► To print a Word document to the DAISY+ Document Archive:
- Open the Microsoft Word document.
- From the Office Button, select Print, then Print.
-
In the Name drop-down list, select DAISY+ Document Archive.
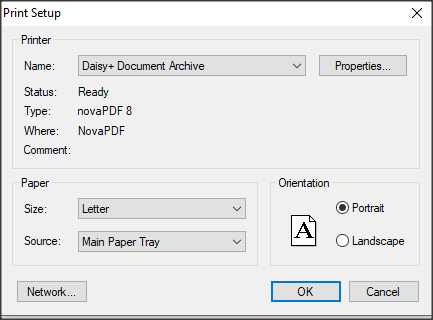
- Click OK.
-
In the Select Link Type dialog box, choose where to attach the document, then click OK.
For example, select Practice.

The Document Properties dialog box opens.
- In the Description text box, type a description of the document.
- Next to the Document Type text box, click to open the Search – Document Type dialog box.
- Select the Document Type, then click OK.
-
Click OK to close the Document Properties dialog box.
You see the Info dialog box confirming that the file was successfully attached to the practice.
- Click OK to close the Info dialog box.
- Close Microsoft Word.
Manage archived documents
Use the Document Manager window to manage all of the documents stored in the DAISY+ document archive.
In the Document Manager window, you can:
- Search for and view a specific document or list of documents stored in the archive.
- Refile a document if it is attached to the wrong patient, account, provider, or practice.
- Attach an Unfiled document to the appropriate patient, account, provider, or practice.
- Review archived documents in a single location.
- Delete archived documents.
You can also add documents to the DAISY+ document archive from the Document Manager window.
View a list of archived documents
► To view a list of documents:
-
From the DAISY+ menu, select Document Mgr.
Note: For easier access, add the Document Manager icon
to the DAISY+ toolbar.You see the Document Manager window.

-
Under Filter Scheme, select one or more options to filter the Documents list:
Use this filter… To do this… Link Type Search for and select the type of information to which the document is attached, such as Patient, Account, Practice, or Provider. Or select
to view documents attached to any type. If the document is not attached to any type of information, then select Unfiled.
Link Name Search for and select the name of the patient, account, practice, or provider that the document is attached to. For example, if the document is attached to a patient, select the patient’s name.
This filter is only activated if a specific Link Type is selected.
Review Status Select documents with a specific review status, such as Ready for Review. Or select to view documents with any status: In Progress, Ready for Review, and Reviewed. Ortho Account Add an Ortho tab to the Account window. This indicates the account is reserved for patients who receive orthodontic treatment. Reviewer Select the user who has been assigned the responsibility for reviewing the document. Or select to view documents assigned to any user. Date Filter Select the type of date:
Document Date: the date of the document itself.
Add Date: the date when the document was added to the system.
Review Date: the date when the document was reviewed and electronically signed off.
From Earliest date of documents to include in the list. To Latest date of documents to include in the list. Document Type Select the type of document, such as Correspondence, Forms, or Treatment Plans. Or select to view any type of document. Description Type the description of the document.
This description was entered in the Description text box in the Document Properties dialog box. For more information, see page "Import a document file into the DAISY+ archive".
-
To view a document, double-click the document in the Documents list.
The document opens in the appropriate application. For example, a Word document opens in Microsoft Word.
Attach an “Unfiled” document
If you want to archive a document before you know where to attach it, you can save it as an Unfiled document. For example, your office receives a referral letter before the new patient arrives, so you archive it ahead of time, and then link it to the patient once the new patient’s record is created in DAISY+.
In this example, the receptionist is attaching a referral letter to the new patient’s record from the Document Manager window.
► To attach an unfiled document:
-
From the DAISY+ menu, select Document Mgr.
You see the Document Manager window.
Note: For easier access, add the Document Manager icon
to the DAISY+ toolbar. -
From the Link Type drop-down list, select Unfiled.
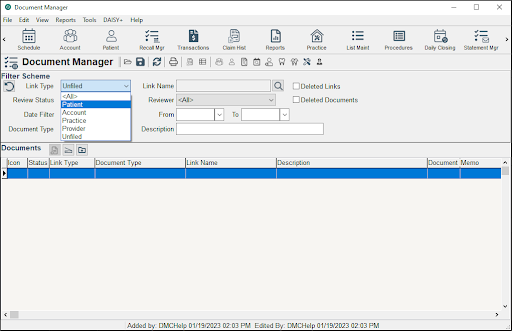
- In the Documents list, right-click on the document and select File Document.
-
In the Select Link Type dialog box, choose where to attach the document, then click OK.
- Search for and select the correct patient.
-
In the Confirm dialog box, click Yes.
The document is now attached to the patient.
Refile an archived document
If you accidentally attach a document to the wrong patient, account, provider, or practice, it can be refiled. In this example, the receptionist is refiling a New Patient Information form that was attached to the wrong patient.
► To refile an archived document:
-
From the DAISY+ menu, select Document Mgr. Note: For easier access, add the Document Manager icon
to the DAISY toolbar.You see the Document Manager window.
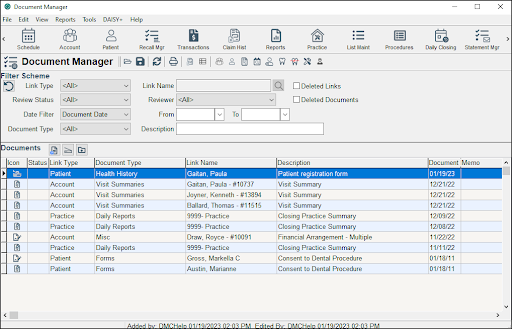
- In the Documents list, right-click on the document and select Refile Document.
-
In the Select Link Type dialog box, choose where to attach the document, then click OK.
- Search for and select the correct patient.
-
In the Confirm dialog box, click Yes.
The document is now attached to the correct patient.
Review archived documents
Documents can optionally be assigned for review when they are archived, or they can be reviewed later from either the Document panel or the Document Manager window.
► To review all archived documents that are ready for review:
-
From the DAISY+ menu, select Document Mgr.
Note: For easier access, add the Document Manager icon
to the DAISY+ toolbar.You see the Document Manager window.
-
From the Review Status drop-down list, select Ready for Review.
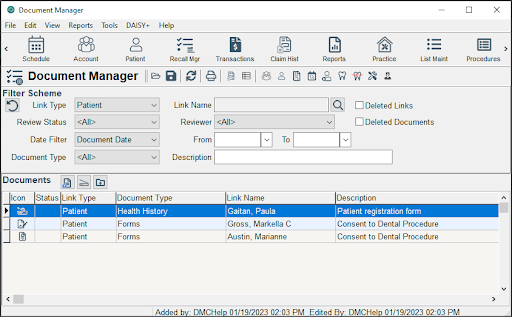
- To view a document, double-click the document in the Documents list, then close the document.
-
To mark the document as reviewed, in the Status section, click
.Document Manager moves to the next document in the list.
Note: To change the document to a different status, click the appropriate status button. For example, if you determine that the document is incomplete, you can set the status back to “In Progress”. However, to change who the document is assigned to, you need to open the Document Properties window.
- For each document, repeat steps 3 through 4.
-
When you are done reviewing all documents, click .
You see the Verify Review dialog window.
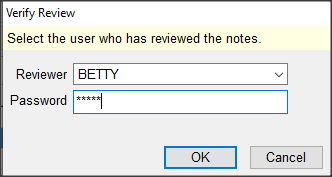
- From the Reviewer drop-down list, select your user name.
-
In the Password text box, type your password, then click OK.
The reviewed documents are saved and electronically signed off with your user name.
Note: If you are not authorized to sign off on documents or to change the status from Ready for Review to In Progress, then when you save the documents, you will see a dialog window that says “A valid reviewer and password is required to save Reviewed items.” For information about how to obtain authorization to make these status changes to documents, see "Set up access permissions for Document Manager".
View and modify document properties
You can view and modify the document properties of a document from the Document Manager window. For example, you can:
- View the e-signature of a document.
-
Add an e-signature to a document.
Note: E-signatures cannot be deleted from an archived document.
- Mark the document for review.
- Change the document’s review status.
Note: Documents can also be modified from the Document Panel. Open the appropriate window, then right-click on the document in the Documents list and select Properties. For more information about the Document Panel, see "About the Document Panel".
► To view or change the properties of a document:
-
From the DAISY+ menu, select Document Mgr.
Note: For easier access, add the Document Manager icon
to the DAISY+ toolbar.You see the Document Manager window.
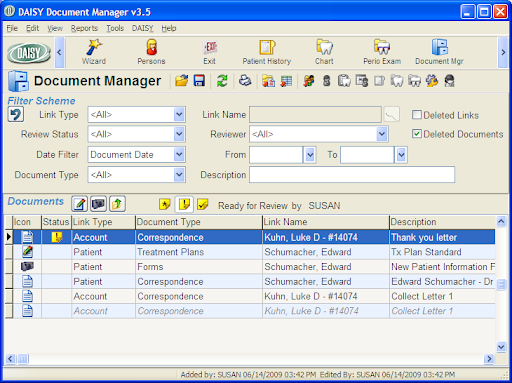
- Search for and select the appropriate document.
-
In the Documents list, right-click the document and select Properties.
The Document Properties window opens.
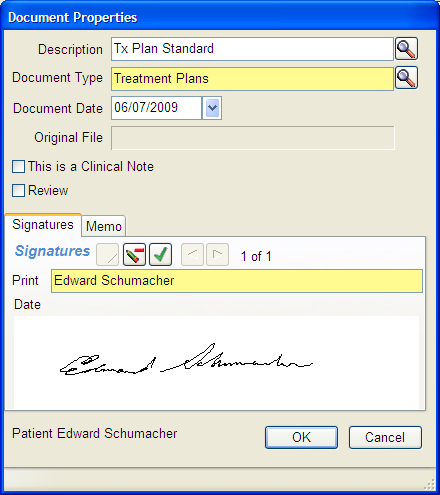
- Make the appropriate changes, then click OK.
Add a document to the archive
Documents can be added to the DAISY+ document archive directly from the Document Manager window.
► To add a document to the archive:
-
From the DAISY+ menu, select Document Mgr.
Note: For easier access, add the Document Manager icon
to the DAISY+ toolbar.You see the Document Manager window.
-
From the Tools menu:
- Select Import File to import a document file. For more information on importing a document file, see "Import a document file into the DAISY+ archive".
- Select Scan, then select the item type to scan in a document. For more information on scanning a document into the archive, see "Scan a document into DAISY+".
Delete an archived document
► To delete an archived document:
-
From the DAISY+ menu, select Document Mgr.
Note: For easier access, add the Document Manager icon
to the DAISY+ toolbar.You see the Document Manager window.
- In the Documents list, right-click on the document and select Delete.
-
In the Confirm Delete dialog box, type a reason for deleting the document, then click OK.
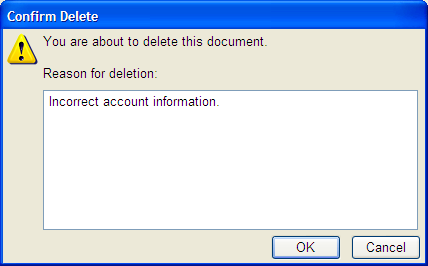
- To view information about the deleted document, including who deleted it:
- In the Document Manager window, check the Deleted Documents check box to display deleted documents.
- In the Documents list, right-click on the document and select Properties.
-
In the Document Properties dialog box, click the Delete Information tab.
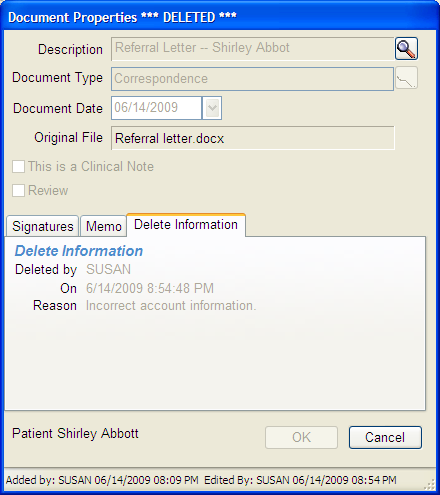
-
Click Cancel to close the dialog box.
Note: Deleted documents display in gray text in the Document Manager window. For more information, see "View a list of archived documents".
Print a prescription (without e-prescribing enabled)
Prescriptions print with the address of the provider’s service location.
- Service location addresses are pulled from the Location tab in the Practice Settings window under the Location tab (DAISY+ > Configure > Practice Config).
- New prescriptions use the provider’s default service location, which is specified in the Provider window (DAISY+ > Configure > Providers). You can also select a different service location.
Prescriptions can be printed from the Patient, Chart, Perio Exam, and Patient History windows. The following procedure illustrates how you can print a prescription from the Patient window, and include the address of the provider’s service location.
► To print a prescription from the Patient window:
- From the DAISY+ toolbar, click .
- Search for and select the patient, then click OK.
- Click the Prescriptions tab.
- Click
 to add a prescription.
 - Search for and select the prescription ID.
-
In the Service Location drop-down list, select the service location.
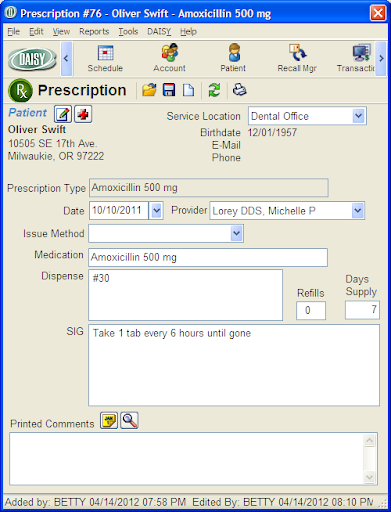
- If your office does not subscribe to DAISY+ eRx or does not have e-prescribing enabled, leave the Issue Method blank to automatically default to Print when you print a prescription.
- Add or modify other prescription information.
- Click
 to save the prescription.
 - From the Reports menu, select Prescription. The prescription prints with the selected service location.
After you print the prescription, you see Print in the Issue Method drop-down list and the Prescription window becomes read-only.
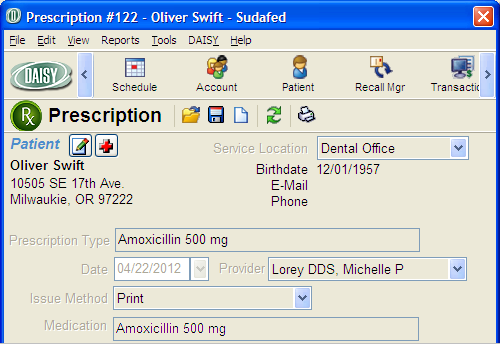
Electronic Prescribing
DAISY+ eRx enables dental offices to issue electronic prescriptions through Clinician, a service managed by Emdeon. This feature enables you to access patients’ existing drug prescriptions covered by insurance and order new prescriptions electronically. DAISY+ eRx also offers improved prescription security and auditing, and real-time eligibility checking.
With DAISY+ eRx, you can:
- Write and send e-prescriptions directly to the patient’s pharmacy.
- Track a patient’s current medications and prescriptions.
- Determine which medications are covered by your patient’s insurance before you write the prescription.
- Download a patient’s prescription history (if available) from Clinician into DAISY+.
- View a patient’s allergies, existing prescriptions, and potential drug interactions, before you prescribe a particular drug.
- Ensure that only authorized providers can issue a prescription.
- Write a prescription anytime or anywhere from your mobile device (smart phone or tablet) using the DAISY+ Mobile service.
- Authorize refills electronically requested by the pharmacy.
How DAISY+ eRx Works
The DAISY+ e-Prescribing window gives you direct access to Clinician, where you can issue and manage e-prescriptions, instantly access drug formularies and drug information, and review and download patient medication history (if available) into DAISY+.
With DAISY+ eRx, you can:
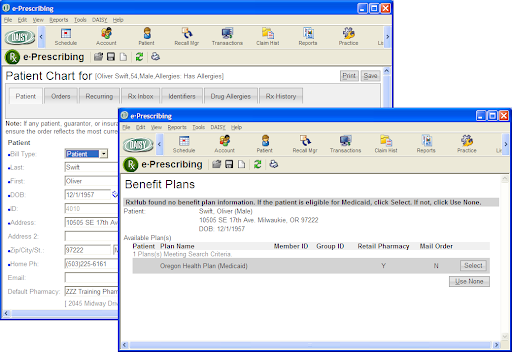
When e-prescribing is enabled, patient prescription information moves from Clinician to DAISY+ securely and automatically.
You can connect directly from DAISY+ to specific windows in Clinician. For example:
- To create a prescription from the Prescriptions tab in the Patient window, click .
- To connect to the Patient Chart window in Clinician from the Patient window, click
 in the Quick Access toolbar.
About the Prescriptions tab
The Prescriptions tab in the Patient window displays the patient’s current and past prescriptions.
- In the Rx Type column:
- eRx indicates an e-prescription issued through Clinician.
- Rx indicates a prescription issued directly in DAISY+.
When you view prescriptions that originated in DAISY+ (Rx), they automatically open in the DAISY+ Prescription window. When you view prescriptions that originated in Clinician (eRx), they automatically open in the Rx History Details window in Clinician. For more information on the Rx History Details window, see "Manage prescription history".
Note: If e-Prescribing is not enabled, then prescriptions with an Rx type of eRx open in the DAISY+ prescription window for viewing only.
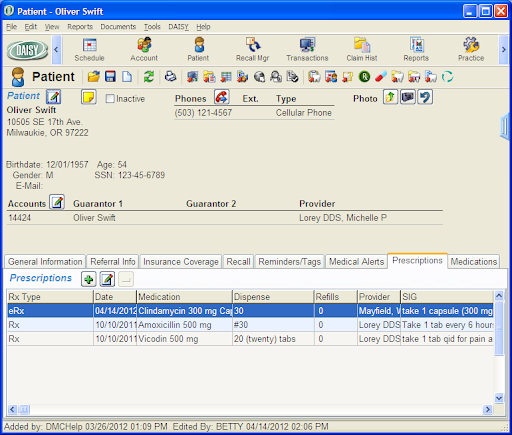
- The Dispense column shows the amount of medication dispensed, such as the number of pills or the amount of liquid.
-
The Status column shows the current status of an e-prescription.
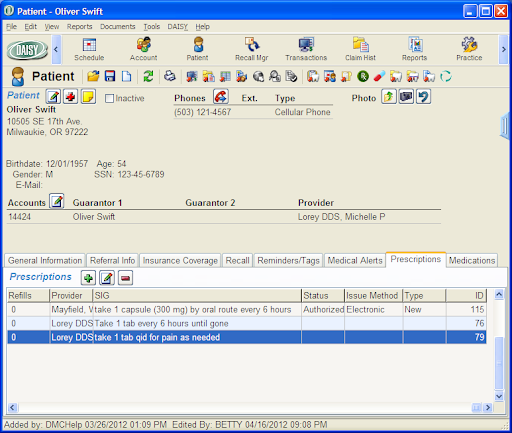
This prescription status… Indicates that… Active The patient is currently taking the prescription. Authorized The provider approved the prescription Discontinued The patient discontinued taking the prescription during the course of treatment. Lapsed The days supply specified for the prescription has been reached, such as 30-days supply. Pending The prescription was placed on hold in Clinician. Void The prescription was voided prior to being filled by the pharmacy. -
The Issue Method column shows the method used to issue the prescription or that the prescription was reported by the patient.
This issue method… Indicates… Electronic The prescription was issued as an e-prescription and sent directly to the patient’s pharmacy. Electronic/Print The prescription was issued as an e-prescription and printed in the dental office. Hand Written The prescription was written on a prescription pad and given to the patient. Print The prescription was printed in the dental office and given to the patient to take to the pharmacy. Reported Self-reported medication that the patient is currently taking. Sample A medication was given to the patient in the office. Telephone The provider phoned in or faxed a prescription to the pharmacy. - The Type column shows whether the prescription is new or a refill.
About the Medications tab
The Medications tab in the Patient window displays the patient’s current medications. If e-prescribing is enabled, then current medications download into this tab automatically from Clinician.
If a days supply has been specified for the medication and the supply has lapsed, DAISY+ automatically removes the medication from this tab.
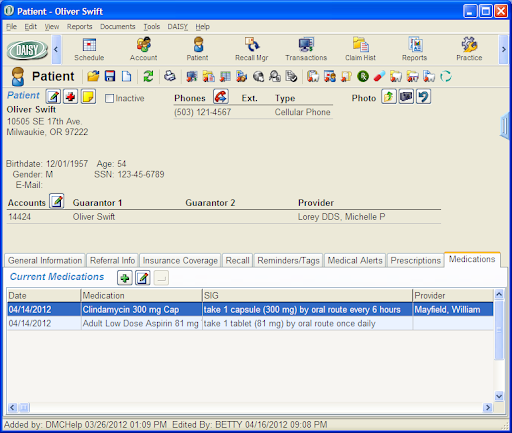
About the Patient History window
The Patient History window differentiates between medications and prescriptions.
- Issued prescriptions have an entry type of RX.
-
Reported medications have an entry type of MEDS.
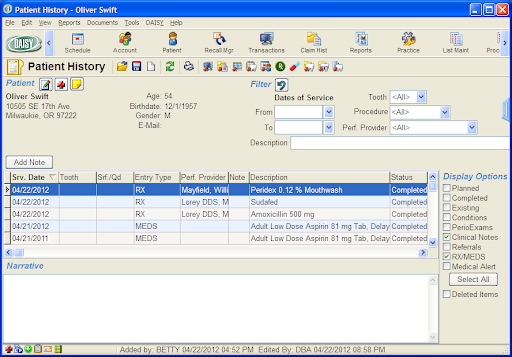
Connect to DAISY+ eRx
To get started, connect to DAISY+ eRx from the Patient window.
► To connect to DAISY+ eRx:
- From the DAISY+ toolbar, click .
- Search for and select the patient, then click OK.
-
In the Patient window, click the Prescriptions tab.

You see the patient’s prescriptions. This tab contains all of the prescriptions that have been issued to this patient, including current and past prescriptions.
Note: To view current prescriptions, click the Medications tab.
-
In the Quick Access toolbar, click
 .
.The e-Prescribing window opens. The first time you connect to DAISY+ eRx, you are required to install two e-prescription modules on each workstation.
-
Click Install to install the first MeadCo’s Scriptx software module.
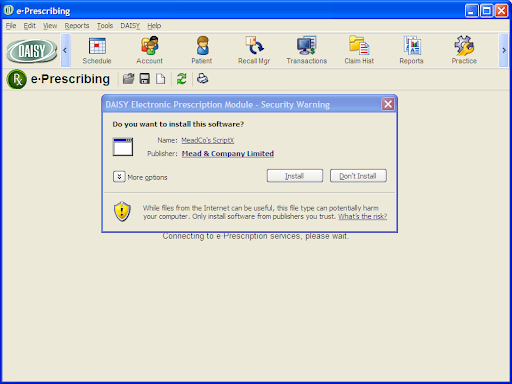
You see an Advanced Printing installation dialog box.
- Click Yes, Allow to enable e-prescription printing. You see the eRx Patient Chart window.
Add patient chart information
The first time you add an e-prescription for a patient, be sure the patient’s phone number is in the Patient Chart in DAISY+ eRx. You might also want to add the pharmacy that the patient commonly uses.
Note: All of the patient’s chart information updates automatically in the eRx Patient Chart when you update the Patient or Account window in DAISY+.
► To add patient chart information:
-
In the Home Ph. text box, type the patient’s phone number.
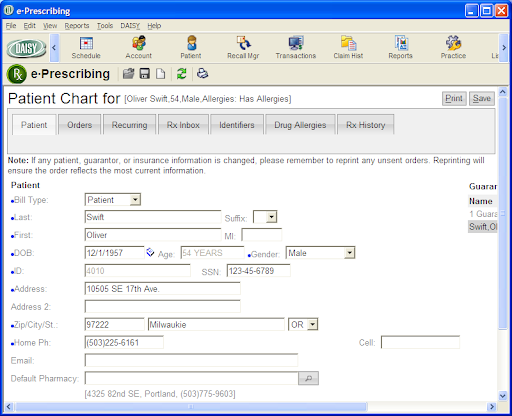
- Next to the Default Pharmacy text box, click
 to open the Pharmacy Search window.
 - In the Step 1 – Search for a Pharmacy section, type the pharmacy information, then click Search.
-
In the Step 2 – Select a Pharmacy section, choose the pharmacy, then click Select.
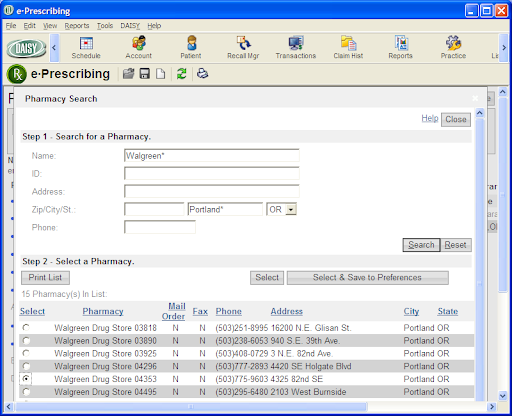
The pharmacy is added to the patient chart.
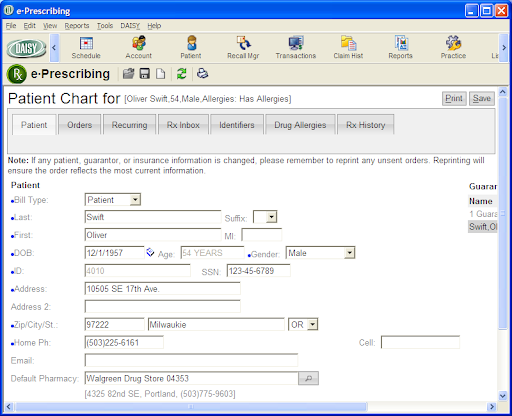
Add drug allergies to a patient chart
To add drug allergies to a patient chart:
- In the eRx Patient Chart window, click the Drug Allergies tab.
- In the Allergies drop-down list, select Has Allergies.
-
Click Add Allergen(s) to open the Allergy Search window.
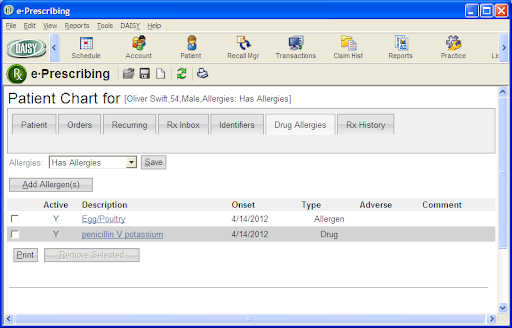
- In the Type drop-down list, select the type of allergen.
- In the Description, type the allergen, then click Search.
-
In the Search results, check the appropriate allergens, then click Use Selected.
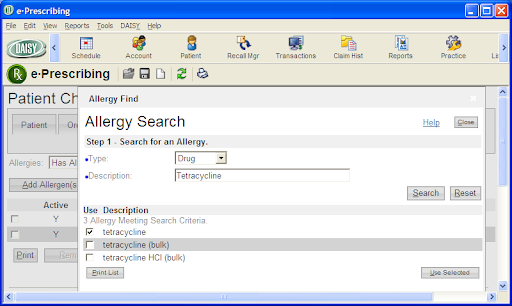
-
Click Save.
The allergen is added to the patient chart.
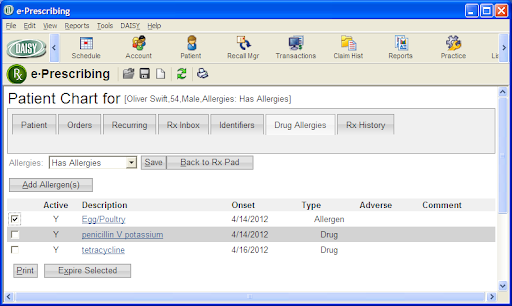
Manage prescription history
With DAISY+ eRx, you can:
- Review the patient’s prescription history before you issue a prescription.
- View current prescriptions issued by external providers and download them into the Medications tab in the Patient window in DAISY+.
- Void, renew, or discontinue a prescription.
- View prescription details.
► To manage a patient’s prescription history:
-
In the eRx Patient Chart window, click the Rx History tab.
You see all of the e-prescriptions issued to the patient by your office.
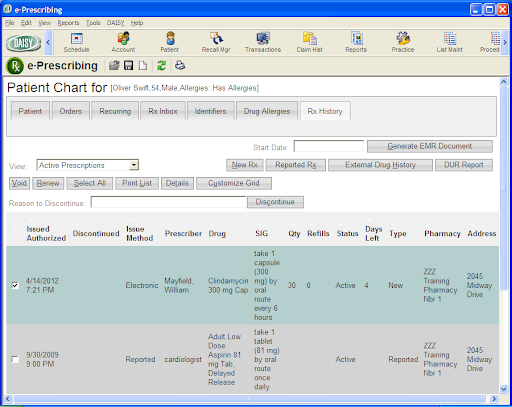
-
Click External Drug History to open the Patient Formulary History window.
You see all of the patient’s current prescriptions issued by external providers.
Note: Not all insurance companies or employer group plans allow prescriptions issued by external providers to show in the patient chart.
-
To download these prescriptions into the Medications tab in the Patient window in DAISY+, do one of the following:
- To download all of the prescriptions, click Select All, then click Add Selected to History.
- To add specific prescriptions, check the check box next to each prescription, then click Add Selected to History.
Note: For more information about the Medications tab, see "About the Medications tab".
-
Click Close.
You see the Patient Chart window.
-
Do one of the following:
- To void a prescription, check the check box to the left of the prescription, then click Void.
- To renew a prescription, check the check box to the left of the prescription, then click Renew.
- To Discontinue a prescription, such as when a patient has had an allergic reaction, check the check box to the left of the prescription. In the Reason to Discontinue text box, type the reason for discontinuing the medication, then click Discontinue.
-
To view a prescription’s details, check the check box to the left of the prescription, then click Details.
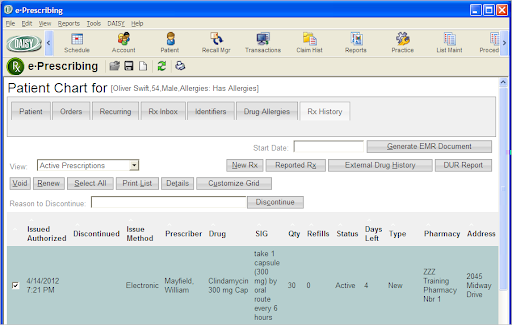
The prescription details window shows you if the patient has allergies. You can also use the prescription details window to void, renew, or discontinue a prescription.
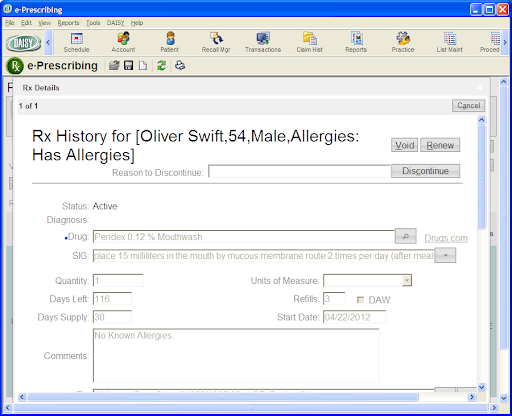
- Click Cancel to return to the eRx Patient Chart window.
Add reported medications
Use the following procedure in DAISY+ eRX to enter any current medications that the patient reported. This information automatically downloads into the Medications tab in the DAISY+ Patient window after you close the e-Prescribing window.
Note: All of the patient’s chart information updates automatically in the eRx Patient Chart when you update the Patient or Account window in DAISY+.
► To add patient-reported medications:
- In the eRx Patient Chart window, click the Rx History tab.
- Click Reported Rx to open the Reported Rx window.
-
Next to the Drug text box, click
to open the Drug Search window.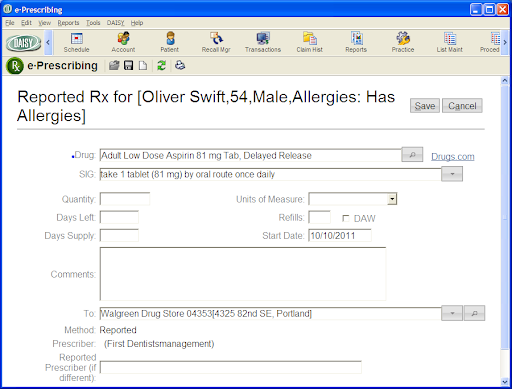
- In the Description text box, type the name of the drug.
- Click Select next to the drug the patient reported.
- Enter other information about the medication, if available.
-
Click Save to close the window.
You see the eRx Patient Chart window.
Add a prescription
After you add reported medications, if any, use the Rx Pad window to add a prescription.
► To add a prescription for a patient:
-
Click New Rx.

You see the e-Prescribing Benefit Plans window.
- Do one of the following:
- Click Select next to the appropriate benefit plan to apply the insurance formulary to the prescription.
- Click Select next to the appropriate benefit plan to apply the insurance formulary to the prescription.
In this example, no benefit plan information is available for Oliver Swift. The doctor clicks Use None.
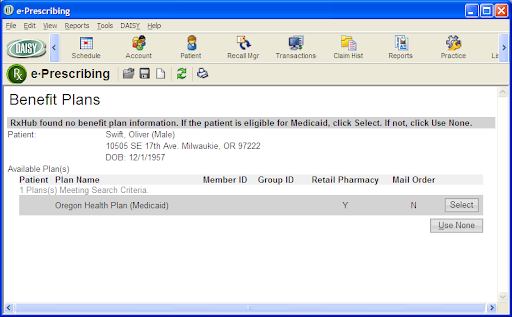
You see the Rx Pad window for the patient.
-
In the Prescriber drop-down list, select the prescriber.
Note: You must select a prescriber before you can enter other prescription information.
- Next to the Drug text box, click to open the Drug Search window.
- In the Description text box, type the name of the drug.
-
Click Select next to the drug you want to prescribe.
Note: DAISY+ eRx automatically issues a Drug Utilization Review (DUR) warning when appropriate. Click View to open the DUR Summary.
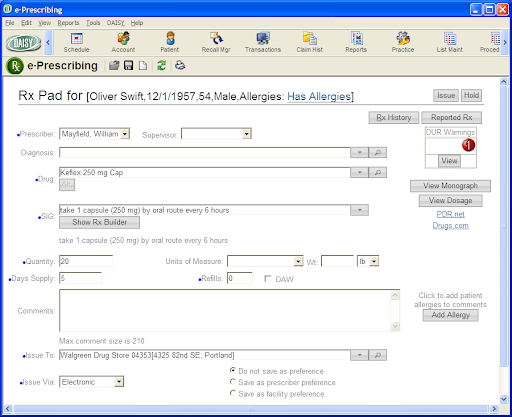
- In the SIG drop-down list, select the appropriate directions.
- Do one of the following:
- In the Quantity text box, type the quantity of medication.
- In the Days Supply text box, type the number of day’s supply of medication.
Note: The days supply is automatically calculated based on the SIG and quantity, where appropriate. If the medication is a liquid, however, you must enter both the quantity of medication and the days supply.
- In the Refills text box, type the number of refills for this prescription.
-
In the Issue To drop-down list, select the receiving pharmacy for this e-prescription.
Note: The patient's default pharmacy displays automatically when you start a new prescription.
-
In the Issue Via drop-down list, select from the following options:
Use this Issue Via option… When you… Electronic Send an e-prescription directly to the pharmacy. Electronic/Print Send an e-prescription directly to the pharmacy and print a copy for your records. Hand Written Issue a paper prescription in the office. This prevents DAISY+ eRx from sending the prescription to the pharmacy and documents that you wrote the prescription. Print Print the prescription in the dental office and give it to the patient to take to the pharmacy. Reported Record a medication that the patient reported. Sample Dispense the medication at the office. Telephone Phone in or fax a prescription to the pharmacy. - Do one of the following:
- Click Issue to issue the prescription.
- Click Hold to put the prescription on hold.
- Do one of the following:
- If the medication has a contraindication or allergy alert, go to step 14.
- If the medication does not have a contraindication or allergy alert, go to step 15.
- In the DUR Summary window, review the information, then do one of the following:
- To issue the prescription, click Review & Return.
- To change the medication, click Close to return to the RX Pad window.
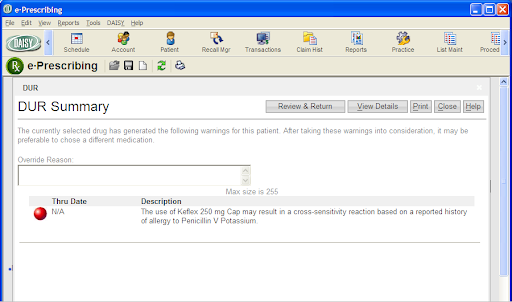
You see a confirmation window.
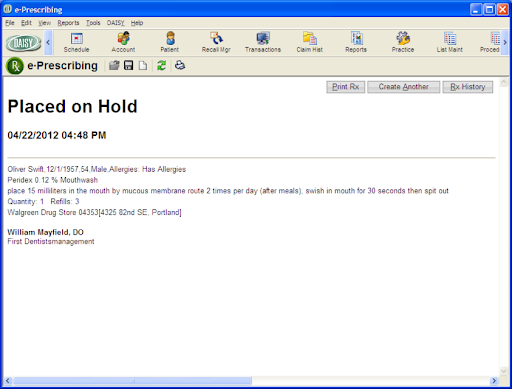
- Close the e-Prescribing window.
Note: You cannot alter or delete an e-prescription after it is issued. You can, however, view the prescription’s details. For more information, see "Manage prescription history".
Authorize a pending prescription
A prescription that has been placed on hold requires someone with the appropriate Clinician authorization permissions to issue the prescription.
Note: If you need to authorize prescriptions, or if you need your authorization permissions changed, contact your DAISY+ Security Officer.
When a prescription is placed on hold in Clinician, it displays with a status of Pending under the Prescriptions tab in the Patient window.
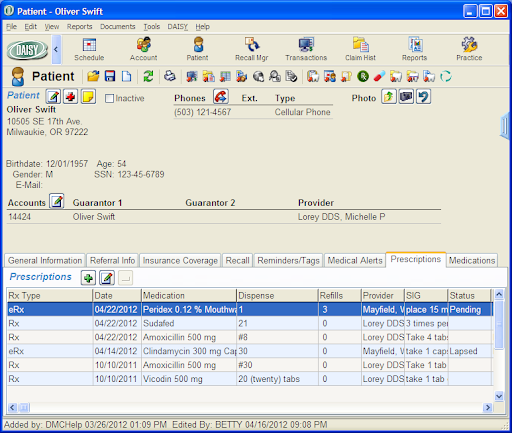
► To authorize a pending prescription:
- From the DAISY+ toolbar, click .
- Search for and select the patient, then click OK.
- In the Patient window, click the Prescriptions tab.
- In the Prescriptions section, select the pending prescription.
-
Click . You see the Issue eRx dialog box.
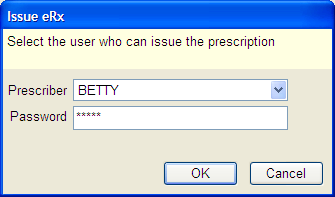
- In the Prescriber drop-down list, select the user who can issue the prescription.
-
In the Password text box, type the password for this DAISY+ user, then click OK.
You see the Patient Chart window in Clinician.
- Click Rx Inbox to view pending prescriptions.
- Check the check box next to the appropriate prescription.
-
Click Authorize to issue the prescription.
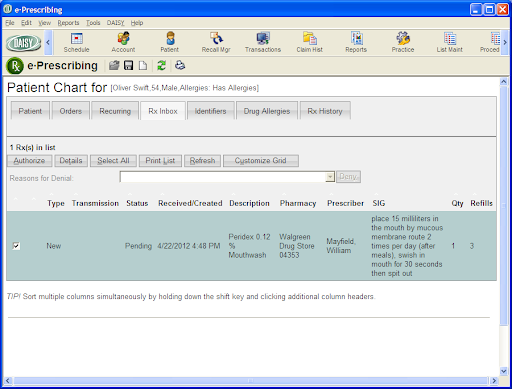
Create a list of drug and SIG preferences
Each time you issue a prescription in DAISY+ eRX, you have the option of adding the drug and the SIG to a list of preferences that you can use whenever you want to prescribe the same drug to one of your patients. You can create a preference list for the facility and one for each prescriber.
To select from the list of drug preferences, you click to the right of the Drug text box, then select the medication. Prescriber preferences appear in the top section of the list, and facility preferences show in the bottom section.
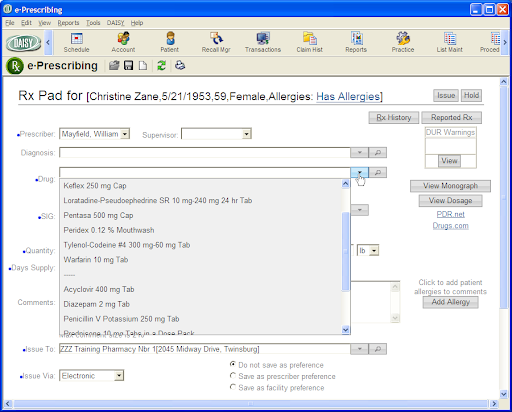
To select from the list of SIG preferences, you click ![]() to the right of the SIG text box, then select the SIG. The top section shows SIGs that were attached to a drug in the list of drug preferences, and the bottom section shows standard SIGs for the selected drug.
to the right of the SIG text box, then select the SIG. The top section shows SIGs that were attached to a drug in the list of drug preferences, and the bottom section shows standard SIGs for the selected drug.
► To add a drug and SIG to your list of preferences:
- From the DAISY+ toolbar, click .
- Search for and select the patient, then click OK.
- In the Quick Access toolbar, click
 to open the eRx Patient Chart window.
 - In the eRx Patient Chart window, click the Rx History tab.
- Click New Rx.
- Do one of the following:
- Click Select next to the appropriate benefit plan to apply the insurance formulary to the prescription.
- Click Use None to use no benefit plan.
- You see the Rx Pad window for the patient.
-
Enter all of the information for the prescription.
Note: For more information about adding a prescription, see "Add a prescription".
- Do one of the following:
- To add this drug and SIG to the preference list for the prescriber, choose Save as Prescriber Preference.
- To add this drug and SIG to the preference lists for the facility, choose Save as Facility Preference.
-
Complete the prescription.
The drug and SIG are added to the preference lists.
View the status of e-prescriptions
The eRx Inbox provides information about the following:
- Prescriptions that the provider still needs to authorize Prescription renewals
- Prescriptions with errors that prevented the pharmacy from filling the order
- DAISY+ automatically updates eRx status information every 10 minutes.
Note: To access the eRx Inbox, you must be assigned the “Allow managing prescriptions?” permission. For more information, see "Set up access permissions for DAISY+ eRx".
► To view the eRx Inbox for the practice:
-
From the DAISY+ Central window, do one of the following:
- Click the Check eRx Inbox link.
-
From the Daisy menu, select eRx Inbox.
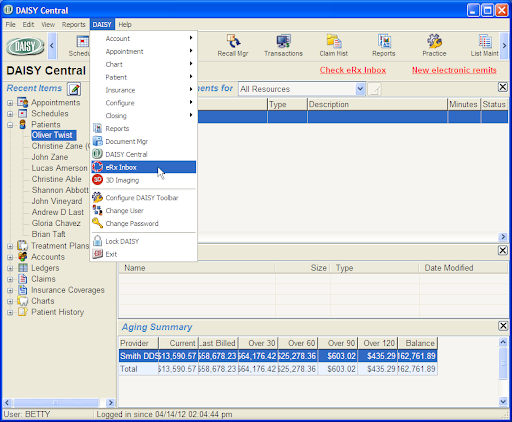
Note: You can also add an eRx Inbox button (
.svg) ) to the DAISY+ toolbar. If the eRx Inbox has at least one pending item, the icon is red; otherwise it is green.
) to the DAISY+ toolbar. If the eRx Inbox has at least one pending item, the icon is red; otherwise it is green.
- In the Access eRx Inbox, type your DAISY+ password.
-
In the Access eRx Inbox, type your DAISY+ password.
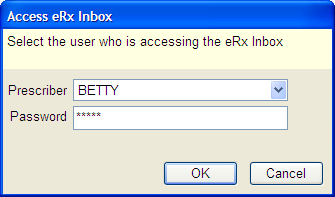
You see the e-Prescribing window with today’s prescription status.
Note: If you are using Internet Explorer 9, you must click the Download /Update Scriptx Here link to enable you to print prescriptions from your computer.

Search for prescriptions
You can search for a patient’s prescriptions by:
Prescription status, such as lapsed, authorized, or pending Issue type, such as electronic, handwritten, or print You can also search for a patient’s prescription types by days supply.
- Prescriptions that the provider still needs to authorize Prescription renewals
- Prescriptions with errors that prevented the pharmacy from filling the order
- DAISY+ automatically updates eRx status information every 10 minutes.
Note: To access the eRx Inbox, you must be assigned the “Allow managing prescriptions?” permission. For more information, see "Set up access permissions for DAISY+ eRx".
► To search for a patient’s prescriptions by issue type:
- From the DAISY+ toolbar, click .
-
In the Quick Access toolbar, click
to open the Search For – Prescriptions window.Click either Begins With or Contains.
Type the name of the issue type, such as Electronic.
Select the result you want, then click OK to open the prescription.
-
In the drop-down list, select Issue Type.
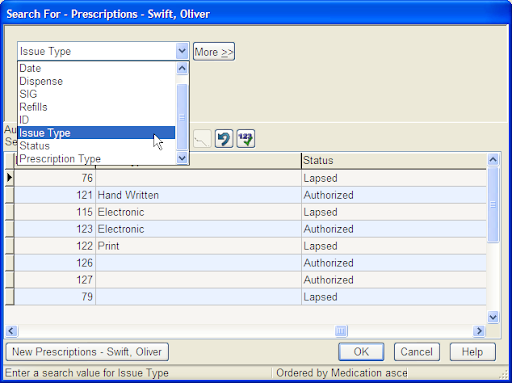
- Click either Begins With or Contains.
- Type the name of the issue type, such as Electronic.
- Select the result you want, then click OK to open the prescription.
► To search for a prescription by status:
- From the DAISY+ toolbar, click .
- Search for and select the patient, then click OK.
- In the Quick Access toolbar, click to open the Search For – Prescriptions window.
- In the drop-down list, select Status.
- Click either Begins With or Contains.
- Type the status of the prescription, such as Lapsed.
- Select the result you want, then click OK to open the prescription.
Search for prescription types
► To search for a patient’s prescription types by days supply:
- From the DAISY+ toolbar, click .
- Search for and select the patient, then click OK.
- Click the Prescriptions tab.
- In the Prescription tab, click to open the Search For – Prescription Type window.
-
In the Search By drop-down list, select Days Supply.
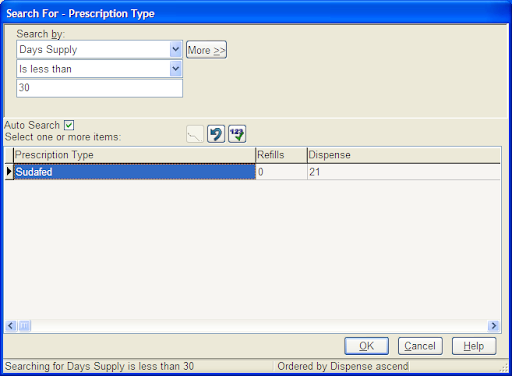
- Select whether the days supply is less than, greater than or equal to the number of days you are searching for.
- Type the number of days.
- Select the result you want, then click OK to open the prescription type.
About Perio Exams
In DAISY+ Chart, exam methods control how you navigate through a periodontal exam. The method controls the path through the mouth, the type of measurements to perform, and the views for each tooth. You can always override the exam method and directly access any tooth, tooth site, or measurement.
One or more unique exam methods can be set up for each clinical staff member. For example, you may want a method for a comprehensive Perio exam and another for an oral cancer screening. Your office colleagues may want to perform the same types of exams, but their methods may be set up differently because, for example, they prefer to take a different path through the mouth or want to perform measurements in a different order.
When you open a perio exam, DAISY+ selects a method based on your user settings. Each method moves forward through the exam automatically. For more information about user settings, see "Configure workstation settings".
As you move through the exam, DAISY+ Chart outlines the current location and measurement in red to show you where you are. For example, the following exam is currently positioned to record pocket depth for sites on tooth 32.
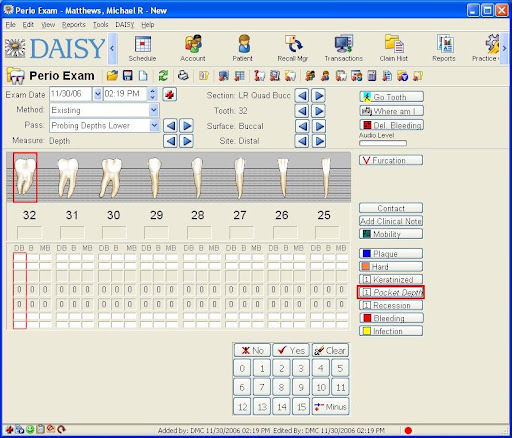
Movement through the mouth follows a hierarchical progression that is determined by the exam method. As you perform an exam, exam status indicators show you where you are in the exam method.
Note: Anytime during an exam, you can take a different kind of measurement or observation, and then return to where you left off in the method. For example, if you’re in a Probing Depth pass, you can also note bleeding.
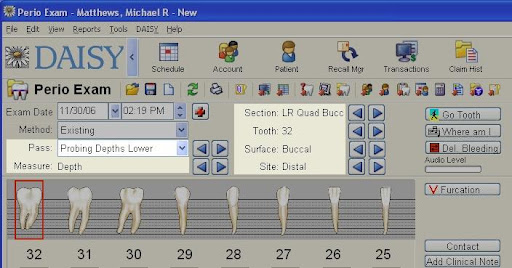
| This exam status indicator... | Shows... |
|---|---|
| Pass | A major sequence through the mouth as defined by the method. Passes, for example, could be missing teeth, probing depths on the upper arch, bleeding on the upper arch, etc. |
| Measure | The type of information to record. A measurement can have any number of steps. For example, pocket depth can be measured on three sites of a tooth |
| Section | The current quadrant, such as lower right (LR), lower left (LL), upper right (UR), upper left (UL) |
| Tooth | The current tooth |
| Surface | The current surface: buccal or lingual |
| Site | The point on the tooth where a measurement is being recorded, such as distal, direct, or mesial |
Create a new perio exam
Because the method can be defined to fit the needs of each performing provider, the path through the mouth, the type of measurements to perform, and the views for each tooth can vary. Here’s an example of a typical comprehensive perio exam to get you started. The order of the passes for this exam are shown in the following illustration:
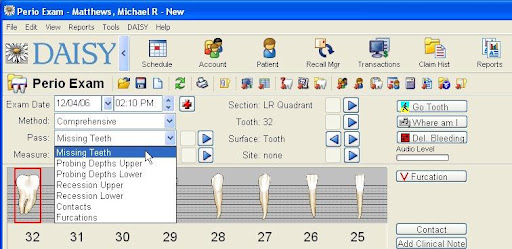
Note: Set up your workstation for Perio Charting before you use this DAISY+ feature. For more information, see "Configure workstation settings".
Tip: You can also create a new perio exam from the Schedule window. From the Schedule window, click the patient’s appointment, then click ![]() on the Quick Access toolbar to open the Search For - Perio Exam window. Click New Perio Exam to open the Perio Exam window.
on the Quick Access toolbar to open the Search For - Perio Exam window. Click New Perio Exam to open the Perio Exam window.
Important: If you prefer to enter perio exam information in DAISY+ after the exam is performed, be sure to set the correct exam date when you open the Perio Exam window.
► To create a perio exam:
- From the DAISY+ toolbar, click .
-
In the drop-down list, select the type of information to search by.
For example, you can search by patient, birth date, or Social Security number. In this example, select Patient.
-
If present, choose either the Begins With or the Contains option.
For example, if you want to find a patient whose name begins with Abr, choose Begins With.
-
In the next text box, type the information you want to match.
In this example, you would type Abr.
-
Click .
Search results display in the lower half of the window.
Tip: To always search automatically without having to click , check the Auto Search check box in the Search window.
-
Select the patient you want, then click OK.
The Patient window opens.
-
Click
 to open the Search For - Perio Exam window.
Do one of the following:
- If no prior exams exist, the Perio Exam window opens. Go to step 9.
-
If this is an established patient, you see a list of previous exams. Click New Perio Exam to open a new exam.
When you create a new perio exam for an established patient, your user settings determine whether or not previous exam information is brought forward. If your account is set up to require a confirmation before previous exam information is brought forward, you see:
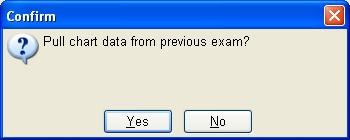
Click Yes to bring previous information forward.
Click No to open a blank exam. Go to step 9.
- From the Exam Date drop-down lists, select the date and time.
- Today’s date and time is automatically selected.
- Select a different date and time if you’re entering exam information after the exam was performed.
-
From the Method drop-down list, select the method.
Tip: You can configure the age when permanent dentition is automatically applied to the patient record. From the DAISY+ menu, select Configure, then Practice Configuration. Click the System Defaults tab. In the General Options section, select the age for permanent dentition.
A method is automatically selected based on your user settings. You can select a different method if you’re performing a different type of exam.
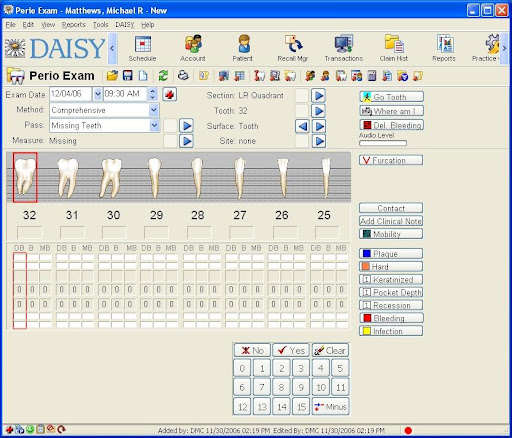
Chart tooth status
You use the Tooth Status window to quickly mark missing teeth, implants, and teeth that should not be probed. You can also use it to set the patient’s overall dentition (permanent or primary).
Tip: The Tooth status window is also available from the Perio Exam window. If tooth status information is entered from there, then it becomes available automatically in the Chart window.
► To chart a patient’s tooth status:
-
From the Quick Access toolbar, click
 .
.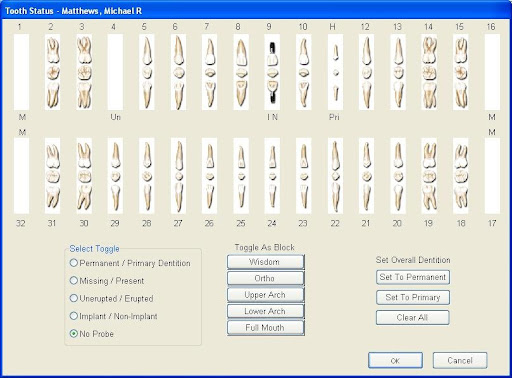
-
In the Select Toggle section, choose the tooth state you want to chart.
For example, choose Missing/Present to set a “missing” tooth state.
-
Do one of the following:
- Click an individual tooth to apply the selected tooth state to the tooth.
- Click one of the Toggle As Block buttons to apply the selected tooth state to a group of teeth.
- To apply another state to a tooth, repeat steps 2 and 3.
- To undo a state from a tooth:
- Select the tooth’s current state in the Select Toggle section.
- Click the tooth that has the state, or click the appropriate Toggle As Block button to undo the state for a group of teeth.
- When done, click OK.
Measure pocket depth
► To measure pocket depth:
-
Answering questions can be done by:
-
Tip: During a perio exam, all missing or unerupted teeth are skipped.
-
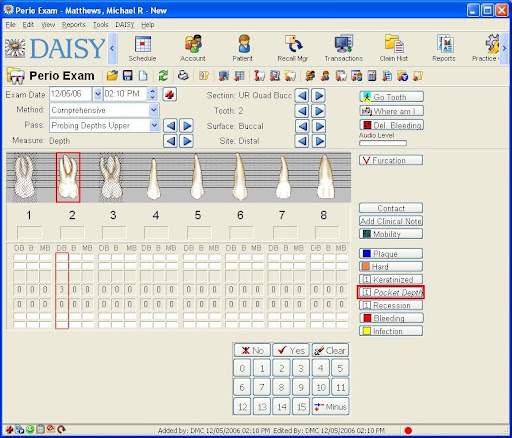
-
- Do one of the following to record pocket depths for this tooth:
-
Type the correct measurement number on the keyboard.
For example, type 3.
-
Click the correct measurement number on the exam keypad.
For example, if pocket depth is 3 on the distal buccal (DB) side of tooth 2, then click 3 on the keypad.
-
- DAISY+ Chart records the measurement then advances to the next pocket location.
-
For each upper tooth, repeat step 2.
At the end of the Probing Depths Upper pass, the exam automatically moves to the next pass. In this example, the next pass is Probing Depths Lower.
-
Repeat step 2 for each lower tooth.
At the end of the Probing Depths Lower pass, the exam automatically moves to the next pass. In this example, the next pass is Recession Upper.
Chart bleeding
This example method does not include a pass for bleeding, so you can chart this type of observation at any time. You can chart individual bleeding points without going tooth by tooth. For example, if there is no bleeding on the lingual side of the upper arch, you can move to the next section. Use the buttons to navigate to the tooth you want.
Bleeding measurements can be charted as Inflamed, Delayed, or Immediate.
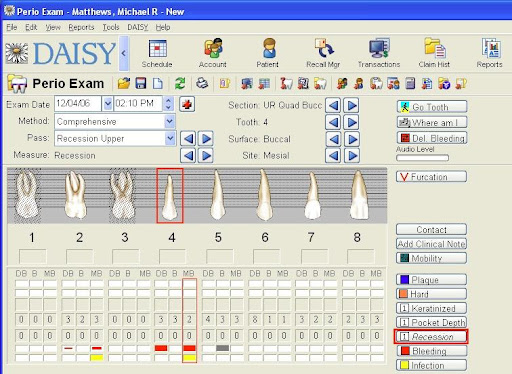
► To chart bleeding:
-
Move to the tooth that shows bleeding.
Use either the buttons, the button
 , or click on the appropriate column heading (such as DB, B, MB, DL, L, or ML) for the tooth.
 -
Do one of the following:
- Click
 , then click the condition you want, such as Inflamed.
 -
In the Bleeding row, click the appropriate cell for the tooth you want. Click again to toggle through the selections.
Note: If a cell is gray, then Bleeding is set to None. When you save the exam, that cell becomes blank (white) again.
- Click
- Repeat steps 1 and 2 to record bleeding for another tooth.
-
When all bleeding is noted, begin the next pass.
The easiest way to return to the start of the pass, should you need to, is to select the pass from the Pass drop-down list.
- The Delayed Bleeding window is another way to chart delayed bleeding, especially for more than one tooth or for multiple sites on a tooth.
► To chart bleeding:
-
Click
 to open the Delayed Bleeding window.
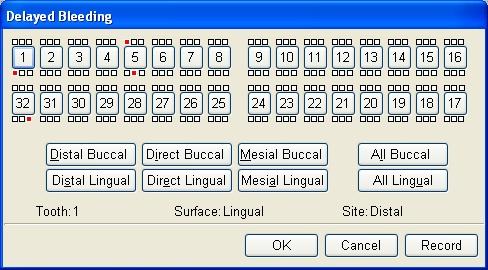
Click the tooth number to select the tooth.
- Click the tooth number to select the tooth.
- Do one of the following:
- Click the site that has delayed bleeding.
-
Note: You can also select a tooth number, then click the appropriate site button, such as Distal Buccal, Direct Lingual, or Mesial Buccal.
- To chart more than one site on the tooth, click the site or site button, then click Record. Repeat this step to record another site on the same tooth.
- To chart multiple sites on the tooth, click All Buccal or All Lingual.
- Click OK to close the window.
Note: Occasionally during an exam, click on the Quick Access toolbar to ensure that measurements and observations are not accidentally lost.
Tip: You can also use the keyboard to enter mobility measurements. For +, I, II, III, and IV, type +, 1, 2,3, and 4. For the plus measurements, use the
Measure recession and hyperplasia
In DAISY+ Chart, recession measurements are assumed to be a negative number to indicate receding gums. When hyperplasia is present, a plus (+) is added to the left side of the measurement number.
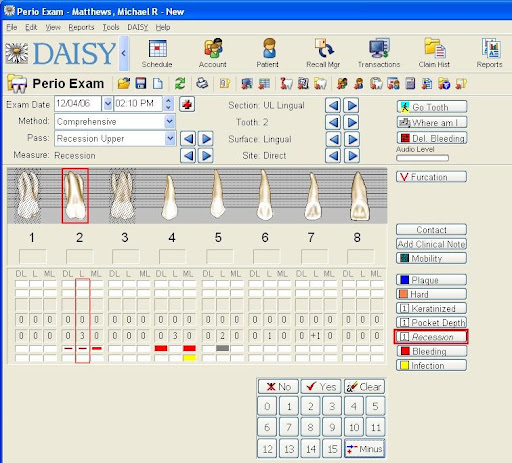
► To measure recession:
Do one of the following:
-
To measure recession, type the correct measurement number on the keyboard or click the correct measurement number on the exam keypad.
For example, type 3 on the keyboard.
Note: Be sure the Plus/Minus button is set to
 before you type or click a recession measurement. If not, click the button to change it.
 -
To measure hyperplasia, click the plus/minus button to Plus, then type the correct measurement number on the keyboard or click the correct measurement number on the exam keypad.
Note: Be sure the Plus/Minus button is set
 to before you type or click a hyperplasia measurement. If not, click the button to change it.
DAISY+ Chart records the measurement, then advances to the next site.
Note: You can also measure individual recession and hyperplasia sites without going tooth by tooth. For example, if there is no recession on the buccal side of the lower arch, you can move to the next section in the pass. Use the buttons to navigate to the site you want.
-
Repeat step 1 for each upper tooth.
The exam automatically moves to the next pass. In this example, the next pass is Recession Lower.
-
Repeat step 1 for each lower tooth.
At the end of the Recession Lower pass, the exam automatically moves to the next pass. In this example, the next pass is Contacts.
Measure mobility
This example method does not include a pass for mobility, so you can chart this type of observation at any time.
► To measure mobility:
Do one of the following:
- Click the mobility box below the tooth graphic.
-
Navigate to the tooth, then click
 .
.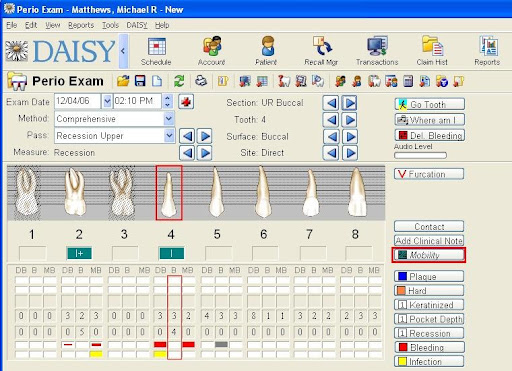
- In the Mobility window, click the measurement you want or click None to clear the measurement.
-
Repeat steps 1 and 2 for each upper tooth.
The exam automatically moves to the next pass. In this example, the next pass is Mobility Lower.
-
Repeat steps 1 and 2 for each lower tooth.
At the end of the Mobility Lower pass, the exam automatically moves to the next pass. In this example, the next pass is Contacts.
Note: When the method includes a mobility pass, use number keys on the keyboard, or the keypad in the Perio Exam window to record mobility. DAISY+ Chart records the measurement and then advances to the next site.
Chart contacts
Use the Contact measurement to record any type of inadequate contact between two teeth.
► To chart contacts:
-
For each tooth, do one of the following:
- Click
 to record a contact problem.
 -
On the exam keypad, click Yes to record a contact problem or click No to advance to the next tooth.
- At the end of the Contact pass, the exam automatically moves to the next pass. In this example, the last pass is Furcations.
- Click
Measure furcations
Use the Furcation measurement to record any class of furcation, including the academic extension of Class II furcations (a,b,c,d). The furcation marker is always placed at the root tip of the tooth.
During the Furcation pass, DAISY+ Chart only shows the teeth in a quadrant that can be marked with a furcation.
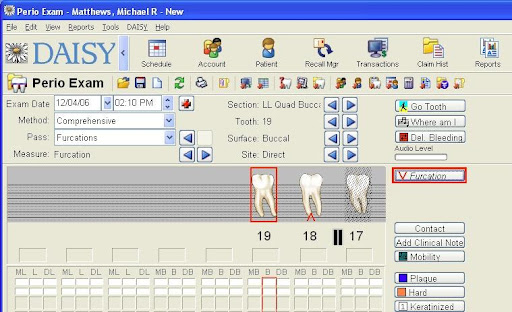
► To chart furcations:
- For each tooth, click
 .
. -
In the Furcation window, click the measurement you want or click None to clear the measurement.
Here are the chart graphics for each furcation measurement:
Class I Class II
 Class II (a)
 Class II (b)
 Class II (c)Class II (d)Class IIIClass IV
Chart keratinized tissue, calculus, plaque, and infection
Anytime during an exam, you can chart other conditions that are not part of the selected method. This example method does not include a pass for keratinized tissue, calculus, plaque, and infection.
Tip: The Periodontal Graphic Chart provides similar information as the Perio Exam Full View, but in a different layout. You can send this report home with the patient or along with an insurance claim.
From the Reports menu, select Perio Graphic Chart. Click Yes to print the report.
► To chart keratinized tissue:
-
Move to the site that has the tissue.
Use either the buttons, the
button, or click on the appropriate column heading (such as DB, B, MB, DL, L, or ML) for the tooth.Note: If you use the Go Tooth button, the tooth and site you select must exist in the current pass. For example, if you select tooth 21during the Probing Depths Upper pass, DAISY+ Chart will not move to tooth 21. Instead, it remains on the current tooth.
- Click
 , then click the number that represents the distance from the mucogingival junction to the gingival margin.
► To chart plaque:
Move to the site that has plaque.
Do one of the following:
- Click
 , then click Slight, Moderate, or Heavy.
 - In the Plaque row, click the appropriate cell for the tooth you want. Click again to toggle through the selections.
► To chart calculus (hard plaque):
Move to the site that has calculus.
Do one of the following:
- Click
 .
. -
In the Hard Plaque row, click the appropriate cell for the tooth you want.
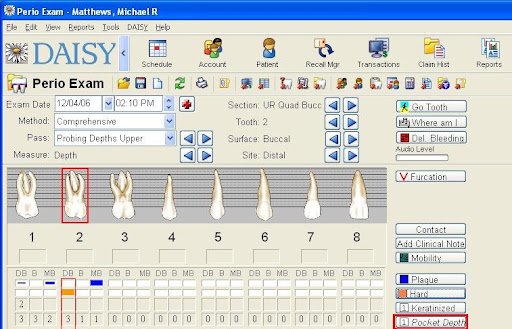
Save the perio exam
When you’re done entering all measurements and observations, save the exam.
► To save the exam:
-
Click and close the Perio Exam window.
Note: To minimize the possibility of losing data, you may want to save periodically during the exam.
Use the Perio Exam Full View
Answering questions can be done by:
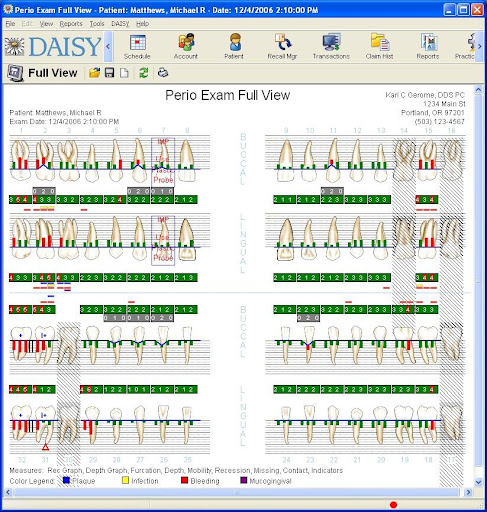
In the DAISY+ Chart Workstation Settings window, the option you choose for the Pocket Depth Red Indicator Line affects the appearance of the Full View as well as other DAISY+ Chart reports.
Tip: For more information about DAISY+ Chart Workstation Settings, see "Configure workstation settings".
If the Pocket Depth Red Indicator Line option is set to:
Pocket + Recession, then the Indicator Line is red when the combination of the site’s pocket depth plus recession are 4 or greater.
Pocket Only, then the Indicator line is red only when the pocket depth is 4 or greater. The recession measurement does not affect the Indicator Line’s color.
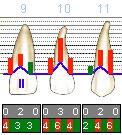
► To open the Perio Exam Full View:
- From the View menu in the Perio Exam window, select Perio Exam Full View.
► To print the Perio Exam Full View:
-
From the Report menu in the Full View window, select Perio Exam Full View.
The report prints to the default DAISY+ Chart printer. For more information about changing this default printer, see "Change printer settings for DAISY+ Chart".
Use the Perio Exam Comparison Chart
The Perio Exam Comparison Chart lets you compare results from up to seven existing exams in a graphic format. You might want to show this report to a patient or send it with the patient to give to a periodontist.
► To view a perio comparison chart:
- From the View menu in the Perio Exam window, select Perio Exam Comparison.
-
To select the exams to compare, press CTRL while you click the primary mouse button on the exams you want.
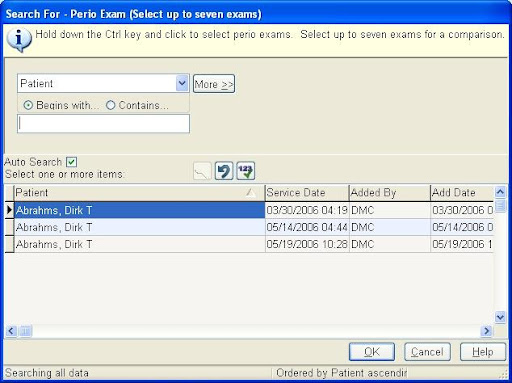
-
Click OK.
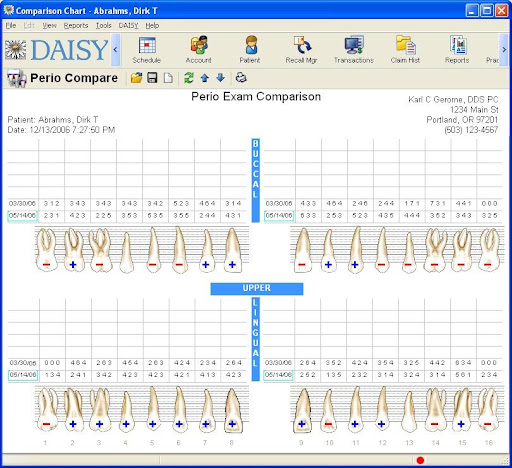
Each exam is displayed top to bottom from the oldest exam to newest. A plus sign on the tooth indicates that the overall pocket depth has improved. A minus sign indicates that the overall pocket depth is worse. No sign means there is no significant change.
Calculations are based only on the measurements from the newest exam and the prior exam on this chart. For each site, DAISY+ Chart subtracts the newest measurement from the prior measurement. If the result is +2 or more, the measurement is retained. If the result is -2 or more, the measurement is retained. If the result is 1, -1, or 0, the measurement is thrown out.
In the following example, all the measurements are thrown out, so the tooth gets no sign because the change was not significant.
1st pocket2nd pocket3rd pocketPrior exam423Newest exam333Results1-10Missing teeth display with hatch lines, similar to the way they are displayed in the Perio Exam window.
Perio exams can be sorted by ascending or descending order.
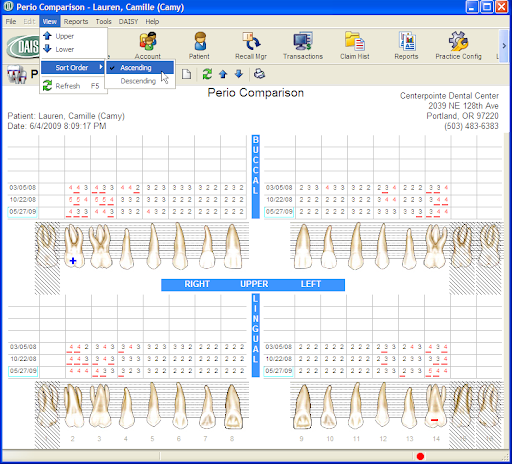
View an existing perio exam
► To view an existing perio exam:
- From the DAISY+ toolbar, click .
-
Search for and select the patient you want, then click OK.
The Patient window opens.
-
Click
to open the Search For - Perio Exam window.You see a list of previous exams.
-
Select the exam to open, then click OK.
The Perio Exam window opens.
Delete a perio exam
► To view an existing perio exam:
To delete a perio exam:
- From the DAISY+ toolbar, click .
-
Search for and select the patient you want, then click OK.
The Patient window opens.
-
Click
to open the Search For - Perio Exam window.You see a list of previous exams.
-
Select the exam to delete, then click OK.
The Perio Exam window opens.
- From the File menu in the Perio Exam window, select Delete.
- In the Confirm window, click Yes to delete the exam.
- Click OK to close the Delete Exam window.
Voice recognition for a perio exam
Perio exams (but not hard tissue exams) can be performed using DAISY+ Chart’s voice recognition capability. To help you get a feel for using voice recognition, here’s a hands-free example of a typical comprehensive perio exam.
To get the most from this section, become familiar with charting a perio exam using the keyboard and mouse first. For more information, see "Create a new perio exam ".
Important: Before you use voice recognition to chart a perio exam, you must configure the voice recognition software for each computer that you plan to use.
Navigation commands
To navigate through the chart, say the command “Next” or “Previous” followed by one of these areas:
- Measure
- Site
- Tooth
- Quadrant
- Pass
- Surface
- To pause voice recognition, say “Stop listening”.
- For a complete list of voice commands, say “What Can I Say?”
- If you lose track of where you are in an exam, say “Where am I?” In your headset, you will hear a detailed explanation of where you are. For example, “Where. The tooth number is nine. The surface is buccal. The site is distal. The measure is depth.
Tip: You can use voice recognition to print an exam to the DAISY+ Chart default printer. To print an exam from the Perio Exam window, say “Print Exam”, then say “Yes”. You may be asked to save the exam. Say “Yes” to save changes to the exam.
Train the patient
Before you begin the exam, make the patient aware that you are using voice technology. Since the computer can also hear the patient, the patient needs to be quiet to prevent erroneous data entry in the exam.
Suggest that patients raise a hand when they need to say something. This signal gives you a chance to mute the headset or tell DAISY+ Chart to stop listening.
Create a perio exam using voice
► To create a perio exam using voice:
-
Open a new perio exam for the patient.
For information about creating a new perio exam, see "Create a new perio exam ".
-
Say “Start Listening” to activate voice recognition.
Tip: To pause voice recognition, say “Stop listening”.
Tip: For a complete list of voice commands, say “What Can I Say?”
When voice recognition is activated, the red dot in the lower right corner of the Perio Exam window changes to green. You also hear “voice recognition active” in the headset.
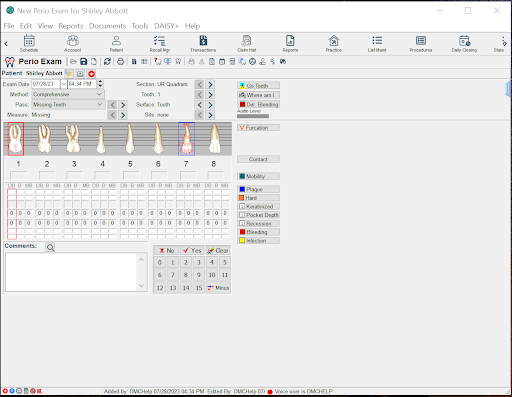
Throughout the exam, DAISY+ Chart echoes each command that you say so you can be sure the correct measurement or observation was recorded. This feedback (combined with the method, which helps to ensure that you always chart in the same order) enables you to chart without having to look at the screen to see where you are.
Now you’re ready to use voice commands to record the exam. In this example, the first pass is Missing Teeth.
Chart missing teeth
► To chart missing teeth:
-
Do one of the following to open the Tooth Status window:
Say “Missing”.
Say “Tooth Status”.
-
In the Select Toggle section, speak the command for the tooth state you want to chart.
For example, say “Missing” to set a “missing” tooth state.
-
Do one of the following:
Speak the number of an individual tooth to apply the selected tooth state to the tooth. For example, say “Three” to mark tooth number 3 as “missing”.
Speak the command for one of the Toggle As Block buttons to apply the selected tooth state to a group of teeth. For example, say “Ortho” to mark teeth 5, 12, 21, and 28 as “missing”.
-
To apply another state to a tooth, repeat steps 2 and 3.
-
To undo a state from a tooth:
Speak the command for the tooth’s current state.
Say the number of the tooth that has the state, or speak the appropriate Toggle As Block command to undo the state for a group of teeth.
-
When done, say “OK”.
The Tooth Status window closes.
-
To move to the next pass, say “Next Pass”.
In this example, the next pass is Probing Depths Upper.
Measure pocket depth
► To measure pocket depth:
Create a perio exam using voice
► To create a perio exam using voice:
-
To record pocket depth, do one of the following:
Speak the pocket measurement for the site.
- For example, say “Two” to mark a pocket depth of “two” for the current site.
If all pocket depths for a tooth are the same, such as “three”, say “All Threes”.
-
Note: The “All” command only works with “Ones”, “Twos” or “Threes”.
-
DAISY+ Chart records the measurement(s) then advances to the next pocket location.
Important: Voice recognition only responds when single numbers or groups of three numbers, such as 3-2-4, are spoken.
-
To navigate backwards, say “Previous” followed by the type of location.
For example, say “Previous pass” to move to the prior pass in the method or “Previous site” to move to the prior site.
Note: If the current pass charts more than one site per tooth, such as distal buccal, direct buccal, mesial buccal, then the command “Previous Tooth” moves to the first measurement site on the previous tooth rather than the closest site.
-
For each upper tooth site, repeat step 1.
At the end of the Probing Depths Upper pass, the exam automatically moves to the next pass. In this example, the next pass is Probing Depths Lower.
-
Repeat step 1 for each lower tooth.
At the end of the Probing Depths Lower pass, the exam automatically moves to the next pass. In this example, the next pass is Recession Upper.
Note: Occasionally during an exam, say “Save Exam” to save the exam to ensure that measurements and observations are not accidentally lost.
Chart bleeding
This example method does not include a pass for bleeding, so you can chart this type of observation at any time. The method remains on its current pass even as you record bleeding measurements. You can chart individual bleeding points without going tooth by tooth. For example, if there is no bleeding on the lingual side of the upper arch, you can move to the next section.
Bleeding measurements can be charted as Inflamed, Delayed, or Immediate.
Tip: If the method has a Bleeding pass, you can speak the command “Yes” to note bleeding or “No” to indicate that no bleeding is present.
► To chart bleeding:
-
Use navigation commands to move to the tooth that has bleeding.
For example, say “Tooth 3”
Note: The tooth must be part of the current section, such as Upper Lingual.
-
Do one of the following:
- To record immediate bleeding, say “Bleeding” or “Immediate”.
- To record delayed bleeding, say “Delayed”.
- To record inflammation, say “Inflamed”.
-
When all bleeding is noted, return to the next pass using the appropriate voice commands.
In this example, the next pass is Recession Upper.
Measure recession
► To measure recession:
-
Speak the recession measurement for the tooth.
For example, say “Three” to mark a recession of “three”. DAISY+ Chart records the measurement(s) then advances to the next tooth or site.
-
For each upper tooth, repeat step 1.
At the end of the Recession Upper pass, the exam automatically moves to the next pass. In this example, the next pass is Recession Lower.
-
Repeat step 1 for each lower tooth.
At the end of the Recession Lower pass, the exam automatically moves to the next pass. In this example, the next pass is Mobility Upper.
Measure mobility
► To measure mobility:
-
Speak the mobility measurement for the tooth.
For example, say “Two Plus” to mark a mobility of “II+”. DAISY+ Chart records the measurement then advances to the next tooth.
-
Repeat step 1 for each upper tooth.
The exam automatically moves to the next pass. In this example, the next pass is Mobility Lower.
-
Repeat step 1 for each lower tooth.
At the end of the Mobility Lower pass, the exam automatically moves to the next pass. In this example, the next pass is Contacts.
Chart contacts
► To chart contacts:
-
For each tooth, do one of the following:
- Say “Yes” to record a contact problem.
- Say “No” to advance to the next tooth.
- At the end of the Contacts pass, the exam automatically moves to the next pass. In this example, the last pass is Furcations.
Chart furcations
► To chart furcations:
-
Speak the class measurement for the tooth.
- For example, say “Class Two” to mark a furcation of Class II.
- DAISY+ Chart records the measurement then advances to the next tooth or site.
-
Repeat step 1 for each tooth.
Note: If you try to chart a furcation for a tooth that doesn’t have one, you hear “Furcation not available for this tooth.”
Chart plaque
Anytime during an exam, you can chart other observations or measurements that are not part of the current pass. For example, during a Mobility pass, you might notice some plaque. Since you are in a Mobility pass, when you record the plaque, the pass does not advance to the next tooth. The pass advances only after you make a mobility measurement.
You can only navigate to sites that exist in the current pass. For example, in this Mobility pass, only the direct site can be charted. So if you want to chart a measurement or observation on a mesial or distal site, you have to do it from a pass where those sites are available, such as Probing Depths Upper.
► To chart plaque:
-
Move to the site that has plaque.
For example, if you are on tooth 4, say “Previous Tooth” to return to tooth 3.
-
Do one of the following:
- Say “Plaque” or “Heavy” to indicate heavy plaque.
- Say “Moderate” to indicate moderate plaque.
- Say “Slight” to indicate slight plaque.
- Plaque is recorded on tooth 3 and the pass remains there. If you do not need to change the mobility measurement for tooth 3, then say “Next Tooth” to move to tooth 4.
Use the Perio Exam Full View
► To open the Perio Exam Full View:
Say “Full View”, then “Yes” to save the exam.
► To print the Perio Exam Full View:
Say “Print”.
► To close the Full View window:
Say “Close”.
Save the perio exam
When you’re done entering all measurements and observations, save the exam.
► To save the exam:
- Say “Save Exam”.
- Say “Stop Listening” to pause voice recognition.
The Perio Exam window remains open. When voice recognition is paused, the green dot in the lower right corner of the Perio Exam window changes to red. You also hear “Voice recognition in pause mode” in the headset.
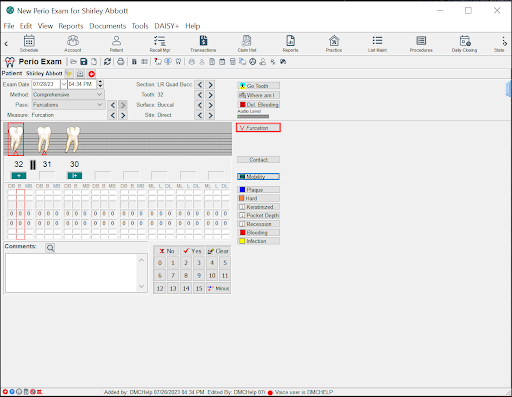
- Close the Perio Exam window.
Troubleshoot voice recognition
Occasionally, voice recognition may stop responding to your voice. This can happen for a variety of reasons, such as when someone else uses your voice profile, the headset is disconnected, or your voice profile becomes corrupted.
If voice recognition stops responding, do the following in this order:
- Check that the Perio Exam window is active. An active window is the currently focused window. Click the window to be sure it is active.
- Check the headset to be sure it is properly connected (plugged in), the mute button is not enabled, and the volume is not turned down completely or set too low.
- Make sure voice recognition is enabled.
- Restart DAISY+.
Check that voice recognition is enabled
If the headset’s physical connections are okay, then check that voice recognition is enabled in Windows.
► To check that voice recognition is enabled:
-
Log in to DAISY+.
The voice profile is always associated with a specific account, so be sure to log in to your user account. For more information, see "Log in to DAISY+".
-
Create a new perio exam.
Create a new exam for any patient. You can use this exam to try out voice activation in perio charting. For information on creating a new perio exam, see "Create a new perio exam ".
- From the Tools menu, select Voice Settings.
-
Click the Voice Settings tab.
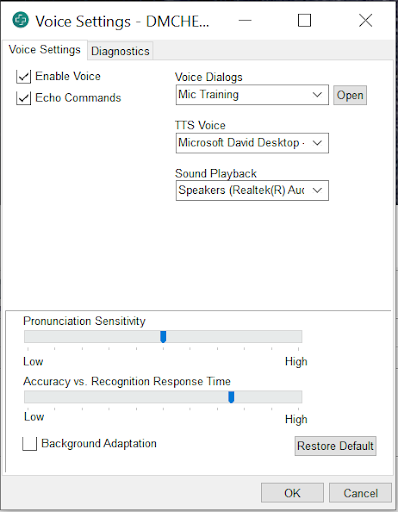
-
Make sure the following check boxes are checked:
- Enable Voice
- Echo Commands
- Make sure the Sound Playback drop-down list shows the correct device.
- Click OK.
Restart DAISY+
► To restart DAISY+:
- From the File menu in any DAISY+ window, select Exit.
- On the Windows Desktop, double-click the DAISY+ icon.
-
Log in to your account.
For more information, see "Log in to DAISY+".
-
Create a new perio exam.
For more information, see "Create a perio exam using voice" .
- Try using voice recognition to record a perio exam.
Retrain voice recognition
If voice recognition still doesn’t work after you have checked all the physical connections and you know that voice recognition is enabled, your voice profile may be corrupted. You need to delete your voice profile, and retrain voice recognition to respond to your voice.
► To retrain voice recognition:
Delete your voice profile:
- From the Windows Start menu, select Control Panel.
- In the Control Panel window, double-click Speech.
- Click the Speech Recognition tab.
-
In the Recognition Profiles section, select your user name, then click Delete.
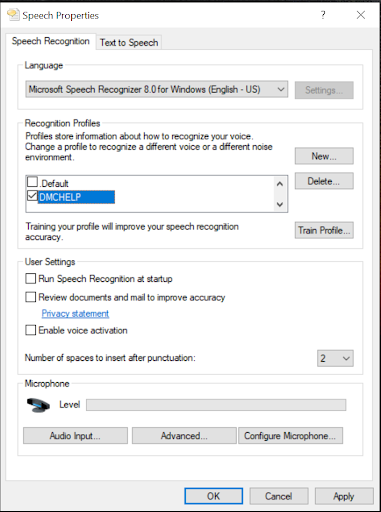
Click OK.
-
Log in to DAISY+.
The voice profile is always associated with a specific account, so be sure to log in to your user account.
-
Create a new perio exam.
Create a new exam for any patient. You can use this exam to try out voice activation in perio charting.
For information on creating a new perio exam, see "Create a perio exam using voice".
- From the Tools menu, select Voice Settings.
- From the Voice Dialogs drop-down list, select Mic Training, then click Open.
-
Follow the instructions in the Windows Microphone Wizard.
The Windows Microphone Wizard walks you through microphone training so voice recognition works with DAISY+ perio charting.
- From the Voice Dialogs drop-down list, select User Training, then click Open.
- Follow the instructions in the Voice Training Wizard.
- When complete, click Finish.
- From the Voice Dialogs drop-down list, select DAISY+ Voice Training, then click Open.
- Follow the instructions in the DAISY+ Voice Training Wizard.
- When complete, click Finish.
- Click OK to close the Voice Settings window.
- You now have a new voice profile on this computer. Try using voice recognition again to record a perio exam. If you still have problems, contact DAISY+ customer support.
What if Voice Recognition Stops Working?
If voice recognition is not responding, make sure the headset’s mute button is not enabled. If it is not enabled, then you may need to retrain voice recognition.
Tip: If you lose track of where you are in an exam, say “Where am I?” In your headset, you will hear a detailed explanation of where you are. For example, “Where. The tooth number is nine. The surface is buccal. The site is distal. The measure is depth.
About Hard Tissue Exams
DAISY+ Chart’s hard tissue charting enables you to graphically record the conditions in a patient’s mouth, including existing restorations and hard tissue pathologies, while you record the procedure codes associated with the treatment provided. You can also use hard tissue charting to set up treatment plans.
Methods
In hard tissue charting, exam methods control the passes through the patient’s mouth during an exam. The hard tissue chart provides two exam methods:
- Default Chart Method charts the passes through a patient’s mouth in this order: existing restorations, conditions of teeth, and treatment planning.
-
Free Form Method charts the passes through a patient’s mouth in this order: existing restorations and treatment planning, but you can also record pathologies during any pass.
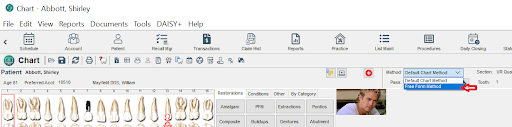
- In addition, both the Default Chart Method and Free Form Method include a Complete pass that you can use to bypass treatment planning, such as during an emergency visit.
- During a hard tissue exam, methods control the order of the passes through the patient mouth, such as when existing restorations, conditions, and treatment planning are recorded. However, you can override the method anytime during an exam.
Note: When you use the Default Chart Method, you can break out of the current pass, but only in a limited manner. During an existing restoration pass, for example, you can click the Conditions tab and chart a pathology, but the method immediately returns to the Restorations tab. In the Free Form Method, whichever tab you choose remains selected until you choose another.
Chart tabs and buttons
As you move through each pass in the Default Chart Method, Daisy Chart automatically selects the most appropriate Chart tab. Each Chart tab contains up to 16 Chart buttons that you can use to record information associated with the pass. For example:
- The Restorations tab includes buttons for recording tooth-related procedures, such as amalgams, buildups, and root canals.
- The Conditions tab includes pathologies, such as abfractions, caries, and tooth fractures.
- The Exam tab includes non-tooth-related procedures, such as adult prophy, comprehensive exam, and x-rays.
-
The By Category tab includes shortcuts to all of the ADA procedure categories, such as Endodonics, Diagnostics, and Oral Surgery, as well as conditions and user-defined procedures.
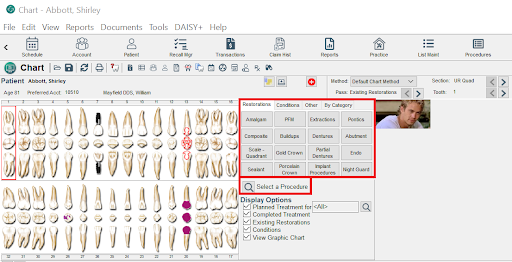
Each Chart button contains a subset of the codes for procedures you perform most often. For example, if you routinely install ceramic crowns, you can click the Ceramic Crown button and the ADA code associated with that procedure is automatically added to the patient chart. If more than one code is associated with a Chart button, you can select which codes apply from a subset of codes.
You can also use the Select Procedure button to search for and select from the entire code set.
Tip: You can create your own Chart tabs and buttons. For more information, see "Customize Chart tabs and buttons".
Tip: By default Chart buttons display alphabetically in columns from left to right. To rearrange the order, right-click in the Chart button section and select Rearrange Buttons. Drag each button to the preferred position. When done, right-click and deselect Rearrange Buttons.
Navigation
As you move through the exam, DAISY+ Chart outlines the current location in red in the tooth graphics section of the chart to show you where you are. For example, the following exam is currently positioned to record information for tooth 1.
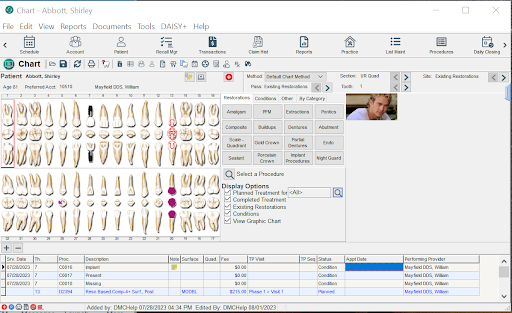
As you perform an exam, exam status indicators near the top of the window show where you are in the exam method.
| This exam status indicator... | Shows... |
|---|---|
| Pass | A major sequence through the mouth as defined by the method. Passes, for example, can be Existing Restorations, Conditions of Teeth, and Treatment Plan |
| Section | The current quadrant, such as lower right (LR), lower left (LL), upper right (UR), upper left (UL) |
| Tooth | The current tooth, even if the tooth is missing from the location |
| Site | Same as the current pass |
To move through the exam, use the buttons near the top of the window to navigate to the pass, section or tooth you want.
Procedures
Procedures that have been performed on the patient display in the tooth graphics section as well as in a list at the bottom of the Chart window. The most recent entry is shown at the top of the list and the list cannot be sorted. Columns can be rearranged, however.
How Tooth Graphics Display
Tooth procedures display in layers on the graphics chart from bottom to top: existing, completed, conditions, planned.
Procedure color codes
The list of procedures at the bottom of the Chart window are color-coded as follows to help you scan more efficiently. The color codes can be customized; the supplied colors are:
- Blue - Planned treatment
- Red - Completed treatment that has not been posted
- Gray - Completed treatment that has been posted
- Black - Existing restorations and conditions

| This procedure column... | Shows... |
|---|---|
| Srv. Date | The date of the procedure |
| Th. | The tooth that received the procedure |
| Description | Description of the service performed |
| Note | A clinical note is associated with the performed procedure when is present |
| Surface | The tooth surface |
| Quad. | The quadrant |
| Status |
The status of the procedure line item: Existing indicates an existing restoration Planned indicates planned treatment Completed indicates completed treatment Condition indicates a tooth condition, such as missing tooth, a failing restoration or a tooth fracture |
| Fee | The fee associated with the procedure |
| Performing Provider | The provider who performed the procedure |
| Appt |
The appointment (when a series of appointments have been scheduled) when the procedure should be performed When treatment planning, you can establish an order for treatment. If multiple appointments are required for the treatment, this number indicates at which appointment the procedure should be performed. This information is then applied to the treatment plan in DAISY+ |
Display options
Display Options control what displays in the Chart window and when you print the chart. For example, uncheck the Planned Treatment check box to remove planned treatment from the tooth graphic chart and the procedure list at the bottom of the window. This same setting hides Planned Treatment if you print the chart.
Depending on what is most important for you to view, you can also change the size of the tooth graphics chart. For example, to see more of the procedures list, you can make the tooth graphics smaller.
► To change the size of the tooth graphics:
From the View menu in the Chart window, select Graphic Size, then select the size of the graphics.
Create a hard tissue chart
Because each exam can be performed according to the needs of each provider, the information recorded can vary. Here’s an example of a typical exam to get you started.
► To create a hard tissue chart:
- From the DAISY+ toolbar, click .
-
In the Schedule window, click the patient appointment to chart. On the Quick Access toolbar, click
.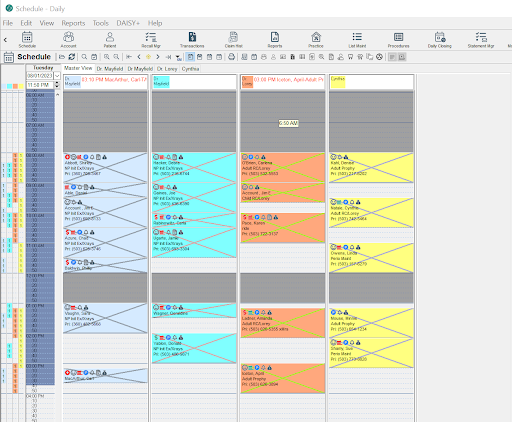
The Chart window opens.
-
From the Method drop-down list, select the method.
This example uses the Free Form Method.
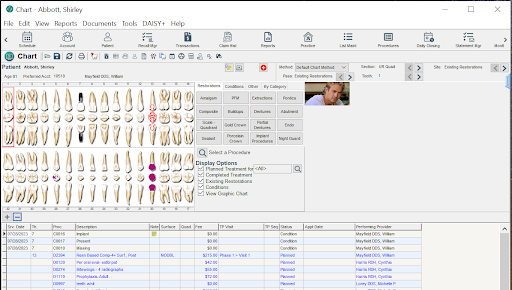
Tip: You can also create a new hard tissue exam from the Patient window. Click the Chart icon on the Quick Access toolbar.
Chart tooth status
Unlike the Perio Exam window, the Tooth Status window shows all the teeth in a single view. You can use this window to quickly mark missing teeth, implants, and teeth that should not be probed. You can also use it to set the patient’s overall dentition (permanent or primary).
All measurements (such as bleeding, pocket depth, recession, and mobility) can be recorded either as part of a pass or outside of a pass.
To record a measurement as part of a pass, the measurement must be set up as a pass in the selected method.
Tip: The Tooth status window is also available from the Chart window. If tooth status information is entered from there, then it becomes available automatically in the Perio Exam window.
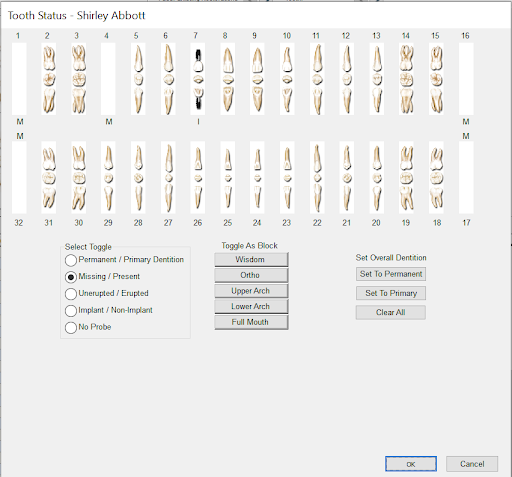
Use the Select Toggle section to designate which tooth state you want to apply to a tooth. For example, choose Missing/Present to designate missing teeth.
Use the Toggle as Block buttons to apply the selected tooth state to a group of teeth. For example, the Wisdom button applies the selected tooth state, such as unerupted, to all the wisdom teeth.
Use the Set Overall Dentition section to specify which tooth graphics should be used in the perio and hard tissue chart. For example, if the patient’s teeth are permanent, click Set to Permanent.
► To chart a patient’s tooth status:
-
From the Quick Access toolbar, click
.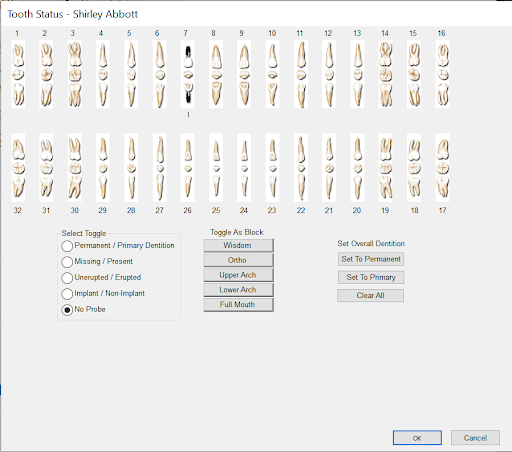
-
In the Select Toggle section, choose the tooth state you want to chart.
For example, choose Missing/Present to set a “missing” tooth state.
-
Do one of the following:
- Click an individual tooth to apply the selected tooth state to the tooth.
- Click one of the Toggle As Block buttons to apply the selected tooth state to a group of teeth.
- To apply another state to a tooth, repeat steps 2 and 3.
-
To undo a state from a tooth:
- Select the tooth’s current state in the Select Toggle section.
- Click the tooth that has the state, or click the appropriate Toggle As Block button to undo the state for a group of teeth.
- When done, click OK.
Note: You can also chart missing teeth in the Perio Exam window. During the Missing Teeth pass, click the tooth, then click Yes on the keypad to mark the tooth as missing. Click No to put a missing tooth back.
Chart existing restorations
The easiest way to chart existing restorations, such as amalgams, buildups, and root canals, is to use the buttons in the Restorations tab.
Tip: To chart the same information on multiple teeth, press CTRL while you click the primary mouse button to multi-select the teeth, then click the appropriate button to apply the procedure.
► To chart existing restorations:
- In the Pass navigation area, click the appropriate buttons to select the Existing Restorations pass.
- Click the tooth to chart. In this example, tooth 15 has an existing amalgam.
- Click the Restorations tab, then click Amalgam.
-
Check the appropriate surfaces for this amalgam, then click OK.
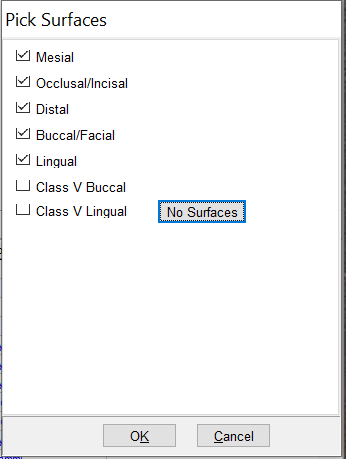
The chart graphic for an amalgam is applied to the tooth in blue, the color for existing restorations. A charted procedure is also added to the list at the bottom of the Chart window.
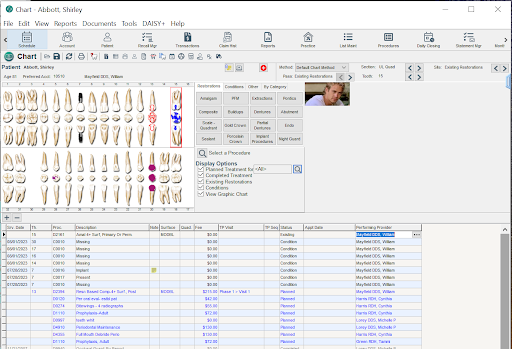
Chart conditions
The easiest way to chart conditions (also known as pathologies), such as abfractions, caries, and tooth fractures, is to use the buttons in the Conditions tab. In the Free Form method, conditions can be charted during any pass.
Tip: Procedures that are not associated with a tooth can be added directly to the procedures list at the bottom of the Chart window.
To add a procedure, click to add a blank line, then type in the appropriate information in each column. When done, save the chart.
► To chart conditions:
-
Click the tooth to chart.
In this example, the amalgam on tooth 15 is fractured on the occlusal surface.
- Click the Conditions tab, then click Fractured Restoration.
-
Check the appropriate surface for this fractured amalgam, then click OK.
The fractured restoration tooth graphic is applied to tooth 15 in green, the color for tooth conditions. A charted procedure is also added to the list at the bottom of the Chart window.
-
Check the appropriate surfaces for this amalgam, then click OK.
The fractured restoration tooth graphic is applied to tooth 15 in green, the color for tooth conditions. A charted procedure is also added to the list at the bottom of the Chart window.
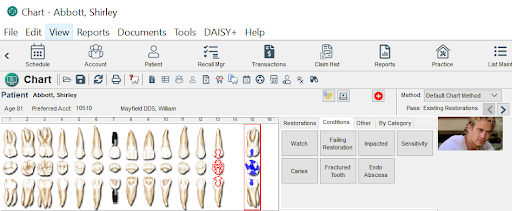
Chart a treatment plan
The easiest way to chart a treatment plan is to use the buttons in the Restorations tab.
► To chart a treatment plan:
-
In the Pass navigation area, click the appropriate buttons to select the Treatment Plan pass. Click the tooth to chart.
In this example, tooth 15 has a large filling with a fractured surface. The provider decides to replace the filling with porcelain-fused-to-gold crown during a future appointment.
-
Click the Restorations tab, then click PFG. The porcelain-fused-to-gold crown graphic is applied to tooth 15 in red, the color for planned treatment.
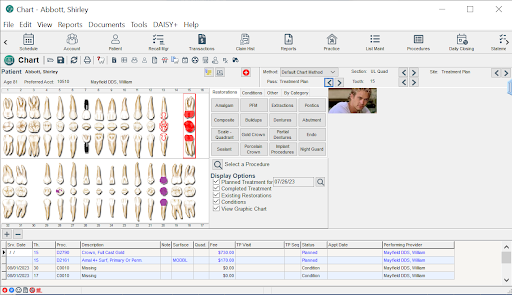
Chart Unplanned Treatment
Treatment planning is not always appropriate for some appointments, such as when a patient comes in with a sensitive spot on a tooth that requires an immediate filling.
► To chart unplanned treatment:
- Open a hard tissue exam for the patient. Select any method.
- In the Pass navigation area, click the appropriate buttons to select the Complete pass.
-
Click the tooth to chart.
In this example, tooth 32 needs a filling.
- Click the Restorations tab, then click Composite.
-
Check the appropriate surfaces for this filling, then click OK.
The filling graphic is applied to tooth 32 in purple, the color for completed treatment.
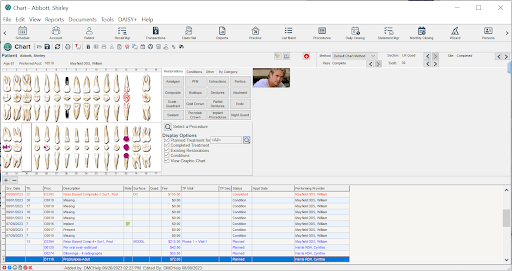
Charting completed treatment generates an entry in the DAISY+ Transactions window. For more information on transactions, see "Manage financial information".
Tip: Once treatment is completed and posted, it cannot be deleted from the chart.
Tip: To remove a procedure associated with a tooth, right-click the tooth, select Remove Entry, then select the procedure. To remove any procedure from the chart, right-click the procedure in the charted procedures list and select Remove entry entry number.
Add a tooth note
You can associate a clinical note with a specific tooth.
► To add a tooth note:
-
In the Chart window, right-click on the tooth, then select Add Note.
The Clinical Notes - General form opens.
- Complete the form.
- Click and close the window.
- Click the Restorations tab, then click Composite.
- The note is added to the procedure list at the bottom of the Chart window. DAISY+ assigns the procedure number C0086 and the description “Observation” to the note.
Print the chart
Tip: Display options in the Chart window affect the content of the printed chart. For example, if Display Options are set to display only planned treatment, then the printed chart shows only planned treatment. For more information on Display Options in the Chart window, see "Display options".
► To print the patient’s chart:
- From the Report menu in the Chart window, select Patient Chart.
-
Do one of the following:
- To view the chart first, click Preview, then click to print it.
-
To print the chart without previewing it, click Print.
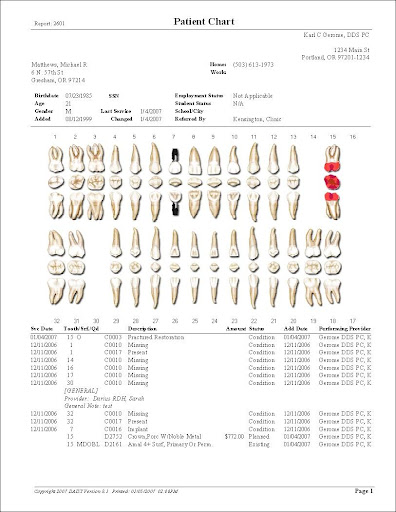
The report prints to the default DAISY+ Chart printer. For more information about changing this default printer, see "Change printer settings for DAISY+ Chart".
Save the hard tissue chart
When you’re done entering all the chart information, save the chart.
► To save the chart:
- Click and close the Chart window.
Complete a planned procedure from the chart
Treatment plan procedures are shown in the Chart window in both the tooth graphic section and in the procedure list at the bottom of the window. Once you complete the planned treatment, you need to indicate that those procedures are complete.
In this example, the patient comes in for a follow-up appointment to have a porcelain-fused-to-gold crown placed on tooth 15.
► To complete a treatment plan procedure:
- From the DAISY+ toolbar, click
 .
. - Search for and select a schedule, then click OK.
- In the Schedule window, click the patient appointment to chart.
-
On the Quick Access toolbar, click
 .
.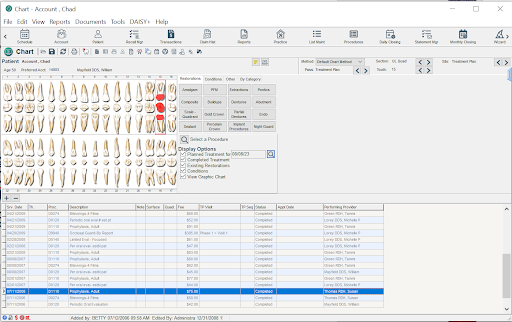
-
To mark the treatment as complete, do one of the following:
- In the procedure list at the bottom of the Chart window, right-click the procedure, then select Mark Completed.
- Right-click a tooth with planned treatment, select Mark Completed, then select the procedure.
-
The Status of the procedure changes to Completed and the completed item is automatically added to the Transactions window in DAISY+.
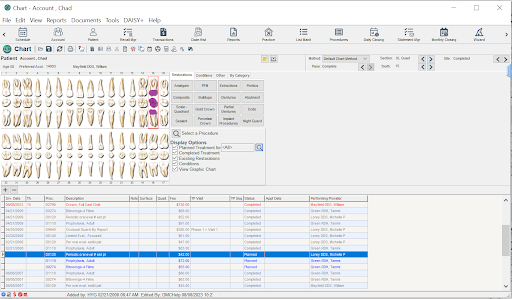
- Click and close the Chart window.
Tip: If you enter procedures when you set up an appointment, they will automatically be marked as Completed in the Chart window when you check out the patient. For more information about adding procedures to an appointment and marking them as Completed during checkout, see "Set up an appointment" and "Check out a patient".
Design a Detail template
Detail templates are a starting point for creating clinical notes. You design customized Detail templates to document patient chart information, such as medical history, treatment notes, phone conversations with the patient, and other clinical information. Here is an example of an Adult Medical History template.
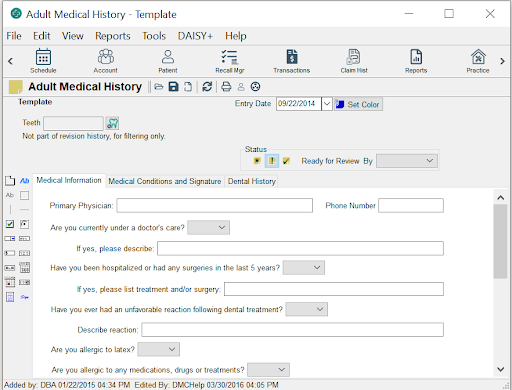
All forms created from these templates can be accessed directly from DAISY+ and DAISY+ Chart. Access to templates and clinical information can also be restricted to specific users. For more information about user access to these templates and clinical information, see "Set up access to Detail templates".
Some templates are designed to bring previously entered information forward. For example, you may want a patient’s medical history brought forward so you can note the changes since the patient's last visit.
If a template contains fields that all respondents will answer in the same way, you can pre-populate them with correct information before you save the template. When users open the form, these fields will already be filled in.
Tip: Use caution when you pre-populate fields in templates with multiple tabs. These fields will show up on Detail forms even if the tab was not otherwise filled out.
DAISY+ keeps an audit trail of changes that are made to clinical information. When a user changes a patient’s clinical information, DAISY+ prompts the user for a reason. DAISY+ records who performed the action, when it occurred, and the reason for the change. Changes in some forms can be made on a field-by-field basis, and the user must provide a reason for each of those changes. When needed, audit trails are easy to access.
To design a Detail template, you need to complete the following steps in this order:
- Create a new template.
- Add a tab sheet.
- Add objects, such as text boxes, drop-down lists, radio buttons, check boxes, and lines.
- Modify the template's properties.
- Rename object labels.
- Modify object properties.
- Specify the sequence of data entry, which is the order in which fields are selected as you press
or on a Detail form created from the template. - Change the default color of the Note icon.
Tip: DMC recommends that you create a mockup of the template on paper first before you design it in DAISY+.
Use the Editing toolbar
Use the Editing toolbar in the template window to add objects, such as text boxes, drop-down lists, radio buttons, check boxes, and lines to a Detail template.
Note: For more information about the template window, see "Create a new Detail template".
| Use this button... | To do this... |
|---|---|
|
|
Add a tab sheet to the template. For example: For more information, see "Add a tab sheet to a Detail template".
 |
|
|
Add a section label. Used to name specific sections of a form. For example:
 |
|
|
Add a label associated with a data object such as a text box, check box, or drop-down list. For example:
 |
|
|
Add a gray rectangle. Used as a 4-sided border to separate sections on a form. |
|
|
Add a gray vertical line. Used as a border to separate sections on a form. |
| Add a gray horizontal line. Used as a border to separate sections on a form. | |
Add a check box. For example:
 |
|
|
Add a group of radio buttons. The buttons can have a vertical or horizontal orientation. For example, this object has a vertical orientation: Note: When you show or hide the label for radio button group, DAISY+ automatically resizes the group to use the minimum amount of space in the template. 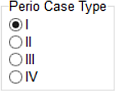 |
|
|
Add an empty drop-down list. For example: Items in the drop-down list are added separately. For more information, see "Modify a drop-down list".  |
|
Add a single-line text box. This can be used for short amounts of text. For example:
 |
|
Add a text box for monetary amounts. This object automatically assigns a dollar sign ($) to the entered amount. For example:
 |
|
|
Add a text box for entering integers, such as 357 and -98. For example: Decimal numbers, such as 357.2, cannot be entered in this type of text box.  |
|
Add a text box for precise numbers, such as 67 or -45, and decimal numbers, such as 479.33 and –29.2. For example:
 |
|
Add a date and time selector. For example:
 |
|
Add a date selector. For example:
 |
|
Add a time selector. For example:
 |
|
|
Add a multi-line text box. For example: Note: This object must be placed at the bottom of the template or on its own tab sheet, otherwise text may overlap other fields when you print a Detail form derived from this template.  |
|
| Add an electronic signature line including date and time (MM/DD/YYY HH:MM AM/PM) to the template. Unsigned electronic forms created from this template do not display the date and time. |
Note: For more information about object properties, see "Modify data object properties".
Create a new Detail template
Create customized Detail templates to document patient chart information, such as medical history, treatment notes, and phone conversations with the patient.
Note: DMC recommends that you create a mockup of the template on paper before you create it in DAISY+ and during construction, and save often.
► To create a new Detail template:
-
Log in to a user account that has permission to create templates.
For more information on user account permissions, see "Set up access to Detail templates".
-
Log in to a user account that has permission to create templates.
Note: If the Detail Templates menu selection is grayed out, then the user does not have permissions to edit templates. For more information, see "Set up access to Detail templates".
-
In the Search for – Detail Template window, click New Detail Template.
The new template opens.
-
Click
 to create a tab sheet.
The tab sheet is where you add objects to your template, such as text boxes, drop-down lists, radio buttons, check boxes, and lines.
-
In the Rename Tab window, type the name of the tab sheet, then click OK.
For example, type Comprehensive Exam.
You see the Editing toolbar on the left side of the window and the tab sheet to the right. The Editing toolbar enables you to add objects, such as text boxes, drop-down lists, radio buttons, check boxes, and lines, to the template. For more information, see "Add objects to a Detail template".
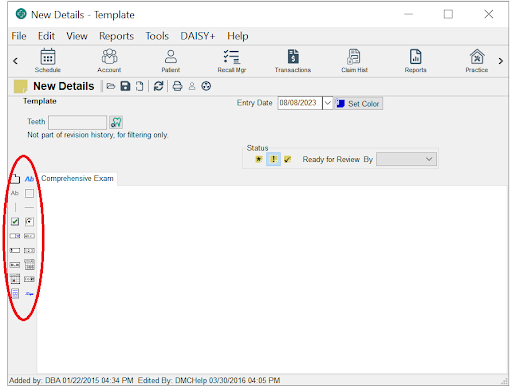
- Click to save the template.
- In the Detail Name window, type the name of the new template, then click OK.
Set up Detail template properties
Use the Detail Properties window to customize template settings, such as the template name, its accessibility, and how forms created from the template are built.
► To set up Detail template properties:
-
Open the template you want to modify.
For more information on opening a template, see "Open a Detail template".
-
From the File menu, select Properties to open the Detail Properties window.
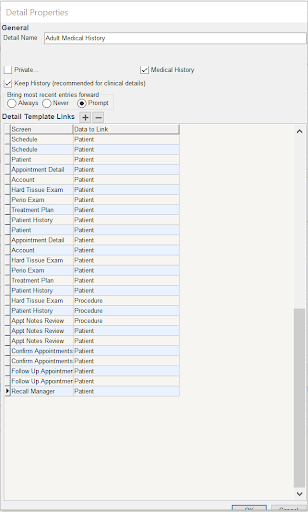
-
Modify the properties that apply to this template.
This property... Does this... Detail Name Defines the name of the template. Medical History If checked, designates that the template may be used to create a Medical History form, and enables you to:
Filter for these forms in the Patient History window.
Open the most recent Medical History form (if available) or create a new medical history form when you click the Medical History button
 .
.Click
in a medical history form to open the Search For - Details window filtered for the patient's other medical history forms created from the same template.Note: This property also affects existing medical history forms derived from this template.
Keep History If checked, DAISY+ keeps a record of revisions made to clinical notes created from this template.
If unchecked, revision history is not retained once you save the clinical note.
Bring most recent entries forward If set to Always, DAISY+ pre-loads the form with the patient's most recent entries.
If set to Never, DAISY+ does not load the form with the most recent entries.
If set to Prompt, DAISY+ prompts the user about whether to pre-load the form with the most recent entries.
-
In the Detail Template Links section, do one of the following:
- Click to link clinical notes based on this template to a patient or a procedure if the note is created in the specified DAISY+ window, such as Account, Treatment Plan, or Appointment Detail. Once linked, the note can be accessed from the Patient History window.
- Select a link and then click to delete the link.
- Click OK.
- Click , then close the window.
Add objects to a Detail template
Use the Editing toolbar in the template window to add objects, such as text boxes, drop-down lists, radio buttons, check boxes, and lines to a Detail template. For more information, see "Use the Editing toolbar".
► To add objects to a Detail template:
-
Open the template you want to modify.
For more information on opening a template, see "Open a Detail template".
- On the Editing toolbar, click an object button.
-
Move the object to its position on the tab sheet, then click to release the object.
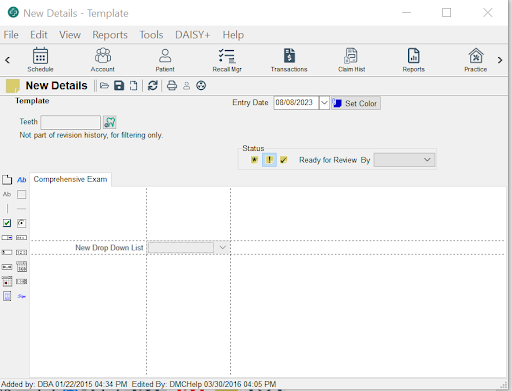
Right-click the object and select Rename to rename the object label.
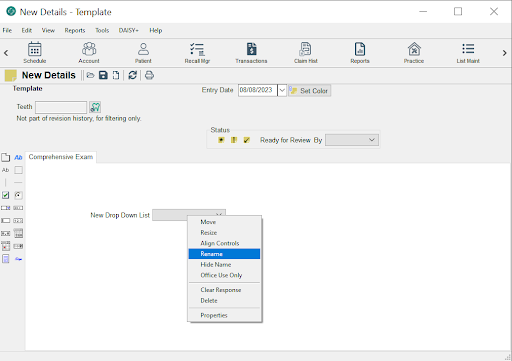
- Type the new label name, then press Enter.
- Right-click the object and select Properties.
-
Modify the properties of this object, then click OK.
Note: For more information, see "Modify data object properties".
- Repeat steps 2 through 7 to add more objects.
- Click , then close the window.
Modify data object properties
Data objects in a Detail template can include drop-down lists, text boxes, check boxes, and time and date selectors. Only data objects have properties that can be modified. Modify the properties of data objects to customize them for your Detail template.
Note: Non-data objects include vertical lines, horizontal lines, and rectangles for separating form sections.
► To modify the properties of a data object:
-
Open the template you want to modify.
For more information on opening a template, see "Open a Detail template".
-
Right-click the object and select Properties.
You see the object's properties window.
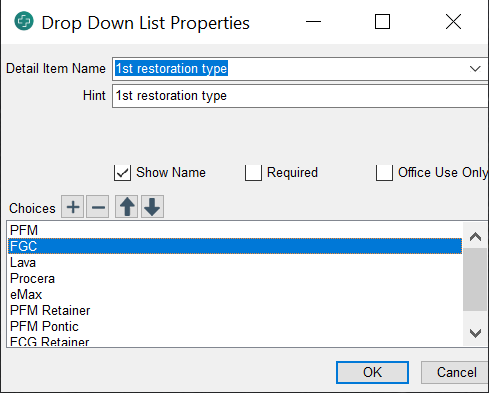
-
Modify the properties that apply to the object.
This property... Does this... Detail Item Name Defines the label of a data object. Hint Displays a short description when the mouse is held over the data object. Show Name If checked, displays the label of the data object.
If unchecked, hides the label of the data object.
Required If checked, the data object must be filled in to complete the Detail form.
If unchecked, the data object may be left blank on the Detail form
Office Use Only If checked, the data object does not display when you view the Detail form in DAISY+ Forms Anywhere or when you print the form using the Detail Form report.
Tip: You can also right-click an object and select Office Use Only.
Note: If an object is associated with a section or data label, you must also set the section label or data label to For Office Use Only.
If unchecked, the data object displays whenever the form is viewed or printed.
Max. Length Sets the maximum number of characters for an object. This property is only available for the short text edit box.
Note: Text entered in a Detail form cannot print properly if its character count exceeds the object's maximum number of characters.
Canned Text If checked, this property links a specified canned text list to the data object. The user can fill out the text box by selecting from the list or by typing in the text box.
If unchecked, the user types a response into the text box.
This property is only available for the short text edit box and multi-line text box.
Allowed Range Specifies the minimum and maximum amounts that can be entered. This property is only available for the Money, Integer, and Precise Number objects. Precision Specifies the number of digits allowed after the decimal point. This property is only available for the Precise Number object. Orientation Sets the relative position of object choices. This property is only available for a set of radio buttons. - If your object is a drop-down list or radio button set, you also need to set the Choices property.
-
To add a choice to the list:
- Click to open the Add Choice dialog box.
- Type the name of the choice, then click OK.
- Repeat Steps a and b to add more choices.
- Click OK.
- Repeat steps 2 through 5 to modify additional objects.
- Click , then close the window.
Modify the sequence of data entry in a Detail form
When you press
Note: The entry sequence setting also affects the order of information displayed in the Detail Report and the Narrative section of the Patient History window.
► To modify the sequence of data entry:
-
Open the template you want to modify.
For more information on opening a template, see "Open a Detail template".
-
Right-click the tab sheet background and select Change Entry Sequence.
You see the list of objects in this template. They are listed from first to last in the sequence.
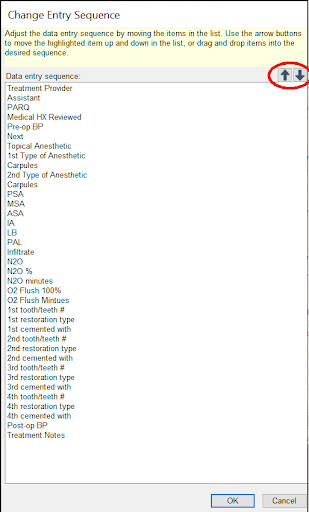
- Select an object, then use the arrows or drag it to the correct position in the list.
- Repeat step 3 until all objects are in the correct data entry order.
- Click OK.
- Click , then close the window.
Modify the color of the Note icon
You can set up different colored icons to distinguish Detail notes (also known as clinical notes) prepared by the hygienist, dentist, front office, and so on to make them easier to spot in the Note column of the Patient History window.
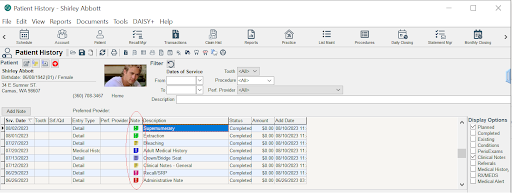
If you set up the default color of the Note icon ![]() in the template, then Detail notes derived from that template will always have the same color of icon.
in the template, then Detail notes derived from that template will always have the same color of icon.
► To modify the default color of the Note icon:
-
Open the template you want to modify.
For more information on opening a template, see "Open a Detail template".
- Click Set Color.
- Select a color, then click OK.
- Click , then close the window.
Open a Detail template
Before you can modify, rename, or copy a Detail template, you need to open it.
► To open a Detail template:
- Log in to a user account that has permission to edit templates.
-
From the DAISY+ menu, select Configure, then Detail Templates.
Note: If the Detail Templates menu selection is grayed out, then the user does not have permissions to edit templates. For more information, see "Set up access to Detail templates".
In the Search For – Detail Template window, you see the list of all available templates.
-
Search for and select the appropriate Detail template, then click OK.
The template opens.
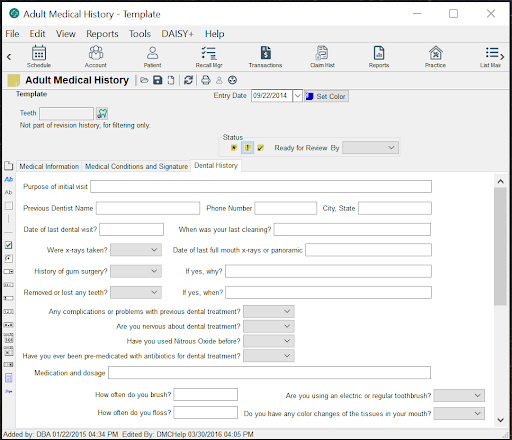
You see the Editing toolbar on the left side of the window. The toolbar enables you to add objects, such as text boxes, drop-down lists, radio buttons, check boxes, and lines, to the template. For more information, see "Use the Editing toolbar".
Copy a Detail template
An easy way to create a new template is to make a copy of an existing one and then customize it.
Note: You can also create a new template then copy the tab sheets from an existing template. For more information, see "Create a new Detail template" and "Copy a tab sheet from another Detail template".
► To copy a Detail template:
-
Open the template you want to copy.
For more information on opening a template, see "Open a Detail template".
- From the File menu, select Export template name Template.
-
Save the template to your desktop.
On the desktop, you see a DPX file. For example, if your existing template is called Doctor Exam, you see a file called Doctor Exam.dpx.
- On your desktop, double-click the DPX file to import the new template.
- From the DAISY+ menu, select Configure, then Detail Templates.
-
In the Search for – Detail Template window, select the new template.
For example, you see a new template called Doctor Exam-1.
-
Customize the new template.
For more information on customizing a template, see "Design a Detail template".
- Click , then close the window.
Select multiple objects in a Detail template
When you design a template, you may want to perform the same action simultaneously on multiple objects in the tab sheet. You can select multiple objects, then right-click a selected object to do the following:
- Move the objects. Drag or use the arrow keys, then click or press
to complete the move. Click to cancel a move. - Delete the objects. Deletions cannot be undone.
- Hide or display their labels. The object you right-click determines if the others will be hidden or displayed.
- Resize to the same height or width. The object you right-click determines the width or height of the selected objects.
- Designate as "For Office Use Only." Objects with this designation do not display when you view the form in DAISY+ Forms Anywhere or when you print the clinical note using the Detail Form report.
- Evenly space the objects horizontally or vertically.
- Align left, right, top, or bottom. Selected objects are aligned to the object you right-click.
- In the following example, you want to move three objects.
► To select and move multiple objects:
-
Open the template you want to modify.
For more information on opening a template, see "Open a Detail template".
-
Place the cursor at one corner of the area you want to select.
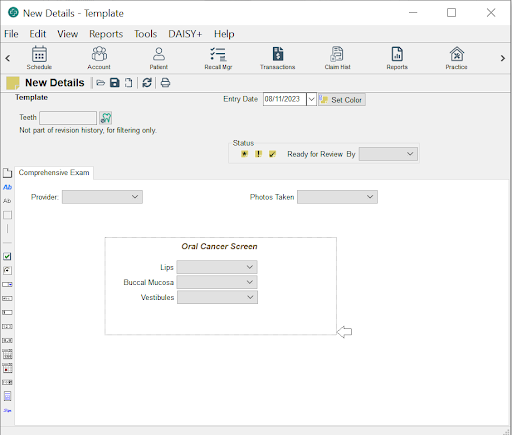
- Drag the mouse across and down (or up) to the opposite corner of the area you want to select.
-
Release the button when you are finished outlining the area.
The objects you selected become outlined in red.
Note: You can also select multiple objects by pressing
and clicking each object. -
Right-click a selected object and select Move.
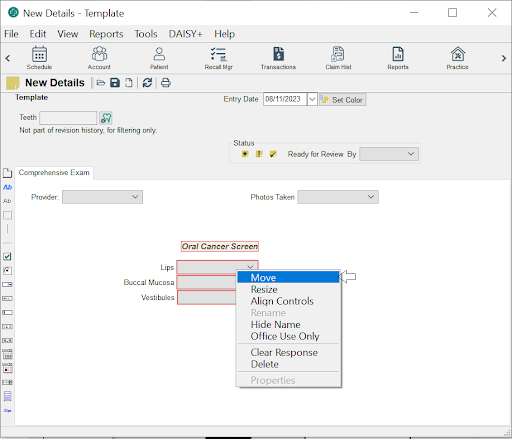
- Move the selected objects to their new position, then click to release them.
- Click , then close the window.
Tip: To select non-contiguous objects, press
Add a tab sheet to a Detail template
You can add one or more tab sheets to a Detail template and reorder the tab sheets after they are added.
You can then add objects, such as text boxes, drop-down lists, radio buttons, check boxes, and lines, to the new sheet.
Note: If clinical notes or medical history forms were created from the template, you will not be able to bring information forward after you reorder the tab sheets.
► To add a tab sheet to a template:
-
Open the template you want to modify.
For more information on opening a template, see "Open a Detail template".
- Do one of the following:
- Click .
- Right-click the tab sheet background and select Add Tab.
- Click
- In the Rename Tab window, type the name of the tab sheet, then click OK.
- To reorder the tab, drag and drop the tab to its new position.
- Click , then close the window.
Note: You can also add tab sheets by copying one or more tab sheets from another Detail template. For more information, see "Copy a tab sheet from another Detail template".
Reorder tabs in a Detail template
Reorder tabs to better organize information in forms created from the template.
► To reorder tabs in a template:
-
Open the template you want to modify.
For more information on opening a template, see "Open a Detail template".
- Drag and drop the tab to its new position.
- Click , then close the window.
Delete a tab sheet from a Detail template
A template must have at least one tab sheet. You may delete all other tab sheets.
► To delete a tab sheet from a template:
-
Open the template you want to modify.
For more information on opening a template, see "Open a Detail template".
- Click the tab you want to delete.
- Right-click the tab sheet background, and select Delete Tab tab name.
- In the Confirm window, click Yes.
- Click , then close the window.
-
Note: A deleted tab sheet cannot be undone.
Copy a tab sheet from another Detail template
You can copy one or more tab sheets from one Detail template to another Detail template. You can reorder the tabs after you add them.
► To copy tab sheets from a template:
-
Open the template you want to modify.
For more information on opening a template, see "Open a Detail template".
-
Right-click the tab sheet background and select Add Tabs from Detail Templates.
You see the Select the Tabs to Add window. The Detail Name column displays template names. The Tab Name column displays tab sheet names. If a template has more than one tab sheet, you see the template name listed more than once.
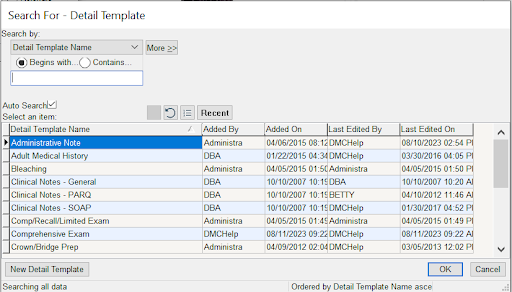
-
Select the tab sheet to add, then click OK.
To reorder the tab, drag and drop the tab to its new position.
- Click , then close the window.
Modify the label of a data object
Data objects in a Detail template include drop-down lists, text boxes, check boxes, radio buttons, and time and date selectors. All data objects have labels. You can rename labels or choose whether or not to show them.
Hiding a label gives you more flexibility on where to place a label or a question in relation to the field. For example, if you have a long question that you want above the field, you can hide the data object's label and then add a separate data label that can be placed in a more appropriate position.
Note: Non-data objects include vertical lines, horizontal lines, and rectangles for separating form sections.
► To rename the label of a data object:
-
Open the template you want to modify.
For more information on opening a template, see "Open a Detail template".
-
Right-click the object and select Rename.
In the following example, you are renaming the label “Performing Dentist.”
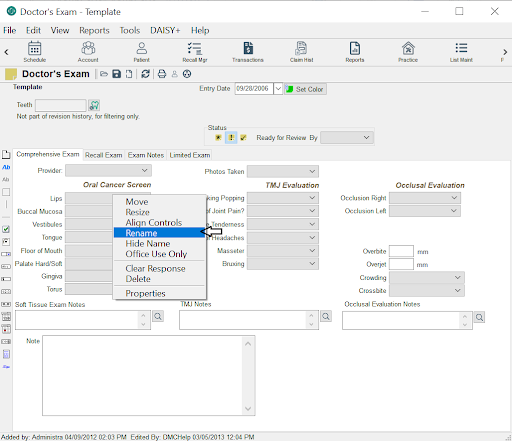
- Type the new name, then press
. - Click and close the window.
► To hide or show the label of a data object:
-
Open the template you want to modify.
For more information on opening a template, see "Open a Detail template".
-
Do one of the following:
- To hide the object label, right-click the object and select Hide Name.
- To show a hidden label, right-click the object and select Show Name.
- Click , then close the window.
Modify a drop-down list
You can add, delete, and reorder the choices in a drop-down list. You can also specify whether:
- The drop-down list is required.
- The label name of the drop-down list should show on forms that are created from the template.
- The drop-down list is for office use only. Objects with this designation do not display when you view the form in DAISY+ Forms Anywhere or when you print the clinical note using the Detail Form report.
Note: You cannot rename a choice in a drop-down list. To change the name of a choice, you have to delete it and add it again using a different name.
► To modify a drop-down list:
-
Open the template you want to modify.
For more information on opening a template, see "Open a Detail template".
-
Right-click the drop-down list and select Properties.
You see the Drop Down List Properties window.

- To make this a required drop-down list, check the Required check box.
- To hide the drop-down list label, uncheck the Show Name check box.
- To make this drop-down list for office use only, check the Office Use Only check box.
-
To add a choice to the list:
Click to open the Add Choice dialog box.
Type the name of the new choice, then click OK.
-
To reorder the choices in the list:
Select the choice you want to move.
Click the up and down arrows to move the choice to its new position in the list.
-
To delete a choice from the list:
- Select a choice from the list.
- Click .
- Click OK to close the Drop Down List Properties window.
- Click , then close the template window.
Resize an object
You can resize any object to accommodate the length of the label name, as well as the number of characters in a text box or drop-down list choices. This example shows how to resize a multi-line text box called Pt Concerns.
► To resize a multi-line text box:
- Right-click the text box and select Resize, then select Item.
-
Place the mouse cursor over the appropriate black dot (this is called a handle) on the boundary of the object until you see an arrow icon overlaying the handle.
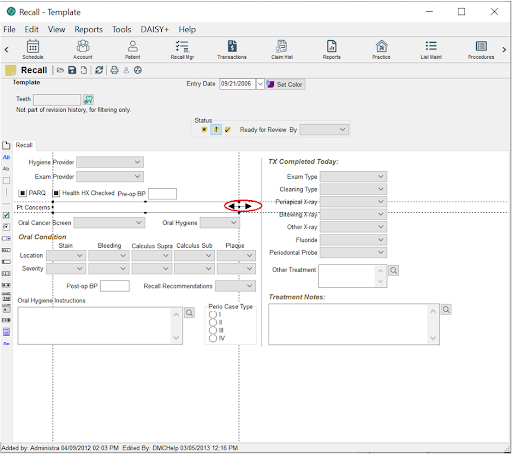
- Click and hold the mouse button and then drag and drop the handle to the position you want.
-
Click the mouse button to complete the action.
Note: Use caution when resizing objects. Some labels are not associated with the object. For example, you might accidentally cover up a label when you resize the object.
- Click , then close the template window.
Clear a response in a data object
If a template contains fields (data objects) that all respondents will answer in the same way, you can pre-populate them with correct information before you save the template. When users open the form created from the template, these fields will already be filled in. You can clear data objects in a template when the response is no longer valid or needed.
► To clear a response in a data object:
-
Open the template you want to modify.
For more information on opening a template, see "Open a Detail template".
- Right-click the data object and select Clear Response.
- Click , then close the template window.
Align objects in a Detail template
You can align multiple objects relative to each other by their left, right, top, or bottom sides. You select the objects to align, then right-click one of them to make it the "anchor" object, which remains stationary. Selected objects align with the anchor object.
Note: Objects include drop-down lists, text boxes, check boxes, radio button groups, electronic signature lines, and time and date selectors, lines, and rectangles.
► To align objects:
-
Open the template you want to modify.
For more information on opening a template, see "Open a Detail template".
- Select the objects you want to align. For more information on selecting multiple objects, see "Select multiple objects in a Detail template".
-
Right-click the anchor object and select Align Controls, then select one of the following:
- Left Sides aligns selected objects with the left side of the anchor object.
- Right Sides aligns selected objects with the right side of the anchor object.
- Top Sides aligns selected objects with the top of the anchor object.
-
Bottom Sides aligns other objects with the bottom of the anchor object.
In the following example, you are aligning the left sides of Lips, Buccal Mucosa, and Vestibules. Vestibules is the anchor object.
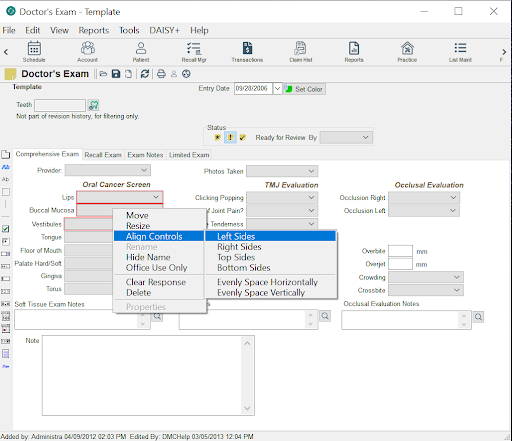
- Click , then close the window.
Rename a Detail template
You rename a Detail template from the Detail Properties window.
► To rename a Detail template:
-
Open the template you want to modify.
For more information on opening a template, see "Open a Detail template".
- From the File menu, select Properties to open the Detail Properties window.
-
In the Detail Name text box, type the new name for this template.
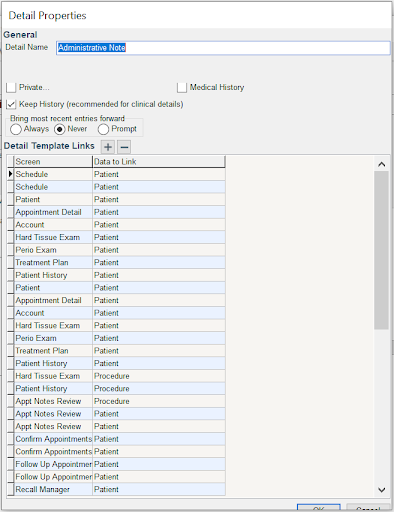
- Click OK.
-
In the Confirm window, do one of the following:
- Click Yes to save the new template name. Go to Step 6.
- Click No to keep the original name. Go to Step 8.
-
Do one of the following:
- If one or more existing clinical notes are based on this template, the Confirm window opens. Go to Step 7.
- If one or more existing clinical notes are based on this template, the Confirm window opens. Go to Step 7.
-
Do one of the following:
- Click Yes to rename the existing clinical notes with the new name of the template.
- Click No to retain the old name for the existing clinical notes.
- Click , then close the window.
Link canned text to a data object
When you link canned text to a text box, the user can fill out the text box by selecting from a list of canned text or by typing in the text box. You can only add this object property to short text edit boxes and multi-line text boxes.
► To link canned text to a data object:
-
Open the template you want to modify.
For more information on opening a template, see "Open a Detail template".
- Right-click the object and select Properties.
-
In the Memo Editor Properties window, check the Canned Text check box.
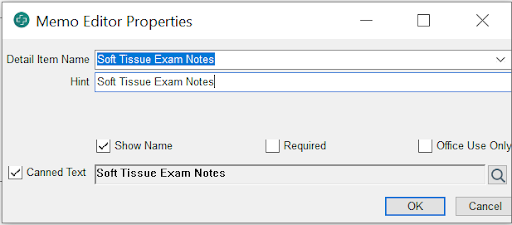
- Click to open the Search For - Canned Text Type window.
- Do one of the following:
- Select the canned text type, then click OK.
- Click New Canned Text Type, type a new canned text type, then click OK.
- In this example, the canned text type is "Soft Tissue Exam Notes."
-
Click OK to close the properties window.
In the template, you now see next to the object.
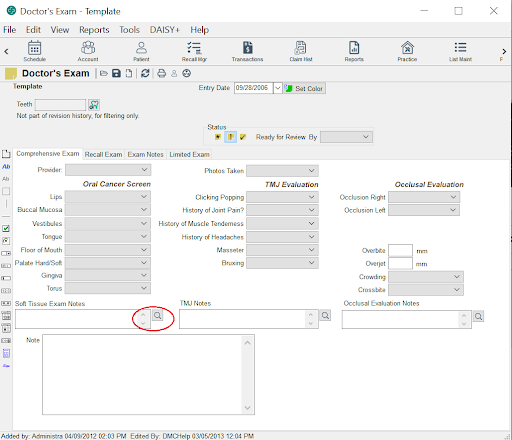
- Click , then close the window.
About patient history
A detailed view of clinical information is available from the Patient History window.
-
To access the Patient History window, click the Patient History icon
 on the DAISY+ toolbar.
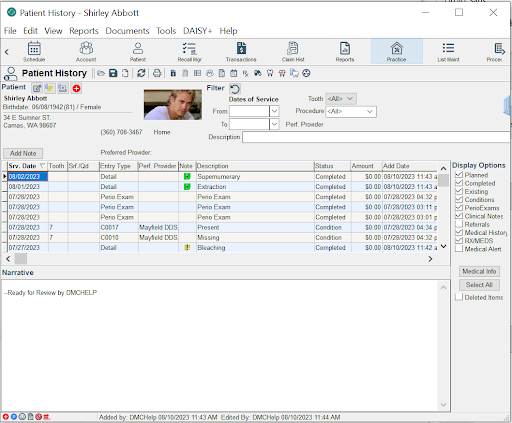
-
To edit an existing note, double-click the note or right-click the note and select Open Note.
Tip: To resize the Narrative section, point to its top border. When the mouse pointer changes to a two-headed arrow, drag the border to shrink or enlarge the section.
- Use the Select All/None toggle button to select or deselect all of the display option settings.
-
Display Options are saved per user per workstation. The settings do not transfer to other users on the same workstation or to other workstations for the same user. In the Display Options section:
- Check the Medical History check box to display a list of the patient's medical history forms.
- Check the Clinical Notes check box to display a list of the patient's clinical notes.
- The Medical Info button under Display Options selects the appropriate check boxes for viewing all medical history forms, prescriptions, reported medications, and medical alerts for the patient.
- Double-click a medical alert entry in the Patient History window to view all of the patient's medical alerts.
- When you remove a medical alert for a patient, a record of it remains in the Patient History window as a deleted item to enable you to track changes to a patient’s medical record.
- When you click the Add Note button, you see a Search For dialog window that is filtered to show only patient-related manage clinical info.
- To add a procedure note, right-click a procedure code in the Entry Type column and select Add Procedure Note.
- To delete a note, open the note, then select File > Delete from the DAISY+ menu in the Clinical Note window.
Add a clinical note
You can add a clinical note to a patient record from a variety of windows, including the Patient, Chart, or Patient History windows.
► To add a clinical note:
- From the DAISY+ toolbar, click .
- Search for and select the patient.
- Click the Add Note button.
- In the Search For – Patient Details window, search for and select the appropriate Detail template.
- Enter clinical information in the template.
-
In the Status section, click the appropriate status button.
This status button… Does this… In Progress Indicates that the note is incomplete. The note is usually assigned to the person who is composing it. Ready for Review Indicates that the note is ready for review. This is the default setting for all notes. You can pick who will be the reviewer in the Ready for Review drop-down list. This list includes all users, even those who are not authorized to review notes.
If an unauthorized person tries to review it, they see a dialog window that says, “A valid reviewer and password is required to save Reviewed items.
Reviewed Indicates that an authorized user reviewed the note and “signed off” on it. -
Do one of the following:
-
If the status is set to In Progress or Ready for Review:
- From the drop-down list in the Status section, select the user who is responsible for the next task..
- Click and close the window.
-
If the status is set to Reviewed, click .
-
The Verify Review dialog window opens.

-
-
Select the reviewer.
- Type the reviewer’s user password.
- Click OK.
-
Close the Details form window.
- Type the reviewer’s user password.
- Click OK.
-
Tip: If you are not authorized to review clinical notes or to change the status from “Ready for Review” to “In Progress”, then you will see a dialog box that says, “A valid reviewer and password is required to save Reviewed items.” For information about how to obtain authorization to make these status changes to notes, see "Set up permissions for electronic sign-off".
Modify a patient’s clinical note
Sometimes you need to make a change to a clinical note because, for example, information was entered incorrectly. Changes to clinical notes can be made on a field-by-field basis, and a reason must be provided for each of those changes.
Note: Use the Details revision feature to make corrections to a clinical note or other Details forms rather than using it to track information that will naturally change over time, such as a person's medical history.
Note: To apply the same reason to multiple changes, right-click on the Reason for Change column header, select Apply Reason To, then select All Changes.
In this example, the dosage of a medication listed in the patient’s Medical-Dental History form is incorrect.
► To modify a patient’s clinical details:
- From the DAISY+ toolbar, click .
- Search for and select a schedule, then click OK.
- In the Schedule window, click the patient appointment to select it.
-
On the Quick Access toolbar, click
.The Chart window opens.
- On the Quick Access toolbar, click
 .
. - Search for and select the details form, then click OK.
-
Revise the information, then click .
The Reason for Change window opens.
-
In the Reason for Change column, type the reason for the change.

Note: All changes in the list are automatically checked. If you only want to keep some of them, uncheck the ones you don’t want. To uncheck all of them at once, click Select None.
- Click OK.
- Close the details form.
Set the Note icon color
Patient Detail forms, such as adult medical history, hard tissue exam, or perio therapy, have a Set Color button. Use this button to set the color of the note icon that displays in the Note column in the Patient History, Clinical Notes Manager, and Appointment Manager windows. This feature makes it easy, for example, to color code types of notes, notes for specific providers, or to bring a particular note to someone’s attention.
Setting the color affects the individual note only, not the Details template. For example, in this Patient History window, the Note icon color for Emily Abbott's 11/05/2114 clinical note has been set to green. Other Note icons are yellow or blue.
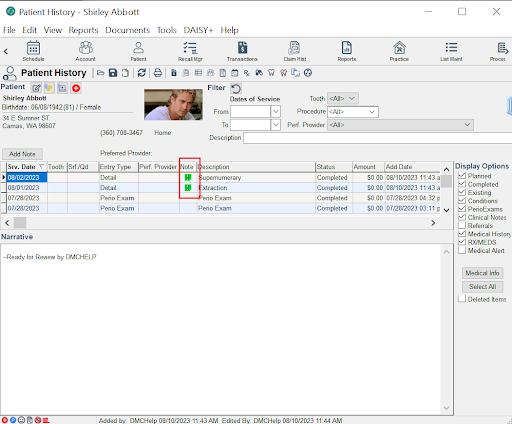
► To modify a patient’s clinical details:
-
Open a clinical note.
Note: You can also set the color of the icon when you create a new note.
-
Click the Set Color button.
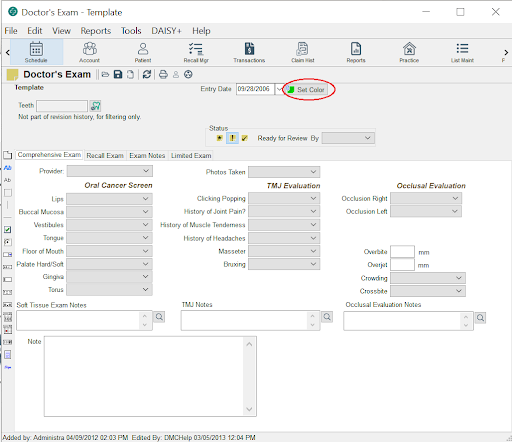
-
In the Color window, click the new color, then click OK.
The color of the icon changes in the Set Color button, as well as in the Note columns in the Patient History, Clinical Notes Manager, and Appointment Manager windows.
Note: You can also change the default color of the Note icon in a Details template, so that all Detail forms created from that template display Note icons of the same color. For more information on changing the default color, see "Modify the color of the Note icon".
Clear a response in a clinical note
You can clear a response in a text box, drop-down list, check box, radio button group, or time and date selector in a clinical note.
Note: Cleared responses in a saved clinical note are added to the note's revision history.
► To clear a response in a clinical note:
-
Open the clinical note for the patient.
For more information on opening a clinical note, see "View patient details".
-
Right-click the field and select Clear Response.
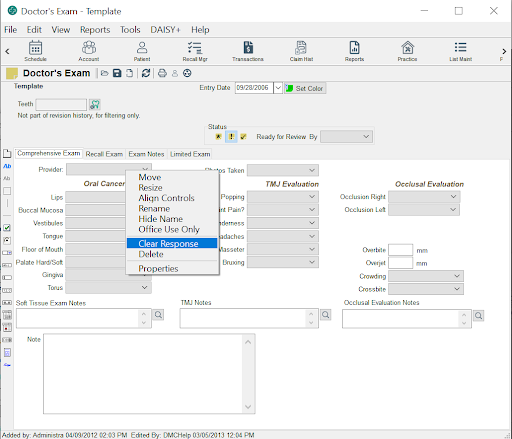
-
Click to save the change.
You see the Reason for Change dialog window.
- In the Reason For Change column, type the reason for the change, then click OK.
- Close the clinical note.
View patient details
You can access patient details, such as clinical notes and medical history, from a variety of windows, such as the Patient, Chart, or Patient History windows.
► To view patient details:
- From the DAISY+ toolbar, click .
- Search for and select the patient, then click OK.
-
Click
in the Patient window.Note: The
 button displays a paperclip only when clinical notes are associated with the patient.
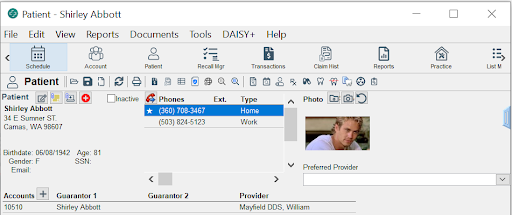
-
Search for and select the details to view.
For example, select Crown/Bridge Prep entered on 10/29/2014.
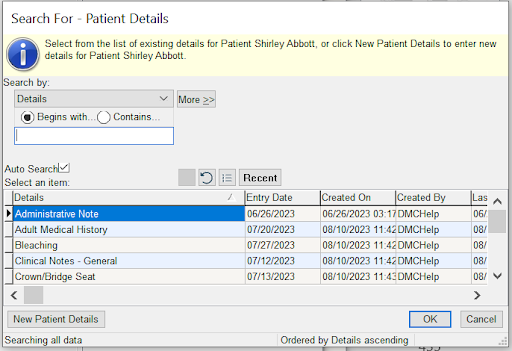
The patient’s clinical note opens.
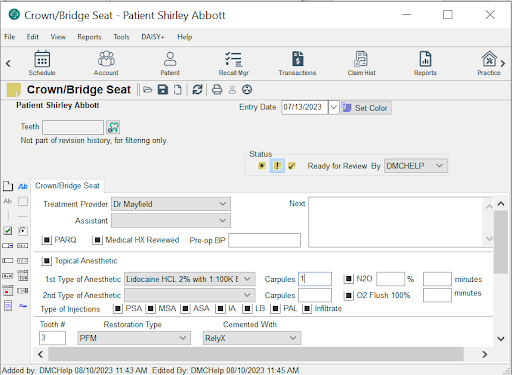
- When finished, close the window.
Print a Detail form
Use the Detail Form report to print a clinical note, medical history, or a blank Detail form as formatted.
This report:
- Displays the practice's name and contact information at the top of the first page.
- Gives you the option of printing all tabs or a specific tab.
- Prints the information in each tab on a separate page.
For best printing results:
- Design your form to be no more than 104 characters wide.
- Adjust all margin settings in the Page Setup window to 0.5 inches.
Note: Form fields, such as text boxes, drop-down lists, radio buttons, check boxes, and lines, that are designated as "For Office Use Only" do not print on this report. Drop-down lists print as a blank text box.
► To print a Detail form:
- From the DAISY+ toolbar, click .
- Search for and select the patient, then click OK to open the Patient window.
-
Click
to open the Search For - Patient Details window.Note: If the patient has no existing Detail forms, click
to open the search window. -
Do one of the following:
- Select a Detail form, then click OK.
- To create a new Detail form, click New Patient Details. In the Search For - Patient Details Template window, select a template, then click OK. Fill out the form or leave it blank.
- From the Reports menu, select Detail Form, then select All Tabs.
-
Do one of the following:
- To preview the report first, click Preview, then click
 to print it.
 -
To print the report without previewing it, click Print. Here is an example of the Detail form.

- To preview the report first, click Preview, then click
Note: The Detail Report is also still available in the Reports menu. Use it to print a summary of a clinical note. Only fields that contain information show on that report.
Print a patient chart
You can use the Patient Chart report (R2601) report to print selected patient details for review, when you need to send patient records to a specialty office, or when you want to transfer a patient to another dental office. This report is available from the Reports menu in the Patient History window or from the Report Gallery.
► To print a patient chart:
- From the DAISY+ toolbar, click .
- Search for and select the patient, then click OK.
- In the Patient window, click to open the Patient History window.
-
In the Display Options section, check the options that you want to include in the report or click Select All to include the entire chart.
In this example, the office wants to print a report of all of the patient's prescriptions and reported medications.
-
From the Reports menu, select Patient Chart.
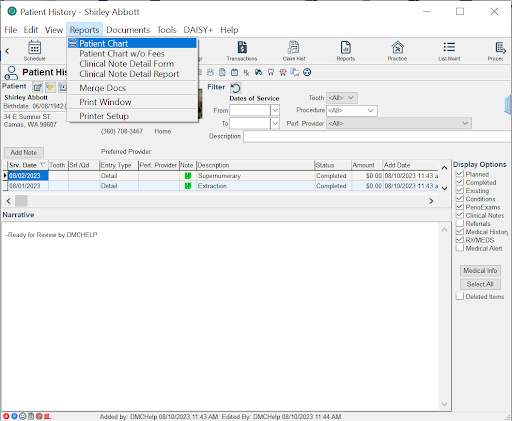
You see the Patient Chart report with both prescriptions (RX) and reported medications (MEDS).
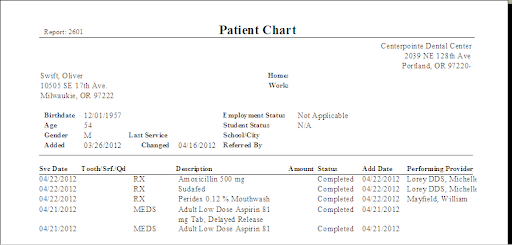
Review a list of clinical notes
The Clinical Notes Manager window shows you a list of clinical notes in a single window. This window lets you work through the list of clinical notes, marking them as reviewed, and then saving them all at once. You can, for example, view a range of notes over multiple days, or view only notes that haven’t been reviewed.
Since some notes are not related to the appointment schedule, this window also helps you to find and review them. For example, if Mrs. Philips calls in with a problem tooth, and Dr. Taylor issues a prescription to ease the pain until she can get in for an appointment, the note about this will not be tied to an appointment.
► To review a list of clinical notes:
-
From the DAISY+ menu, select DAISY+, then Patient, then Clinical Notes Mgr.
Tip: For easier access, add the Clinical Notes Mgr icon
to the DAISY+ toolbar. You see the Clinical Notes Manager window. In the Reviewer field, DAISY+ automatically selects the user who is logged in.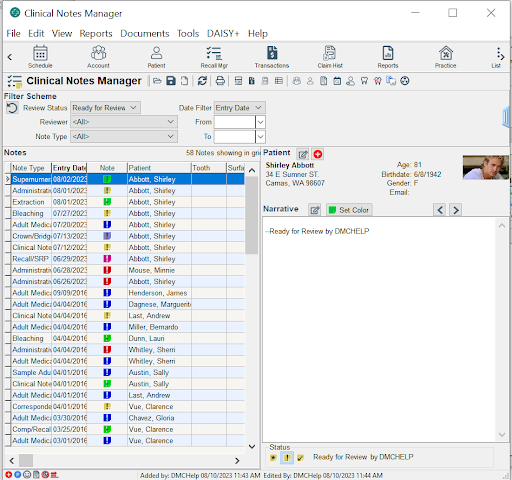
-
Under Filter Scheme, select one or more options to filter the Notes list:
Use this filter... To do this... Review Status Select notes with a specific review status, such as Ready for Review. Or select to view clinical notes with any status: In Progress, Ready for Review, Received, and Reviewed. Reviewer Select the user who has been assigned the responsibility for reviewing the note. Or select to view notes assigned to any user. Note Type Select the type of date:
Entry Date: the date of service that the note is attached to.
Add Date: the date when the note was added to the system.
Entry Date: the date of service that the note is attached to.
Review Date: the date when the note was reviewed and electronically signed off.
From Earliest date of notes to include in the list. To Latest date of notes to include in the list. -
Select a clinical note from the filtered list.
In the Narrative section at right, you see a summary of the clinical note's details.
-
To open the selected note, do one of the following:
-
In the Note column, double-click
 .
.Tip: The color of this icon may vary. For more information, see "Set the Note icon color".
- In the Narrative section, click .
-
-
View or modify the note, then click .
If you modify the note, you see the Reason for Change dialog window.
- In the Reason For Change column, type the reason for the change, then click OK.
- Close the note.
-
To mark the note as reviewed, in the Status section,
- click .
- The Clinical Note Manager moves to the next clinical note in the list.
Tip: To change the note to a different status (other than “Reviewed”), click the appropriate status button. For example, if you determine that the note is incomplete, you can set the status back to “In Progress.” However, to change who the note is assigned to, you need to open the note.
- click
- For each note, repeat steps 3 through 8.
-
When you are done reviewing all notes, click .
You see the Verify Review dialog window.
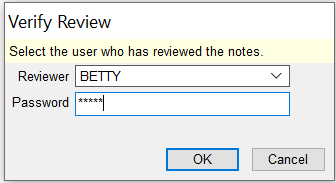
-
From the Reviewer drop-down list, select your user name.
Tip: Only users with the permission "Allow Review of Detail Responses" are included in the Reviewer drop-down list. For information about how to obtain authorization to make these status changes to notes, see "Set up permissions for electronic sign-off".
- In the Password text box, type your DAISY+ password, then click OK.
- The reviewed clinical notes are saved and electronically signed off with your user name.
View revisions to clinical details
When changes are made to existing clinical details, DAISY+ tracks the revisions for auditing purposes.
► To view revisions to clinical details:
- From the DAISY+ toolbar, click .
- Search for and select the patient.
- Click OK.
-
Click
in the Patient window.Note: This button displays only when there are details associated with the patient.
- Search for and select a details form that has been revised.
-
Click OK.
The details form opens.
-
Click Revisions.
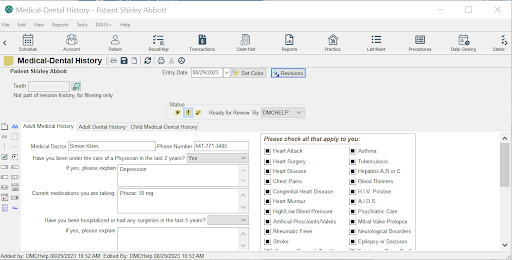
Note: The Revisions button displays only if revisions have been made to the form.
The Revision History window opens.
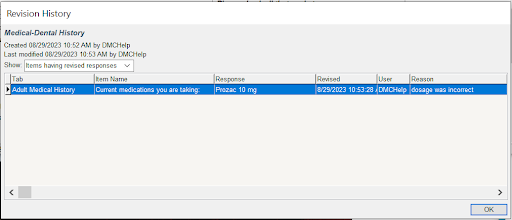
The items in this example window are arranged in the same order as the tabs on the Medical - Dental History form. Items are sorted by these tabs in the order that the information was entered from newest to oldest. Items are then sorted according to the order that information would be entered if the user were to tab through the form.
- In the Show drop-down list, select which items to view.
- Click OK to close the window.
Note: Revision History can also be accessed from any details form window. From the View menu, select Revision History, then select the type of items to view. Even if an item has not been revised, you can use the Revision History window to view original entries to determine who entered the information and when.
Run the Clinical Note List report
A Clinical Note List report is available from Clinical Notes Manager window. The report shows patient information, such as name, address, and last service date, and also provides clinical notes for the patient.
Note: This report can also be run from the Patient folder in the Report Gallery.
You can use this report to:
Review the day's notes at home or during lunch before assigning them to another provider for final review.
Print all the notes for a particular patient in a more concise format instead of just one per page.
► To run the Clinical Note List report:
- Open the Clinical Notes Manager window.
-
From the Reports menu, select Clinical Note List.
The report uses the filter settings from the Clinical Notes Manager window. In the following example, the filters were set to show only the clinical notes for services performed from 8/10/2107 to 8/11/2107 that Kate needed to review.
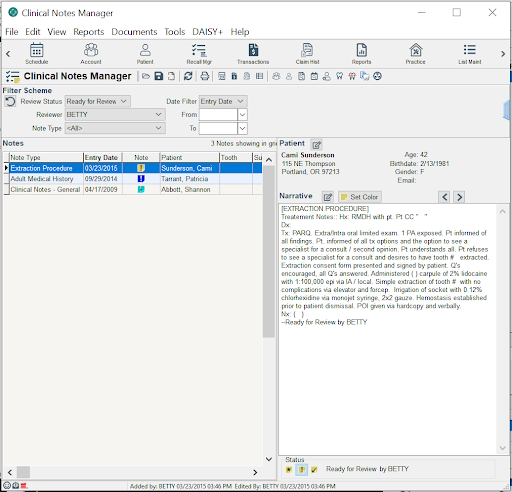
When Kate ran the Clinical Notes List report from the Reports menu in Clinical Notes window, it included the following information:
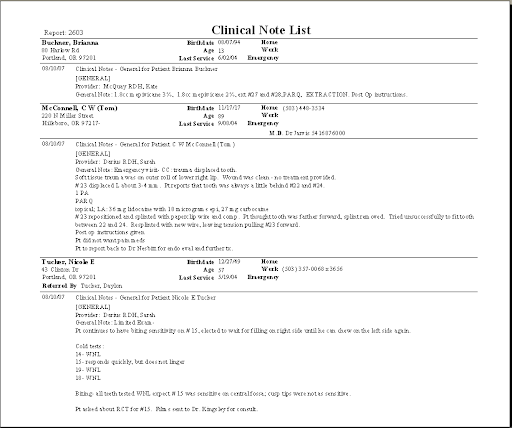
Use Appointment Notes Review
The Appointment Notes Review window provides a list of all the appointments scheduled on a selected day, along with an easy way to view all the patient history information (such as clinical findings, clinical notes, or a patient’s medical history) for those appointments. This is the same information that you see in the Patient History window.
This window helps to ensure that the day’s treatment for each patient has been documented and that it is accurate. Using this window, you can easily review the progress notes for each patient on the day’s schedule. You can also create notes for any appointments that do not have them.
This window is also useful for viewing the next day’s appointment list and related patient information, such as medical history, what services were performed during the last visit, and what treatment is planned for the next appointment.
► To review the day’s treatment for each patient:
-
From the DAISY+ menu, select DAISY+, then Appointment, then Appt Notes Review.
Note: For easier access, add the Appt Notes Review icon (
 ) to the DAISY+ toolbar.
You see the Appointment Notes Review window.
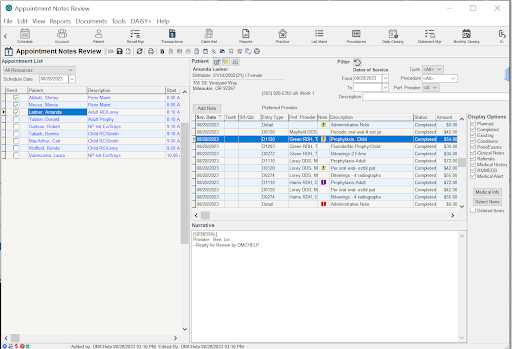
The Appointment List section contains a list of appointments based on:
- A selected appointment date
- A resource, such as the doctor or hygienist, or all resources
-
From the Appointment List, select an appointment.
You see the patient’s history on the right side of the window. If no note is attached to service that occurred on the selected date (look for
in the Note column), you need to add a note.Note: If the appointment is for a new patient, you will see this warning in the Patient section of the window: “This is a New Patient appointment. There is no Patient History corresponding to this appointment.”
-
Do one or more of the following:
- In the Narrative section, view a summary of the selected note’s details attached to this appointment.
- Filter the information that displays in the patient history list by selecting:
- A range of service dates
- Tooth number
- Procedure
- Performing provider
-
Description (what is shown in the Description column)
To view or modify the note attached to the patient associated with this appointment, in the Note column, double-click
to open the clinical note. View or modify the note, then close the note window.Note: The color of this icon may vary. For more information, see "Set the Note icon color".
To track which appointments have been reviewed, in the Appointment List section, check the check box next to the patient’s name in the Rev’d column.
Note: This review is not the same as the electronic sign-off review for clinical notes. For more information about electronic sign-off, see "Set up permissions for electronic sign-off".
When you are done reviewing all appointments, click and close the window.
► To add a note from the Appointment Notes Review window:
- In the Appointment List, select the patient that is missing a note.
-
To add patient-related details:
- Click the Add Note button.
- Select a Details template for the note.
- Fill out the note, then click and close the window.
- A icon is added to the Note column for the selected patient.
-
To add procedure-related details:
- Right-click the Entry Type column in any cell that contains a procedure code, and select Add Procedure Note.
- Select a Details template for the note.
- Fill out the note, then click and close the window.
- A icon is added to the Note column for the selected procedure.
Note: Although notes can be individually opened and marked “Reviewed” from this window, the Clinical Notes Manager lets you mark a list of clinical notes as “Reviewed” without having to open each note. For more information, see "Review a list of clinical notes".
Manage medical history
Dental practices commonly ask new patients for medical information at their first appointment. They may also ask established patients to review the old medical history form periodically and either update existing information or indicate that the information is still correct.Answering questions can be done by:
You can use the patient's existing medical history form to create a new blank one or bring forward the most recent entries and have the patient update information that has changed. For more information, see "Create a medical history form".
After you create a medical history form for the patient, you can:
- Print the form using the Detail Form report and have the patient complete it, then transcribe the information into the patient's medical history form on the computer. For more information, see "Print a medical history form".
- Hand patients an electronic device (such as a tablet) in the office that they can use to fill out the form. For more information, see "Fill out medical history on an office tablet".
- Use DAISY+ Forms Anywhere to enable patients to access and complete the form online from any device with an Internet connection. For more information, see "Use DAISY+ Forms Anywhere".
Create a medical history form
For new patients, you can create a blank medical history form. For established patients, you can:
- Create a blank form.
- Bring forward the medical information provided last time into a new form so the patient can note changes or indicate that the information is still correct.
- Open an existing form so the patient can complete the form if information has been omitted.
Create a medical history form for a new patient
Christine Able is a new patient at Centerpointe Dental. Sharon in the front office wants Christine to complete a medical history form on paper. She creates a medical history form for Christine and prints it when Christine arrives for her appointment.
► To create a medical history form for a new patient:
- From the DAISY+ toolbar, click .
- Search for and select the patient, then click OK.
-
In the Patient window, click
 to open the Search For - Medical History Template window.
Note: If the patient is new, the Medical History button will be grayed out in the Confirm Appointments and Follow Up Appointments windows and it will not display in the Appointment window.
-
Search for and select the template, then click OK.
The medical history form opens.
- Click to save the form.
Create a medical history form for an established patient
Emily Abbott is an established patient at Centerpointe Dental. Sharon in the front office wants Emily to update her a medical history information when she arrives for her appointment. Sharon pulls Emily's prior responses into a new form so Emily can save time updating her information.
► To create a medical history form for an established patient:
- From the DAISY+ toolbar, click .
- Search for and select the patient, then click OK.
- In the Patient window, click to open the patient's most recent medical history form.
- Click to open a new medical history form.
-
In the Confirm window:
Click Yes to pull in the patient's prior responses.
Note: If the template used to create the original medical history form no longer exists, DAISY+ warns you that it cannot create new details and that the template was deleted, renamed, or is no longer allowed to link to the same kind of data. DAISY+ will not pull in prior responses.
Click No to leave the form blank.
- Click to save the form.
Tip: To use a different Detail template from the one that opens when you click ![]() , select File > New > Other Details for Patient xxx. Select the template to use and click OK. Note that all Detail templates appear in the list rather than just those designated as Medical History templates.
, select File > New > Other Details for Patient xxx. Select the template to use and click OK. Note that all Detail templates appear in the list rather than just those designated as Medical History templates.
Print a medical history form
Use the Detail Form report to print a medical history form that patients can fill out. Form fields, such as text boxes, drop-down lists, radio buttons, check boxes, and lines, that are designated as "For Office Use Only" do not print on this report.
Tip: For best results, line up the right margin of the template with the right edge of the "Ready for Review By" drop-down list. Drop-down lists print as a blank text box.
Christine Able is a new patient at Centerpointe Dental. Sharon in the front office wants Christine to complete a medical history form on paper when she arrives for her appointment. Sharon creates the form in advance, and then prints it when Christine arrives for her appointment.
► To print a medical history form:
- From the DAISY+ toolbar, click .
- Search for and select the patient, then click OK.
-
In the Patient window, click
to open the most recent medical history form.For information on creating a medical history form, see "Create a medical history form".
- From the Reports menu, select Detail Form, then select All Tabs.
-
In the Print Options window, click Print.
Here is an example of a medical history form.
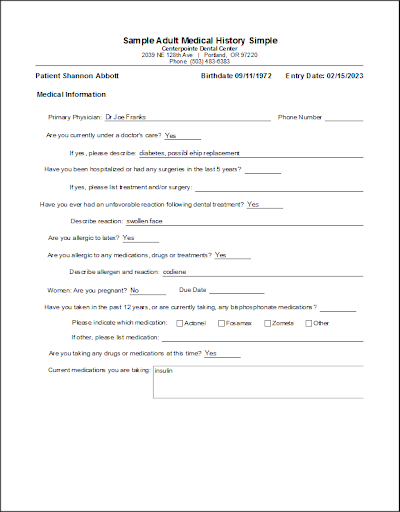
- For more information about printing other types of Detail forms, see "Print a Detail form".
Set up an access code
You can set up a secure access code for a medical history form at any time. After you set up the code, you can:
- Enter the code into a device (such as a tablet) that the patient can use to complete the form in your office. For more information, see "Fill out medical history on an office tablet".
- Securely email the code to a patient who has subscribed to DAISY+ Forms Anywhere. For more information, see "Email access to a medical history form".
Note: You cannot enable access to an existing medical history form if the Detail template that the form was originally based on has been deleted or renamed.
Emily Abbott is an established patient at Centerpointe Dental. Beverly in the front office wants Emily to update her medical history when she arrives for her appointment. Beverly sets up an access code for Emily's medical history form, enters the code on a tablet, and hands it to Emily to use for updating her information. Emily makes the appropriate changes and submits the form.
► To set up an access code:
- From the DAISY+ toolbar, click .
-
Search for and select the patient, then click OK.

-
In the Patient window, do one of the following:
For a new patient or an established patient with no medical history on file, click
to open the Search For - Medical History Template window. Search for and select the template, then click OK to open a medical history form.For an established patient, click
to open the patient's most recent medical history form. -
From the Tools menu, select Allow Patient Access, then select one of the following:
- New Form with Prior Responses for a new medical history form preloaded with the patient's prior responses.
- New Blank Form for a blank medical history form.
-
Existing Form for Revision for the last medical history form that the patient submitted.
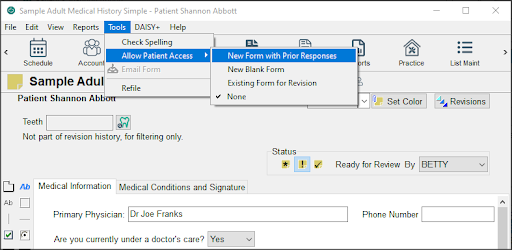
You see a new patient access code below the patient's name. To the right of the code is an expiration date and time. The code's expiration date and time default to 11:59 p.m. on the current day. However, you can change it here before you send the access code to the patient.
Note: Access codes are randomly generated. They are not in numerical order.
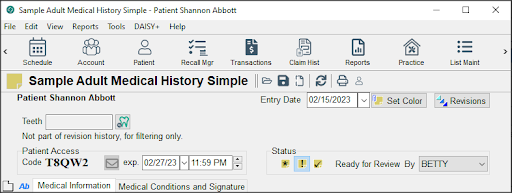
Tip: To see the type of access granted to the patient, rest your cursor on the access code.
Fill out medical history on an office tablet
You can give patients the option of filling out their medical history form on an electronic device (such as a tablet) in the office. You create a medical history form, set up an access code, enter the code on an office tablet, and hand it to the patient to complete the form.
Note: Access codes are randomly generated. They are not in numerical order.
Note: Access codes are randomly generated. They are not in numerical order.
► To fill out a medical history form on an office tablet:
- Create a medical history form. For more information, see "Create a medical history form".
- Set up an access code. For more information, see "Set up an access code".
-
Type the access code into the tablet, then click Submit.
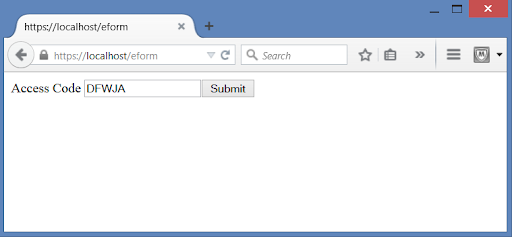
The patient's medical history form opens. Hand the tablet to the patient.
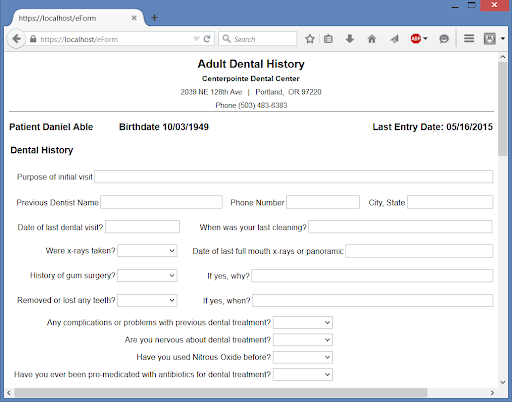
After reviewing and updating the information, the patient clicks Submit at the bottom of the form.
Use DAISY+ Forms Anywhere
With DAISY+ Forms Anywhere, patients can securely access and complete their medical history information online from any type of electronic device with Internet access, including Apple, Android, Kindle, and Microsoft Windows. Patients must subscribe to DAISY+ Forms Anywhere before they can receive access.
Note: To set up DAISY+ Forms Anywhere for your dental practice, contact your DAISY+ representative.
In this example, the office sends the patient an email to subscribe to DAISY+ Forms Anywhere and then sets up an access code for the patient's medical history form.
Christine Able is a new patient at Centerpointe Dental. Sharon in the front office wants Christine to complete a medical history form before she comes in for her first appointment.
Sharon creates a medical history form for Christine. She then creates an access code Christine can use to access the medical history form. Sharon sends Christine an opt-in email for DAISY+ Forms Anywhere. Christine clicks a link in the email message and sets up her passphrase and hint for this service.
After Christine subscribes, DAISY+ automatically emails Christine a second email that has the access code and a link to the form. She clicks the link to open the form, enters the access code and her passphrase, enters her medical history information, then submits the form. Sharon then opens the form via the Clinical Notes Manager window.
In this example, the office first sets up an access code for the patient's medical history form and then sends the patient an email to subscribe to DAISY+ Forms Anywhere.
Robert Taylor is an established patient at Centerpointe Dental. Sharon in the front office wants Robert to update his medical history before he comes in for his appointment. Sharon creates a new medical history form that pulls in Robert's older medical history information. She then creates an access code for Robert to use to access the medical history form.
Sharon sends Robert an opt-in email for DAISY+ Forms Anywhere. Robert clicks a link in the email message and sets up his passphrase and hint for this service. After Robert subscribes, DAISY+ automatically emails Robert a second email that has the access code and a link to the form. Robert clicks the link to open the form, enters the access code and passphrase, enters his medical history information, then submits the form. Sharon then opens the form via the Clinical Notes Manager window.
For more information, see "Set up a patient for online access" and "Email access to a medical history form".
Set up a patient for online access
To set up a patient for online access, send the patient an opt-in email message for DAISY+ Forms Anywhere. The patient clicks a link in the email message and sets up a passphrase and hint for DAISY+ Forms Anywhere.
Note: Patients can unsubscribe from DAISY+ Forms Anywhere at any time. For more information, see "Unsubscribe from DAISY+ Forms Anywhere".
► To set up a patient for online access:
- From the DAISY+ toolbar, click .
- Search for and select the patient, then click OK.
-
In the Personal Info window, click to send an opt-in email message to the patient.
- From the Reports menu, select Detail Form, then select All Tabs.
-
In the Print Options window, click Print.
Here is an example of a medical history form.
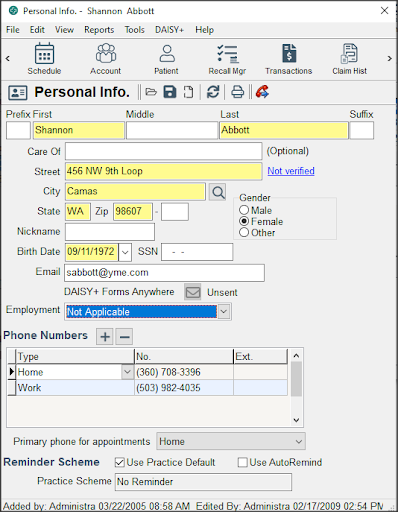
Note: You will not see the button if the Email text box has no email address.
The patient's online access status changes from "Unsent" to "Sent." You also see an Info window that confirms the message was sent. For more information about viewing a patient's access status, see "View the status of a patient's online access".
-
Here's an example of an opt-in email message:
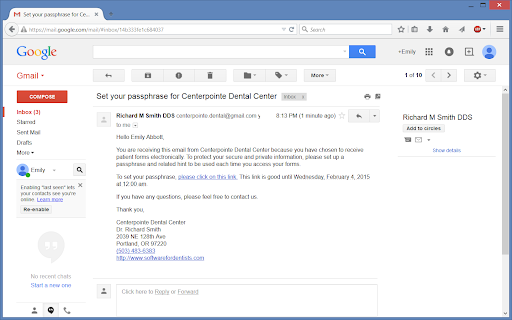
- The patient clicks "please click on this link" and sees the DAISY+ Forms Anywhere Terms and Conditions of Use window.
Note: Patients only see this window the first time they set their passphrase.
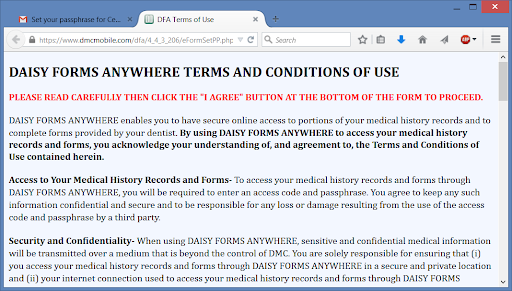
The patient scrolls to the bottom of the page and clicks "I Agree" to accept the terms and conditions. Next, the patient sets up a passphrase and passphrase hint. Patients must use their passphrase each time they need to access their medical history form online.
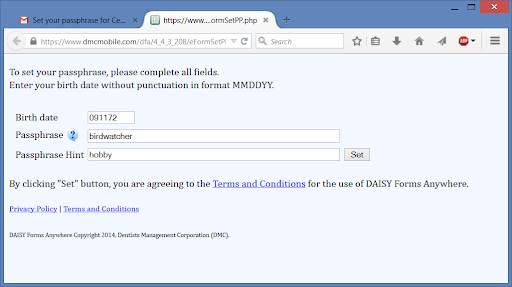
After clicking the Set button, the patient sees the following confirmation message:
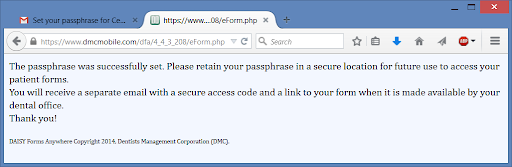
Email access to a medical history form
You can email a secure access code and link for a medical history form to any patient who has subscribed to DAISY+ Forms Anywhere.
► To email access to a medical history form:
- From the DAISY+ toolbar, click .
-
Search for and select the patient, then click OK.

-
In the Patient window, do one of the following:
- For a new patient or an established patient with no medical history on file, click to open the Search For - Medical History Template window. Search for and select the template, then click OK to open a medical history form.
- For an established patient, click to open the patient's most recent medical history form.
- For a new patient or an established patient with no medical history on file, click
- From the Tools menu, select Allow Patient Access, then select one of the following:
- New Form with Prior Responses for a new medical history form preloaded with the patient's prior responses.
- New Blank Form for a blank medical history form.
- Existing Form for Revision for the last medical history form that the patient submitted.
Note: You cannot enable access to an existing medical history form if the Detail template that the form was originally based on has been deleted or renamed.

-
You see a patient access code below the patient's name. To the right of the code is an expiration date and time. The code's expiration date and time default to 11:59 p.m. on the current day. However, you can change it here before you send the access code to the patient.
Note: Access codes are randomly generated. They are not in numerical order.

Note: To see the type of access granted to the patient, rest your mouse cursor on the access code.
-
Do one of the following:
- Right-click the code number and select Email Form.
- Click
 to the right of the access code.
 - In the Tools menu, select Email Form.
Note: You cannot enable access to an existing medical history form if the Detail template that the form was originally based on has been deleted or renamed.
- If the patient has not subscribed to DAISY+ Forms Anywhere, the Email Form option will be grayed out. However, once the patient sets up a passphrase, DAISY+ will automatically send out the access code you generated in Step 4 unless the access code has expired. For more information on setting up a patient for DAISY+ Forms Anywhere, see "Set up a patient for online access".
-
In the Email Access Code window, add an optional personal message, then click Yes.
DAISY+ adds this personal message to an email message containing an access code and link to the patient's medical history form.
Note: DAISY+ automatically inserts the last personal message used, if any.
Tip: Click to insert a canned message.
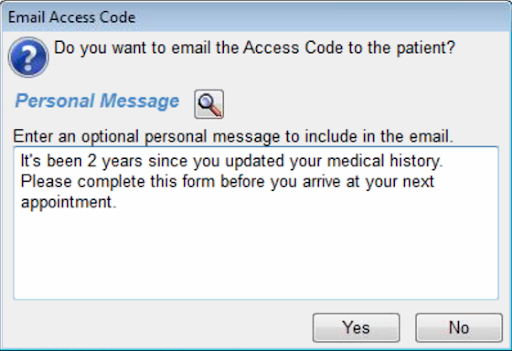
You see an Info window that confirms the message was sent.
-
In the Info window, click OK.
Note: After you send the email to the patient, the access code's expiration date automatically changes to seven days from the time the code was generated.
The patient receives an email message with an access code and link to access the form.
Here's an example:
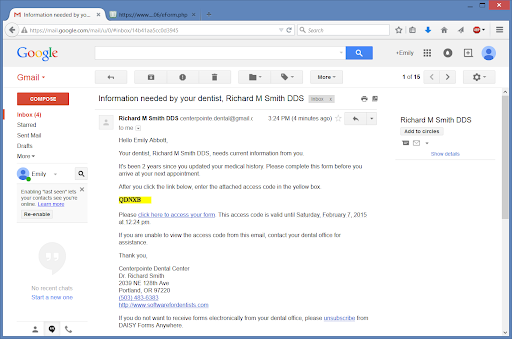
The patient clicks "click here to access your form" and sees the DAISY+ Forms Anywhere access window.
The patient enters the access code and personal passphrase, then clicks Proceed.
Note: The patient may make up to five attempts to enter the correct access code and five attempts to enter the correct passphrase.
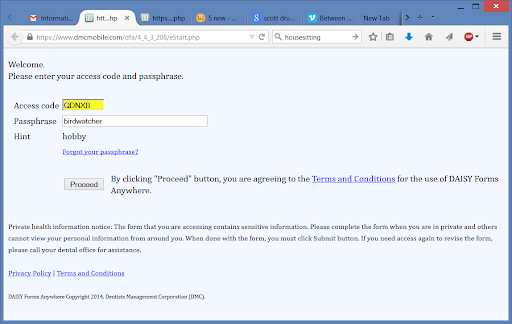
The patient's medical history form opens.
Note: After 15 minutes of inactivity, DAISY+ issues a warning that the connection will timeout in 5 minutes. After 20 minutes of inactivity, DAISY+ logs the patient out and redirects the browser to the provider's landing page.
After reviewing and updating the information, the patient clicks Submit at the bottom of the form. DAISY+ then opens the landing page specified in the Web Site text box in the Practice Configuration window.
Note: If the patient receives access to the same form again, you see “Modified by Patient” in the bottom left corner of the medical history window.
Revoke patient access to a medical history form
You can revoke a patient's access to a medical history form at any time, such as when a patient cancels an appointment or prefers not to submit the form electronically.
Tip: To see the type of access granted to the patient, rest your mouse cursor on the access code.
► To revoke access to a medical history form:
- From the DAISY+ toolbar, click .
-
Search for and select the patient, then click OK.
-
In the Patient window, click
to open the patient's most recent medical history form. -
From the Tools menu, select Allow Patient Access, then select None.
Note: If you delete the patient's Medical History form, DAISY automatically revokes the access code.
View the status of a patient's online access
DAISY+ Forms Anywhere enables patients to securely access their medical history form online. Patients must opt in to this free service. You can view their access status in the following windows:
- Personal Info
- Patient
- Patient History
- Appointment Notes Review
- Appointment Confirmation
- Appointment Followup
► To view a patient's access status from the Personal Info window:
- From the DAISY+ toolbar, click
 .
. -
Search for and select the patient, then click OK.
You see the patient's access status for DAISY+ Forms Anywhere.

This status... Shows that the patient... Unsent Has not been sent an opt-in email. Sent mm/dd/yy Has been sent an opt-in email on the specified date, but has not subscribed yet. Subscribed mm/dd/yy Subscribed to DAISY+ Forms Anywhere on the specified date. Unsubscribed Unsubscribed to DAISY+ Forms Anywhere on the specified date.
Unsubscribe from DAISY+ Forms Anywhere
-
Patients can click the "unsubscribe" link in any access code email message and enter their date of birth and passphrase. The patient and the provider each receive an email message confirming that the patient has unsubscribed.
Note: To receive this email, the provider's email address must be in the Email text box in the Provider window .
- The dental provider can use an option in the Personal Info window.
► To unsubscribe a patient from the Personal Info window:
- From the DAISY+ toolbar, click .
- Search for and select the patient, then click OK.
-
In the Personal Info window, right-click on the DAISY+ Forms Anywhere status and select Unsubscribe from DAISY+ Forms Anywhere.
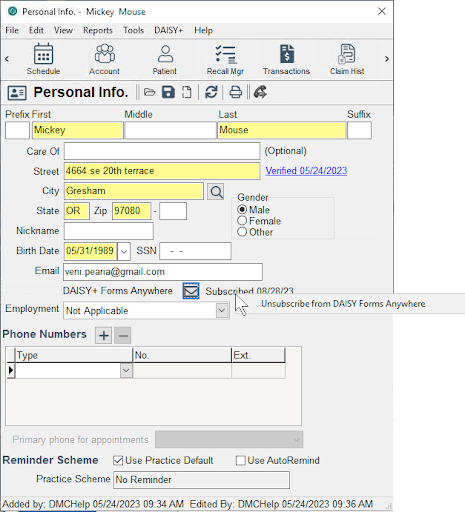
-
In the Warning window, click Yes.

The patient's DAISY+ Forms Anywhere status changes to Unsubscribed. For more information about access status, see "View the status of a patient's online access".
- Click , then close the window.
Reset a DAISY+ Forms Anywhere passphrase
You can reset a patient's passphrase as follows:
- Use an option in the Personal Info window. You can also use this method to set up a passphrase for the first time.
-
Click the "Forgot your passphrase?" link in the following DAISY+ Forms Anywhere access window. Patients can use this method. For more information, see "Email access to a medical history form".
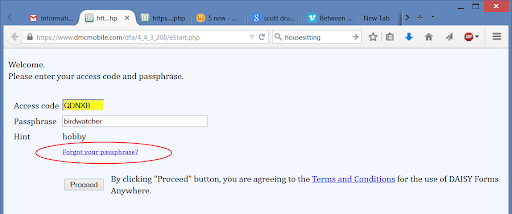
► To reset a patient's passphrase from the Personal Info window:
- From the DAISY+ toolbar, click .
- Search for and select the patient, then click OK to open the Personal Info window.
- In the Tools menu, select Email Link to Set Passphrase.
-
You see the following Info window.
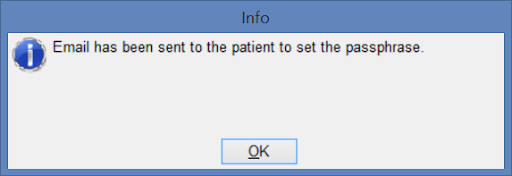
-
Click OK.
The patient receives an email message with a link to set the passphrase.
Here's an example:
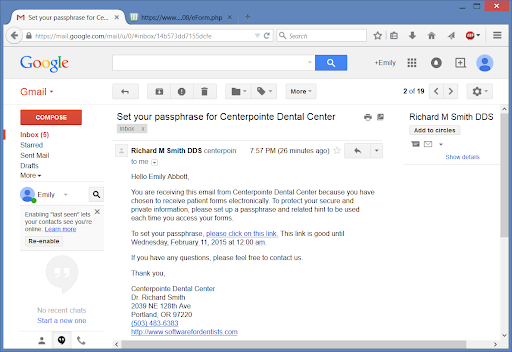
The patient clicks "please click on this link."
The patient enters a passphrase and passphrase hint, then clicks Proceed.
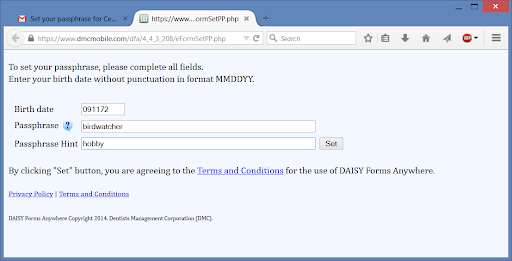
Once the passphrase is reset, the patient receives a confirmation email. Here's an example:

NPI numbers
NPI numbers must be entered in DAISY+ in the Practice Settings and Provider windows before claims can be processed.
-
The Location tab in the Practice Settings window has an entry field for a default National Provider Identifier (NPI) number (Type II) and a default claim location.
Note: If your office does not have a Type II NPI number, enter your Type I number in the Default NPI field.
-
If you have multiple locations, set a default location because when you set up a new provider, DAISY+ automatically applies the default location and its NPI number to the provider in the Provider window.
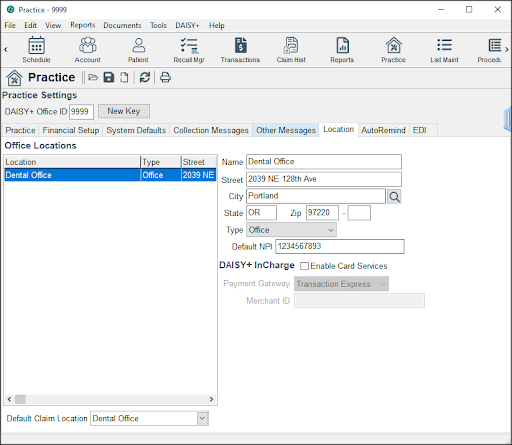
- For an existing provider, you must enter the NPI number in the Provider window.
-
For a new provider, DAISY+ automatically applies the default location and its NPI number.
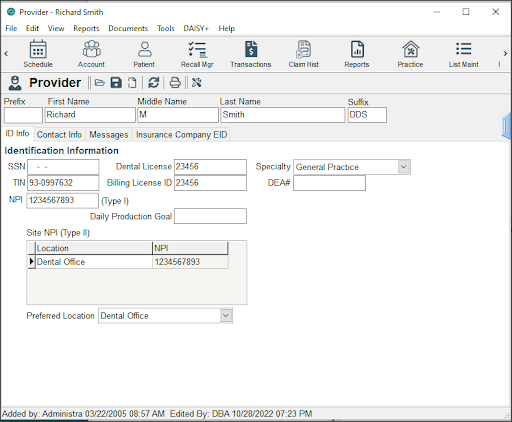
Set up auto-hold for secondary claims
To set up DAISY+ to automatically send a secondary claim once the primary claim is paid, you first have to enable auto-hold for secondary claims.
Then, when you enter a payment for the primary insurance and attach it to the claim,
![]() appears in the RC (Related Claim) column.
appears in the RC (Related Claim) column.
DAISY+ automatically attaches the date paid and the amount paid by the primary insurance company. The secondary claim is automatically sent the next time you run closing.
► To set up auto-hold for secondary claims:
- From the DAISY+ menu, select Configure, then Practice Configuration.
- In the Practice window, click the System Defaults tab.
- In the Claims section, check the Always Hold Secondary Claim check box.
Enable pop-up reminders
Overview
Patient Reminders
Patient reminders open in a pop-up dialog box.
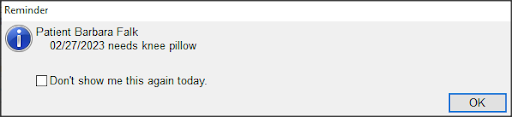
The Reminder dialog box opens whenever you access a patient record that has a reminder attached to it. Reminders attached to the patient open in this dialog box when you access the following patient-related windows:
- Patient
- Patient History
- Treatment Plan
- Chart
- Perio Exam
-
Appointment Detail, either when you:
- Open this window with an appointment already selected in the Schedule.
- Select the patient in the Appointment Detail window.
- In the Reminder dialog box, you can check the “Don’t show me this again today” check box to dismiss a particular reminder for the rest of the day. This setting is user specific per workstation.
Account Reminders
You can also add reminders to accounts. Account reminders open in a Reminder pop-up dialog box.
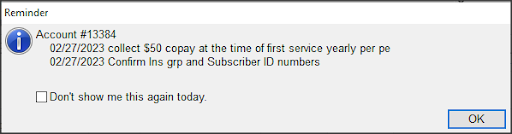
Reminders attached to an account open in the Reminder dialog box when you access the following account-related windows:
- Account
- Ledger
- Patient
- Patient History
- Treatment Plan
- Chart
- Perio Exam
-
Appointment Detail, either when you:
- Open this window with an appointment already selected in the Schedule.
- Select the patient in the Appointment Detail window.
- In the Reminder dialog box, users can check the “Don’t show me this again today” check box to dismiss a particular reminder for the rest of the day. This setting is user specific per workstation.
► To enable pop-up reminders for the practice:
- From the DAISY+ menu, select Configure, then select Practice Config.
- In the Practice window, click the System Defaults tab.
-
Check the “Show popup reminder” check box.
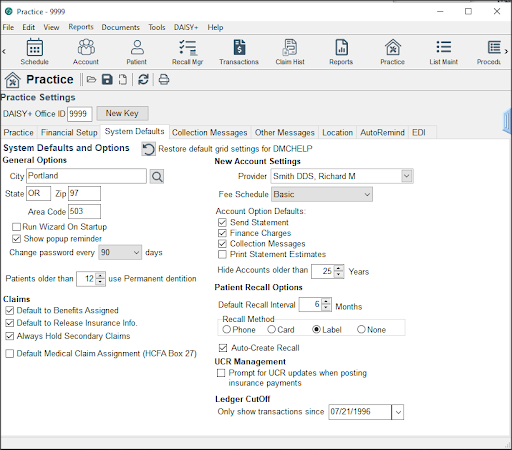
- Click , then close the window.
Set up a service location address
Service location addresses are set up in the Practice Settings window.
► To set up a service location address:
- From the DAISY+ menu, select Configure, then Practice Configuration.
- In the Practice window, click the System Defaults tab.
-
In the Office Locations section, right-click and select New Location.
You see the warning "One a location is created, it cannot be deleted. Do you still want to create a location?"
- Click Yes.
- In the Name text box, type the name of the location.
- Complete the address information for the new location.
- In the Type drop-down list, select the type of location.
-
In the Default NPI text box, type the NPI number for this location.
Note: DAISY+ requires NPI numbers to process claims. For more information, see "NPI numbers".
- Click to save the location.
Set up electronic prescribing
To use DAISY+ eRx, your practice must have:
- An Emdeon Clinician username and password for each provider and staff member
- A Site ID number from Emdeon
-
When you subscribe to DAISY+ eRx, a DAISY+ representative adds the Emdeon usernames and passwords and the Site ID number to your practice settings.
Before you can connect to Emdeon Clinician to manage patient e-prescriptions, you must enable e-prescribing for the practice.
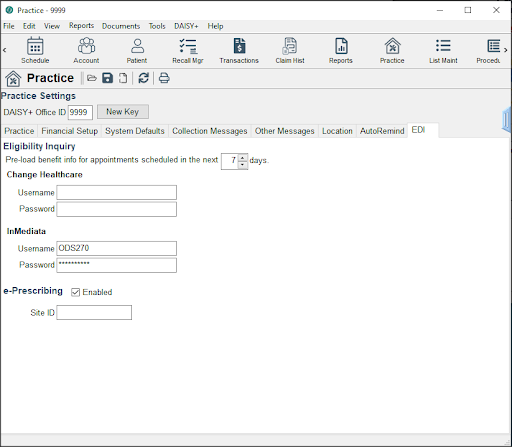
► To set up electronic prescribing for the practice:
- From the DAISY+ menu, select Configure, then select Practice.
- In the Practice window, click the EDI tab.
- In the e-Prescribing section, check the Enabled check box.
- Click , then close the window.
Note: If you do not have the appropriate DAISY+ eRx access permissions, you see the Site ID text box and the Enabled check box grayed out. For more information on EDI access, see "Set up access permissions for DAISY+ eRx".
Manage user accounts
Dental offices often have different types of users, such as front office staff, dental hygienists, and dental assistants. DAISY+ enables you to set up each user with access permissions that are appropriate for the work they do. You manage user accounts from the User window.
Note: Only those who have full access rights can change user settings.
► To manage a user account:
- From the DAISY+ menu, select Configure, then select Users.
-
Do one of the following:
- Search for and select the user account, then click OK.
- To add a user account, click New User.
-
The User window opens.

-
Do one of the following:
- If you are adding a new user account, type the new user name, first name, middle name, and last name.
- If you are modifying a user account, go to step 4.
- Select or modify the appropriate permission and access settings.
-
Click , then close the window.
Note: DAISY+ logs changes to security settings in the Activity Log and the Security Log.
Copy user account permissions
Dental offices often have different types of users, such as office staff, dental hygienists and dental assistants. Each user of the same type often requires a DAISY+ user account that has the same set of permissions.
The easiest way to set up accounts with the same permissions is to copy the permissions from an existing user account. For example, copy the permissions from the account of one dental hygienist to the account of another.
► To copy user account permissions:
- From the DAISY+ menu, select Configure, then Practice Config.
-
Click the Security tab to view Practice Settings.
Note: Only those who have full access rights can change security settings.
-
Do one of the following:
- To copy permissions to a new account: from the File menu, select New, then select User. In the User Name text box, type the name of the new user account, then click .
- To copy permissions to an existing account: click to open the Search For – User window. Search for and select the user whose permissions need to be modified, then click OK.
- From the Edit menu, select Copy Permissions From…
-
In the Select a User to Copy dialog box, search for and select the user whose permissions will be copied.
Note: As a security precaution, the search results only show user accounts with permissions less than or equal to the user account performing this task.
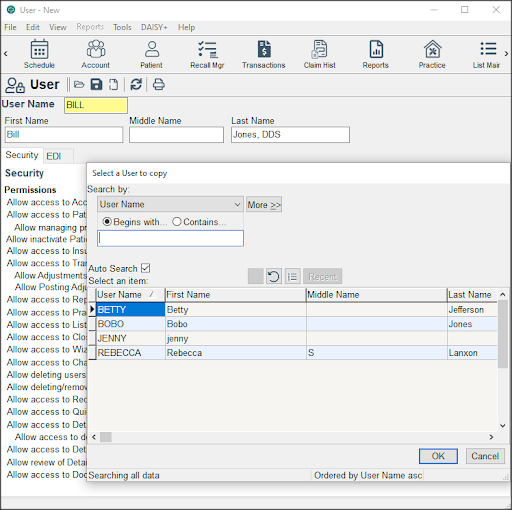
-
Click OK.
The permissions are copied to the other account.
- Click to save the changes.
Reset a user password
DAISY+ administrators with Security Officer access can now reset a user account to its original default password.
Note: Users cannot reset their own passwords, and only DAISY+ support representatives can change the password on a user account that has the Security Officer permission.
► To reset a user password:
- From the DAISY+ menu, select Configure, then select Users.
- Search for and select the user account whose password needs resetting.
- Click OK to open the User window.
-
Click the Security tab.
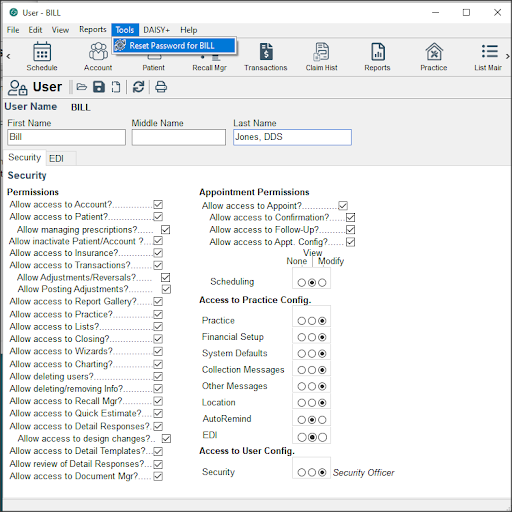
-
From the Tools menu, select Reset Password for user name.
In this example, the user name is REBECCA.
-
In the Info dialog box, click OK.
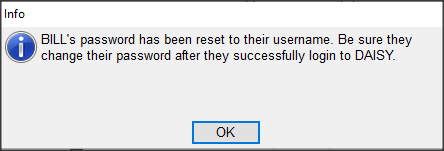
- Close the User window.
Set up appointment security settings
DAISY+ offers a fine degree of control over user access to appointment scheduling and resource management. You can limit users to Confirmation Only, Follow-Up Schedule Viewing, Schedule Modifying, Configuration, or all of the above.
Note: To set up appointment security settings:
- From the DAISY+ menu, select Configure, then Practice Config.
-
Click the Security tab to view Practice Settings.
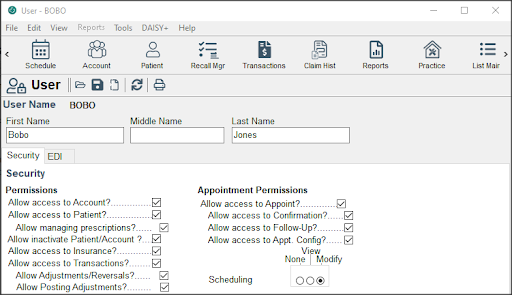
- Click to open the Search For - User window.
- Search for and select the user whose permissions need to be modified.
-
In the Practice window, select from the following appointment permissions:
This permission... Does this... Allow access to Appoint? Acts as a master switch. This permission allows or prevents the user from accessing appointment scheduling, such as the Schedule, the Confirm Appointments window, or from changing Appointment configuration settings.
If checked, the user can access some (depending on the other permissions granted) or all areas of appointment scheduling.
If unchecked, the user has no access to appointment scheduling.
Allow access to Confirmation? If checked, the user can access and modify information in the Confirm Appointments window. Allow access to Follow-Up? If checked, the user can access and modify information in the Follow Up Appointments window.
If unchecked, the user cannot access the Follow Up Appointments window.
Allow Access to Appt. Config? If checked, the user can change Appointment configuration settings, including practice availability, resource availability, and schedule set up.
If unchecked, the user cannot change Appointment configuration settings.
Scheduling If set to None, the user cannot view or change appointment information.
If set to View, the user can open and view schedules and appointments, but cannot make changes.
If set to modify, the user has full access to schedules, including modifying appointment details, checking in and out, scheduling and rescheduling appointments, and using the Organizer.
- Click and close the Practice window.
Set up access to adjustments
In the Security tab in the Practice Settings window, the control option “Allow Posting Adjustments?” in the Permissions section limits the kind of access users have to adjustment transactions.
Entering and posting adjustment transactions are treated as separate tasks. Users who have permission to enter and reverse adjustments can be restricted from posting them. This allows others to review adjustments before they are posted.
► To set up user access to adjustment transactions:
- From the DAISY+ menu, select Configure, then Practice Config.
-
Click the Security tab to view Practice Settings.
Note: Only those who have full access rights can change security settings.
- Click to open the Search For – User window.
- Search for and select the user whose permissions need to be modified.
- Click OK.
-
In the Practice window, in the Permissions section, check the “Allow access to Transactions?” check box.
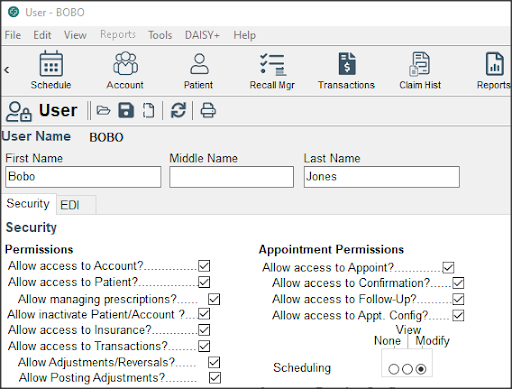
- To give the user permission to create adjustments and reversals, check the “Allow Adjustments/Reversals?” check box.
-
To give the user permission to post adjustments, click the “Allow Posting Adjustments?” check box.
Note: Only user accounts that have “Allow Adjustments/Reversals” permission can be granted “Allow Posting Adjustments” access.
- Click and close the Practice window.
Set up access to Detail templates
Before you can edit Detail templates, your DAISY+ user account needs to have the correct permissions. These permissions are set in the User window.
Note: Only those who have full access rights can change user settings.
► To set up access to Detail templates:
- From the DAISY+ menu, select Configure, then select Users.
- Search for and select the user whose permissions need to be modified.
- Click OK.
-
In the User window, check the Allow Access to Detail Templates check box.
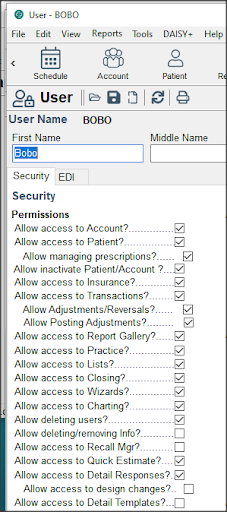
- Click OK.
-
In the User window, check the Allow Access to Detail Templates check box.
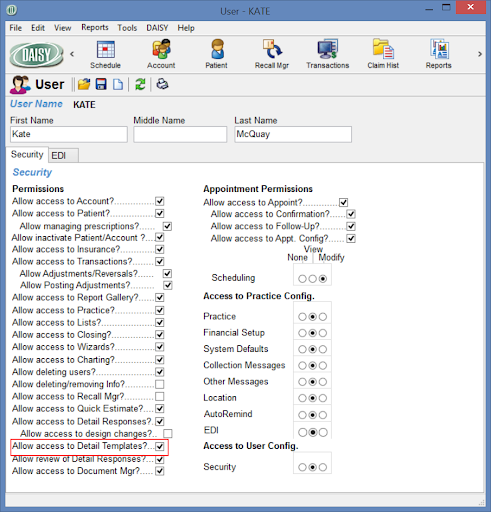
- Click , then close the window.
Set up access permissions for DAISY+ eRx
Only DAISY+ users with full access rights can change user account settings.
► To set up user access permissions for DAISY+ eRx:
- From the DAISY+ menu, select Configure, then Users.
- Search for and select the user account, then click OK to open the User window.
-
Click the Security tab to view the user account settings.
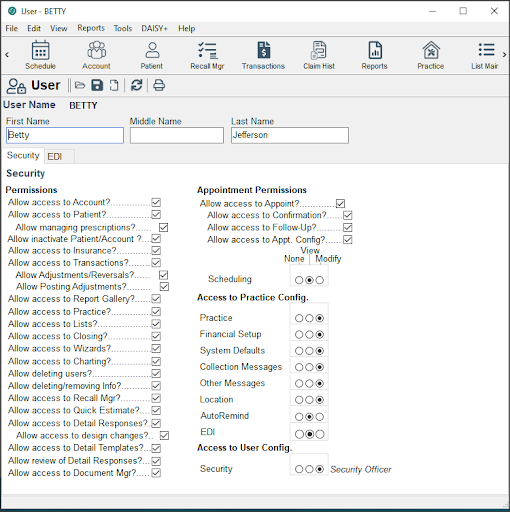
-
To allow the user to manage e-prescriptions, check the Allow Managing Prescriptions check box.
Note: The user must first have the Allow Access to Patient setting enabled.
- To allow the user to enable or disable DAISY+ eRx for the practice, change the EDI setting to Modify.
- Click , then close the window.
Set up permissions for electronic sign-off
The User window has an option that gives users permission to electronically “sign off” on a Details form. With this permission, users can change a Details form from “Ready for Review” to “Reviewed.” When they mark it as “Reviewed,” and save the form, they must enter their user password to make the change permanent.
Note: Only those who have full access rights can change user settings.
► To set up a user for electronic sign-off:
- From the DAISY+ menu, select Configure, then select Users.
- Search for and select the user whose permissions need to be modified.
- Click OK to open the User window.
-
In the Permissions section, check the “Allow review of Detail Responses?” check box.
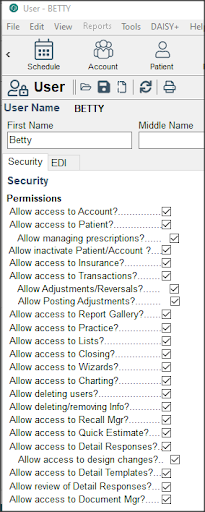
- Click , then close the window.
Set up access permissions for Document Manager
The Security tab in the Practice Settings window now has an option that gives users permission to access Document Manager. With this permission, users can access the DAISY+ archive via the Document Panel and use all of the features of the Document Manager window.
Document Manager permissions do not override other DAISY+ security settings.
Filed documents. Users must have security access to a window to view filed documents attached to it. These same restrictions apply to the Documents list in the Document Manager window. For example, if hygienists do not have security access to the practice, they will not see documents attached to the practice.
Unfiled documents. Users with Document Manager permissions can view any unfiled document. However, they can only attach unfiled documents to those areas in DAISY+ that they have permission to access.
► To set up a user to access Document Manager:
- From the DAISY+ menu, select Configure, then Practice Config.
-
Click the Security tab to view Practice Settings.
Note: Only those who have full access rights can change security settings.

- Click to open the Search For – User window.
- Search for and select the user whose permissions need to be modified.
- Click OK.
-
In the Practice window, in the Permissions section, check the “Allow access to Document Mgr?” check box.
Click and close the Practice window.
Set up access permissions for AutoRemind
► To set up a user to modify practice settings for AutoRemind:
- From the DAISY+ menu, select Configure, then Practice Config.
-
Click the Security tab to view your practice’s security settings.
Note: Only DAISY+ users who have full access rights can change security settings.
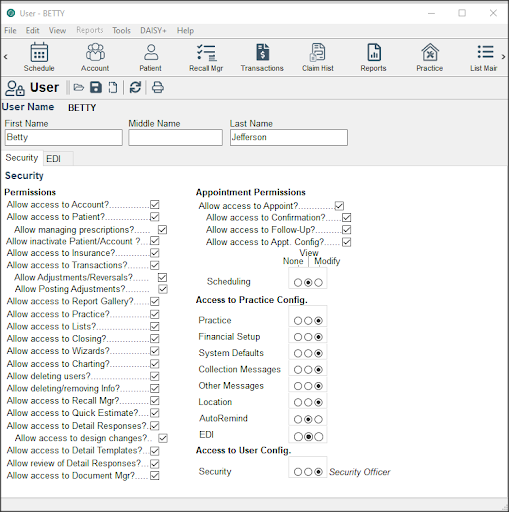
- Click
 to open the Search For – User window.
 - Search for and select the user whose permissions need to be modified.
- Click OK.
- In the Practice window, in the Access to Practice Config. section, change the AutoRemind setting to Modify.
- Click and close the Practice window.
Set up access permissions for Document Manager
The Security tab in the Practice Settings window now has an option that gives users permission to access Document Manager. With this permission, users can access the DAISY+ archive via the Document Panel and use all of the features of the Document Manager window.
Document Manager permissions do not override other DAISY+ security settings.
Filed documents. Users must have security access to a window to view filed documents attached to it. These same restrictions apply to the Documents list in the Document Manager window. For example, if hygienists do not have security access to the practice, they will not see documents attached to the practice.
Unfiled documents. Users with Document Manager permissions can view any unfiled document. However, they can only attach unfiled documents to those areas in DAISY+ that they have permission to access.
► To set up a user to access Document Manager:
- From the DAISY+ menu, select Configure, then Practice Config.
-
Click the Security tab to view Practice Settings.
Note: Only those who have full access rights can change security settings.
- Click to open the Search For – User window.
- Search for and select the user whose permissions need to be modified.
- Click OK.
-
In the Practice window, in the Permissions section, check the “Allow access to Document Mgr?” check box.
Click and close the Practice window.
Set up access permissions for AutoRemind
► To set up a user to modify practice settings for AutoRemind:
- From the DAISY+ menu, select Configure, then Practice Config.
-
Click the Security tab to view your practice’s security settings.
Note: Only DAISY+ users who have full access rights can change security settings.
- Click to open the Search For – User window.
- Search for and select the user whose permissions need to be modified.
- Click OK.
- In the Practice window, in the Access to Practice Config. section, change the AutoRemind setting to Modify.
-
Click and close the Practice window.
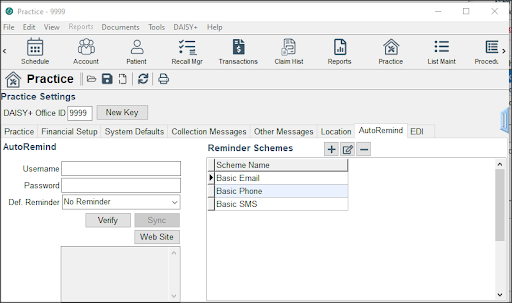
Set up access to clinical details
DAISY+ Chart offers a variety of Details templates that you can use to create forms for entering routine clinical information, such as clinical findings, daily progress notes, and patient medical history. You can limit access to the templates and the forms created from these templates.
► To set up user access to Details:
- From the DAISY+ menu, select Configure, then Practice Config.
-
Click the Security tab to view Practice Settings.
Note: Only those who have full access rights can change security settings.

- Click to open the Search For - User window.
- Search for and select the user whose permissions need to be modified.
- Click OK.
-
Check or uncheck the permissions that apply to this user.
This permission... Does this... Allow access to Detail Responses Acts as a master switch. This permission allows or prevents the user from accessing Details.
If checked, the user has access to some (depending on the other permissions granted) or all areas of Details.
If unchecked, the user has no access to Details.
Allow access to Detail Templates If checked, the user has full access to Details, including creating and modifying Details templates.
If unchecked, the user cannot create or modify Details templates.
Allow access to Detail Design If checked, the user can modify a Details form on a one-time basis, such as adding a field or changing a field name. For example, the user needs to collect a different kind of information than is usually requested in the form. This change does not modify the Details template.
If unchecked, the user cannot modify an existing Details form.
This option is reserved for DAISY+ customer support staff.
Click , then close the Practice window.
Security and auditing
Several security and auditing features make it easy to manage and monitor your practice:
- Users can lock their DAISY+ session to prevent unauthorized access when they leave their computer.
- If the password is the same as the user account name, DAISY+ prompts the user to change the password whenever the user logs in. However, no prompt occurs if the user logs in from the Change User window (DAISY+ > Change User).
- Users who have permission to enter and reverse adjustments can be restricted from posting them. This allows another individual to review adjustments before they are posted.
- The Status History section of an appointment tracks how many times an appointment is rescheduled.
- The Activity Log provides an audit trail of critical financial and other transactions. This report is available from the Report Gallery.
-
The Security Log report:
- Tracks who the user is, which computer the user was on, and what activity occurred during the user’s session.
- Tracks user permission changes.
- Tracks abnormal database disconnects.
- Allows filtering by computer and event time.
- The Closing Practice Summary report provides a snapshot of all of the practice’s financial transactions since the last Daily Closing. This report is generated and archived automatically during Daily Closing. The report can be accessed and printed from the Document Manager panel in the Practice Setting window and can also be optionally printed from the Daily Closing dialog box.
- Permissions can be copied from one user account to another.
Use the Activity Log report
The Activity Log report provides an audit trail of critical financial activities and other transactions in the DAISY+ system.
Note: Only those who have the Practice option set to View or Modify under the Security tab of the Practice Setting window can run the Activity Log report.
- The Activity Log report tracks:
- When users log in or out of DAISY+
- User account permission changes
-
Appointments that are:
- Rescheduled for a date in the past
- Set to “Pending” after the start time, but only if the appointment is deleted from the Organizer’s Recycle Bin
- Changed from one patient to another
- Moved from one schedule to another
- Rescheduled more than two times
- Appointments where the patient’s name is significantly changed
- Appointments where the patient is changed from “On File” to “New”
- When a user changes or deletes unposted transactions
- If the guarantor is changed on an account
- If the guarantor’s address is changed
Create the Activity Log report
The Activity Log report is not automatically accessible from the Report Gallery window. You must create the report before it becomes available.
► To create the Activity Log report:
- From the DAISY+ toolbar, click
 to open the Report Gallery.
 - From the File menu, select New, then select Report.
-
Search for and select the Activity Log report, then click OK.
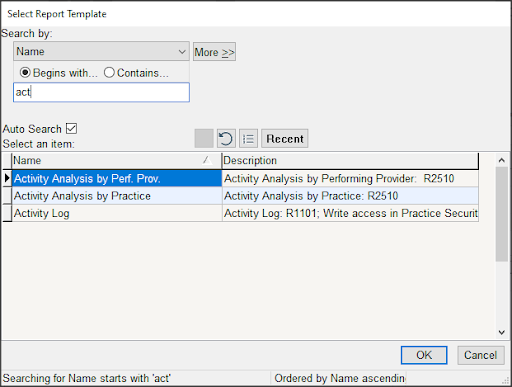
The report is added to the Report Gallery window.
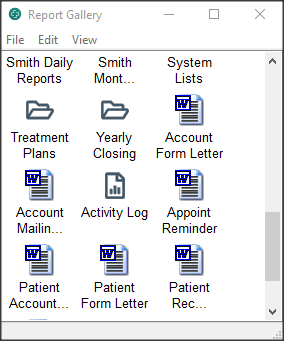
Run the Activity Log report
► To run the Activity Log report:
-
In the Report Gallery window, double-click Activity Log.
The Activity Log report shows the data and time of the activity, the user who performed the activity, and the type of activity that occurred.
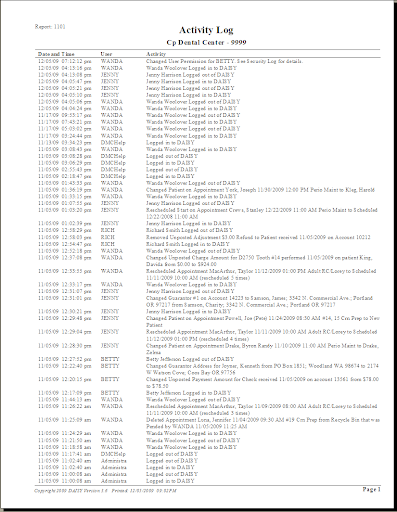
Use the Security Log report
The Security Log report now includes the following information:
- Who the user is
- Which computer the user was on
- Which DAISY+ program modules were accessed during the user’s session
- What activity occurred during the user’s session
- The report also tracks:
- User account permission changes
- Failed logins
- Abnormal database disconnects, such as when a computer is shut off without properly exiting DAISY+
In addition, enhanced report filters enable you to filter by computer and event time.
Run the Security Log report
► To run the Security Log report:
-
In the Report Gallery window, double-click Security Log.
The Activity Log report shows the data and time of the activity, the user who performed the activity, and the type of activity that occurred.
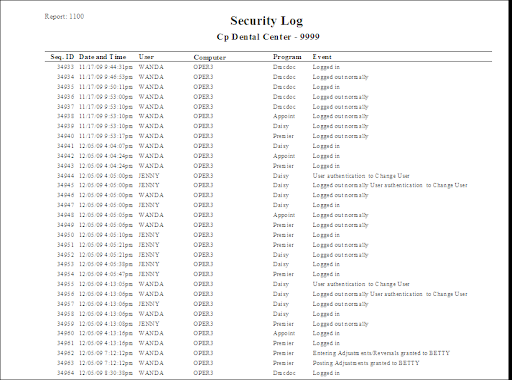
Filter the Security Log
New Security Log report filters enable you to filter by computer and event time.
► To filter the report:
- From the DAISY+ toolbar, click to open the Report Gallery.
-
In the Report Gallery window, right-click on Security Log and select Properties.
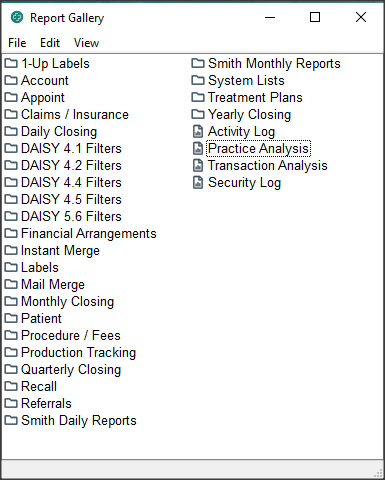
-
In the Parameters section of the Property Editor – Security Log window, click a tab and select the options to filter by.
For example, to filter for all activities that Betty performed, click the User tab and select the appropriate filtering options.
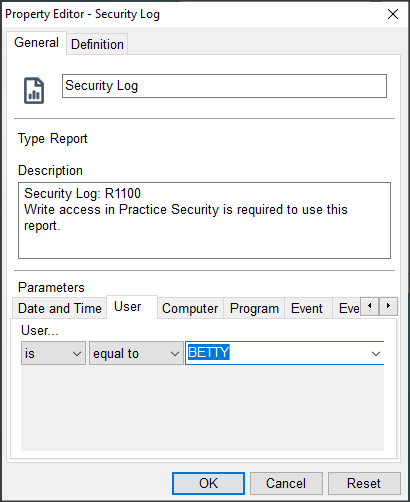
-
Repeat step 3 until all appropriate filters are selected.
Note: To clear all filter settings, click Reset.
- Click OK.
- In the Report Gallery window, double-click Security Log to run the filtered report.
Set up a default disclaimer for financial arrangements
You can set up a default disclaimer for financial arrangements. By default, this disclaimer displays on all of the practice’s financial arrangements.
Note: You may also type a different disclaimer on individual financial arrangements.
► To set up the default disclaimer for financial arrangements:
- In the Practice window, click the Financial Setup tab.
- In the Financial Arrangement Default Disclaimer section, type the disclaimer that you want to show on every financial arrangement by default.
- Click to save the settings.
Define a treatment plan disclaimer
Offices can define their own version of the disclaimer that appears on treatment plans. This user-defined disclaimer replaces the default DAISY+ treatment plan disclaimer that is printed on the treatment plan.
The user-defined disclaimer is limited to 500 characters and appears on all treatment plans. Only one disclaimer per practice is permitted.
Note: Use caution when redefining the disclaimer. If you print a treatment plan with one disclaimer, then change the disclaimer and print that treatment plan again, it will have the new disclaimer.
► To define your own disclaimer:
- From the DAISY+ menu, select Configure, then select Practice Config.
- Click the Other Messages tab.
- In the Treatment Plan Disclaimer text box, type or modify the disclaimer.
-
Click to save the change.
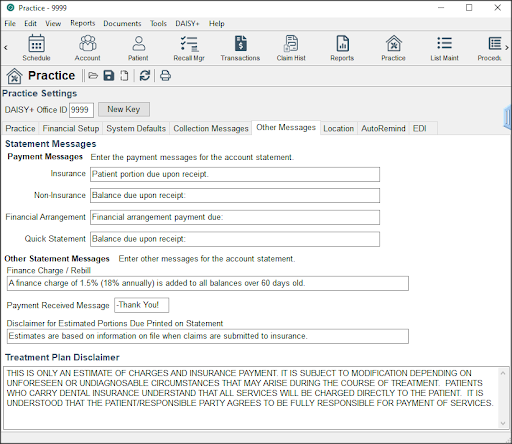
Configure the schedule
DAISY+ Scheduler relies on default settings for both office hours, as well as resource availability, to ensure that appointments and events are only scheduled when the appropriate resources are available.
Office hours and resource availability are set up using time patterns. These patterns are combinations of:
-
Time ranges. You can specify up to three time ranges by beginning and ending times. For example, morning hours could have the time range of 8:00 am to 12:00 pm, and afternoon hours could have the time range of 1:00 pm to 5:00 pm.
Note: Time ranges must fall within a 24-hour period. In addition, time ranges in the same pattern must not overlap.
-
Recurring Patterns. You can specify how often the time range is repeated, and on what days of the week, days of the month, or months of the year that it applies.
Note: Time ranges must fall within a 24-hour period. In addition, time ranges in the same pattern must not overlap.
-
Effective Dates. You can specify when this pattern begins and when it ends. For example, winter hours are in effect from Oct 15, 2006 to March 15, 2007.
Time off for the practice, as well as resources, is specified using these same types of time patterns. You can name each pattern to make it easier to identify.
Set up practice availability
Practice availability or office hours are set up using a series of recurring time patterns. For example, you can use this feature to create seasonal schedules—one for winter, and one for summer.
Practice availability settings have no direct effect on the scheduling of resources. However, when you make changes to practice availability, you do have the option of applying those changes to selected resources. This process is called synchronization.
► To set up practice availability:
- From the DAISY+ menu, select Appointment, then Configure, then Practice.
-
Click the Availability tab.
Use this window to view the current office hours and time off for the practice. The calendar shows six weeks worth of dates.
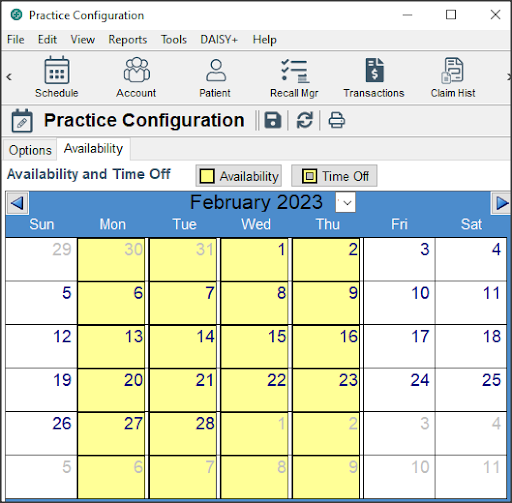
- Click the Availability button.
-
Do one of the following:
In the Search For - Practice Availability window, search for and select a time pattern, then click OK.
Note: The Search For - Practice Availability window does not show patterns whose effective dates have expired. To view all Availability patterns, including expired ones, click the Less button to clear the Ending filter.
To create a new time pattern, click New Practice Availability.
-
In Name text box, type a name for this time pattern.
For example, if you're setting up a pattern for summer hours, type Summer Hours.
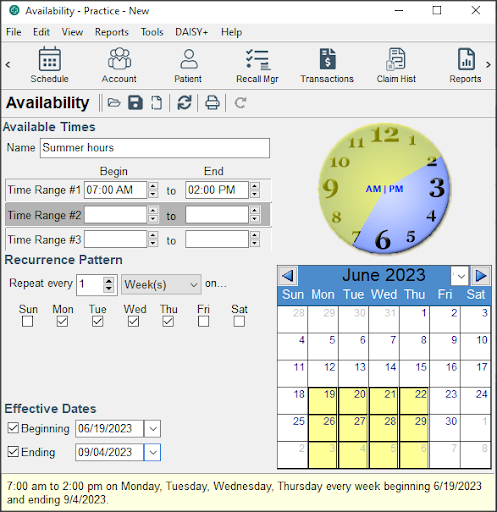
-
In Time Range #1 do one of the following:
- Type the beginning and ending times for this pattern's first time range.
- Use the arrows to scroll through the times beginning and ending times for this pattern's first time range.
-
Select beginning and ending times for Time Range #2 and #3, if required.
Note: Time ranges must fall within a 24-hour period. In addition, time ranges in the same pattern must not overlap.
-
In the Recurrence Pattern section:
- From the Repeat Every lists, select how often the pattern should repeat and whether it repeats by week, month, or year.
-
Choose one of the following:
If the pattern repeats every... Do this... Week Check the check box next to each day of the week on which the pattern should recur. Month Has been sent an opt-in email on the specified date, but has not subscribed yet.

Year Select the month of the year that the pattern recurs or select specific details from the drop-down lists. For example, this selection repeats the pattern on the third Friday of December every year.
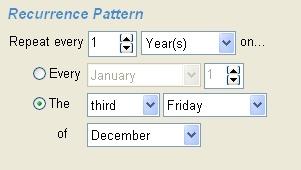
-
In the Effective Dates section, if required, select the beginning and ending dates for this pattern as follows:
To add a beginning date, check the Beginning check box, and type or select a date.
To add an ending date, check the Ending check box, and type or select a date.
Note: If no effective date is selected, then the pattern takes effect immediately. If only a beginning date is specified, then the pattern takes effect on that date and remains in effect indefinitely. If only an ending date is specified, then the pattern is in effect for all dates up to and including the ending date.
- Click to save the time pattern.
-
In the Synchronize Practice Availability with Resources window, do one of the following:
- Check the check box next to each resource whose availability needs to match this time pattern.
- To synchronize all resources to this time pattern, click All.
- To add these changes to resources whose availability needs to match this time pattern for the first time, click New Only.
- To only update resources whose availability previously matched this time pattern, click Update Only.
-
To synchronize none of the listed resources to these changes, click None.
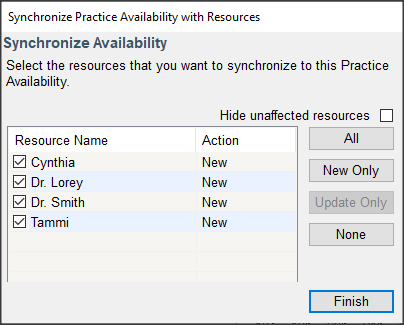
- Click Finish.
- Close the Availability - Practice window.
- Close the Practice Configuration window.
Set up practice time off
Practice time off, just like practice availability, is set up using a series of recurring time patterns. Use the Practice Time Off feature to schedule exceptions to normal business hours. For example, you can use this feature to schedule holidays or other events that affect the practice as a whole.
Practice time off settings have no direct effect on the scheduling of resources. However, when you make changes to practice time off, you do have the option of applying those changes to selected resources. This process is called synchronization.
► To set up time off for the practice:
- From the DAISY+ menu, select Appointment, then Configure, then Practice.
- Click the Availability tab.
- Click the Time Off button.
-
Do one of the following:
- In the Search For - Practice Time Off window, search for and select a time pattern, then click OK.
-
In the Search For - Practice Time Off window, search for and select a time pattern, then click OK.
Note: The Search For - Practice Time Off window does not show patterns whose effective dates have expired. To view all Time Off patterns, including expired ones, click the Less button to clear the Ending filter.
To create a new time pattern, click New Practice Time Off.
-
In the Reason text box, type a reason for this time pattern, such as Thanksgiving or HIPAA Seminar.

-
From the Type drop-down list, select the kind of time off.
For example, if the time off is for Thanksgiving, select Holiday.
-
Do one of the following:
- If the office is closed all day, select All Day.
- If the office is closed part of the day, select Time Between, then select the beginning and ending times for this time off pattern.
Note: Time range must fall within a 24-hour period.
-
In the Recurrence Pattern section:
- From the Repeat Every lists, select how often the pattern should repeat and whether it repeats by day, week, month, or year.
-
Choose one of the following:
If the pattern repeats every... Do this... Day Select the number of days the pattern recurs. Month Select the number of days the pattern recurs or select specific details from the drop-down lists. For example, this selection repeats the pattern on the first Wednesday of every month.
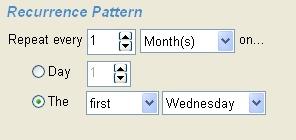
Year Select the month of the year that the pattern recurs or select specific details from the drop-down lists. For example, this selection repeats the pattern on the third Friday of December every year.

-
In the Effective Dates section, if required, select the beginning and ending dates for this pattern as follows:
- To add a beginning date, check the Beginning check box, and type or select a date.
-
To add an ending date, check the Ending check box, and type or select a date.
Note: TIf no effective date is selected, then the pattern takes effect immediately. If only a beginning date is specified, then the pattern takes effect on that date and remains in effect indefinitely.
If only an ending date is specified, then the pattern is in effect for all dates up to and including the ending date.
- Click to save the time pattern.
-
In the Synchronize Practice Time Off with Resources window, do one of the following:
- Check the check box next to each resource whose availability needs to match this time pattern.
- To synchronize all resources to this time pattern, click All.
- To add these changes to resources whose availability needs to match this time pattern for the first time, click New Only.
- To only update resources whose availability previously matched this time pattern, click Update Only.
-
To synchronize none of the listed resources to the changes, click None.
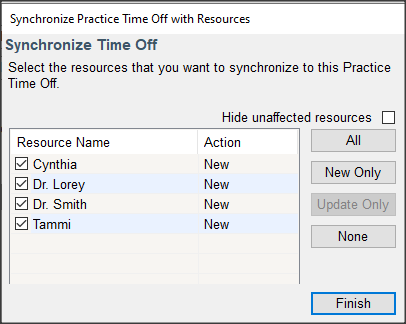
- Click Finish.
- Close the Time Off - Practice window.
- Close the Practice Configuration window.
Delete practice availability
Whenever you delete one of the practice's availability time patterns, DAISY+ looks for resources that have time patterns that match. If any are found, DAISY+ asks if you want to delete the time pattern from those resources as well.
► To delete a practice availability time pattern:
- From the DAISY+ menu, select Appointment, then Configure, then Practice.
- Click the Availability tab.
- Click the Availability button.
-
In the Search For - Practice Availability window, search for and select a time pattern, then click OK.
Note: The Search For - Practice Availability window does not show patterns whose effective dates have expired. To view all Availability patterns, including expired ones, click the Less button to clear the Ending filter.
- From the File menu, select Delete.
- In the Confirm dialog window, click Yes to delete the availability information.
-
In the Synchronize Practice Availability with Resources window, do one of the following:
- Check the check box next to each resource whose availability needs to match this change to practice availability.
- To match all resources to this practice availability change, click All.
- To synchronize none of the listed resources to this practice availability change, click None.
Note: If you decide to synchronize a resource's availability to these changes, be sure that the resource has an alternative availability time pattern; otherwise when you use the Best Fit feature, it may not be able to find available appointment slots for the resource.

- Click Finish.
- Click and close the Practice Configuration window.
Delete practice time off
Whenever you delete one of the practice's time-off time patterns, DAISY+ looks for resources that have time-off patterns that match. If any are found, DAISY+ asks if you want to delete the time pattern from those resources as well.
► To delete a practice time-off time pattern:
- From the DAISY+ menu, select Appointment, then Configure, then Practice.
- Click the Availability tab.
- Click the Time Off button.
-
In the Search For - Practice Time Off window, search for and select a time pattern, then click OK.
Note: The Search For - Practice Time Off window does not show patterns whose effective dates have expired. To view all Time Off patterns, including expired ones, click the Less button to clear the Ending filter.
- From the File menu, select Delete.
- In the Confirm dialog window, click Yes to delete the time-off information.
-
In the Synchronize Practice Time Off with Resources window, do one of the following:
- Check the check box next to each resource whose time off needs to match these changes.
- To match all resources to these changes, click All.
-
To match none of the listed resources to these changes, click None.

- Click Finish.
- Click and close the Practice Configuration window.
Set up resource availability
Resource availability is set up using a series of recurring time patterns. For example, you can use this feature to schedule a hygienist who works on Tuesdays and Thursdays only.
► To set up when a resource is available:
- From the DAISY+ menu, select Appointment, then Configure, then Resources.
- In the Search For - Appointment Resource window, search for and select a resource, then click OK.
-
Click the Availability tab.
Use this window to view the resource's current availability and upcoming time off. The calendar shows six weeks worth of days.
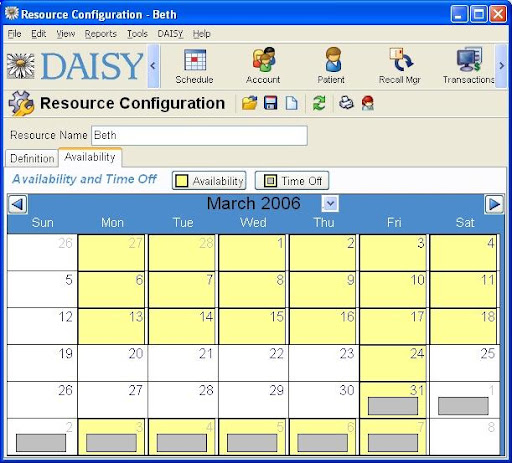
- Click the Availability button.
-
Do one of the following:
-
In the Search For - Resource Availability window, search for and select a time pattern, then click OK.
Note: The Search For - Resource Availability window does not show patterns whose effective dates have expired. To view all Availability patterns, including expired ones, click the Less button to clear the Ending filter.
- To create a new time pattern, click New Resource Availability.
-
-
In Name text box, type a name for this time pattern.
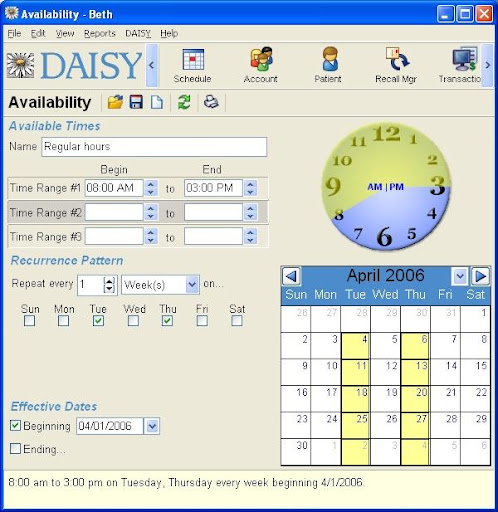
-
For Time Range #1, do one of the following:
- Type the beginning and ending times for this pattern's first time range.
- Use the arrows to scroll through the times beginning and ending times for this pattern's first time range.
-
Select beginning and ending times for Time Range #2 and #3, if required.
Note: Time ranges must fall within a 24-hour period. In addition, time ranges in the same pattern must not overlap.
-
In the Recurrence Pattern section:
- From the Repeat Every lists, select how often the pattern should repeat and whether it repeats by week, month, or year.
-
Choose one of the following:
If the pattern repeats every... Do this... Week Check the check box next to each day of the week on which the pattern should recur. Month Select the number of days the pattern recurs or select specific details from the drop-down lists. For example, this selection repeats the pattern on the first Wednesday of every month.

Year Select the month of the year that the pattern recurs or select specific details from the drop-down lists. For example, this selection repeats the pattern on the third Friday of December every year.
-
In the Effective Dates section, if required, select the beginning and ending dates for this pattern as follows:
- To add a beginning date, check the Beginning check box, and type or select a date.
- To add an ending date, check the Ending check box, and type or select a date.
Note: If no effective date is selected, then the pattern takes effect immediately. If only a beginning date is specified, then the pattern takes effect on that date and remains in effect indefinitely. If only an ending date is specified, then the pattern is in effect for all dates up to and including the ending date.
- Click and close the Availability window.
- Close the Resource Configuration window.
Set up resource time off
Resource time off is set up using a series of recurring time patterns. For example, you can use this feature to schedule vacation or convention attendance.
► To set up when a resource has time off:
- From the DAISY+ menu, select Appointment, then Configure, then Resources.
-
Do one of the following:
- In the Search For - Appointment Resource window, search for and select a resource, then click OK.
- To create a new appointment resource, click New Appointment Resource.
- Click the Availability tab.
-
Do one of the following:
-
In the Search For - Resource Time Off window, search for and select a time pattern, then click OK.
Note: The Search For - Resource Time Off window does not show patterns whose effective dates have expired. To view all Time Off patterns, including expired ones, click the Less button to clear the Ending filter.
- To create a new time pattern, click New Resource Time Off.
-
-
In the Reason text box, type a reason for this time pattern.
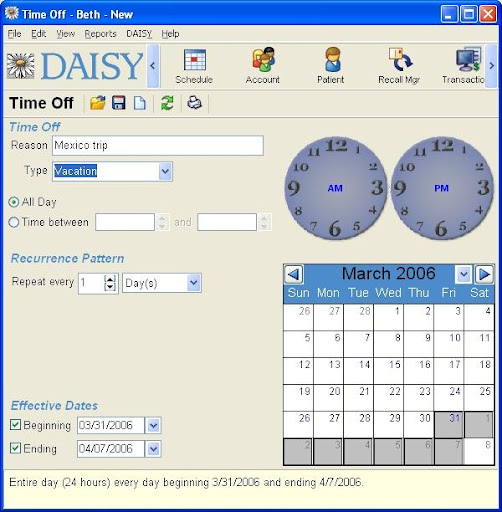
-
- From the Type drop-down list, select the type of time off.
-
For example, if the time off is for vacation, select Vacation.
Note: You can also add more types to this drop-down list. In the Type text box, type the name of the new type. After you save this pattern, the type becomes available whenever you select from the Type drop-down list. You can also maintain the list of time off types. From the DAISY+ menu, select Configure, then List Maint. Click the Simple Lists tab, and from the drop-down list in the Lookup List Maintenance window, select Time Off Types.
-
Do one of the following:
- If the resource will be off all day, select All Day.
-
If the resource has time off part of the day, select Time Between, then select the beginning and ending times for this time off pattern.
Note: Time range must fall within a 24-hour period.
-
In the Recurrence Pattern section:
- From the Repeat Every lists, select how often the pattern should repeat and whether it repeats by day, week, month, or year.
-
Choose one of the following:
If the pattern repeats every... Do this... Week Check the check box next to each day of the week on which the pattern should recur. Month Select the number of days the pattern recurs or select specific details from the drop-down lists. For example, this selection repeats the pattern on the first Wednesday of every month.

Year Select the month of the year that the pattern recurs or select specific details from the drop-down lists. For example, this selection repeats the pattern on the third Friday of December every year.

-
In the Effective Dates section, if required, select the beginning and ending dates for this pattern as follows:
- To add a beginning date, check the Beginning check box, and type or select a date.
-
To add an ending date, check the Ending check box, and type or select a date.
Note: If no effective date is selected, then the pattern takes effect immediately. If only a beginning date is specified, then the pattern takes effect on that date and remains in effect indefinitely. If only an ending date is specified, then the pattern is in effect for all dates up to and including the ending date.
- Click and close the Time Off window.
- Close the Resource Configuration window.
Configure a schedule to show first names only
The Schedule window and the printed schedule (Schedule View Report) can be configured to show the patients’ first names only.
► To configure a schedule to show patient first names only:
- From the DAISY+ menu, select Configure, select Appointment, then select Practice.
-
In the Practice Configuration window, check the “Show first names ONLY on schedule?” check box.

- Click to save the change.
► To print the schedule showing patient first names only:
- From the DAISY+ toolbar, click .
- From the Reports menu, select Schedule.
-
In the Print Schedule View Report dialog box, click the Appointments tab.
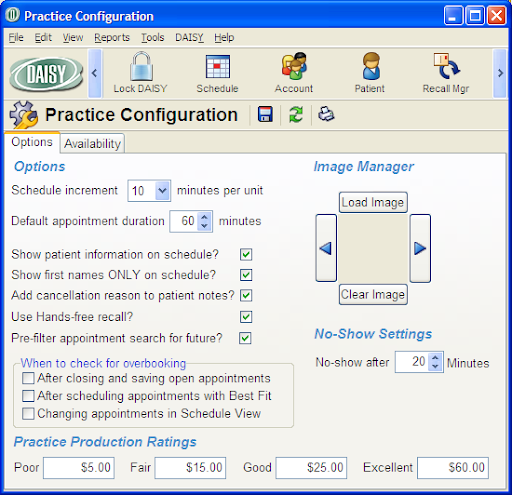
Check the “Print first names ONLY” check box. Click OK.
► To open Statement Manager:
- From the DAISY+ toolbar, click .
- From the Reports menu, select Schedule.
-
In the Print Schedule View Report dialog box, click the Appointments tab.
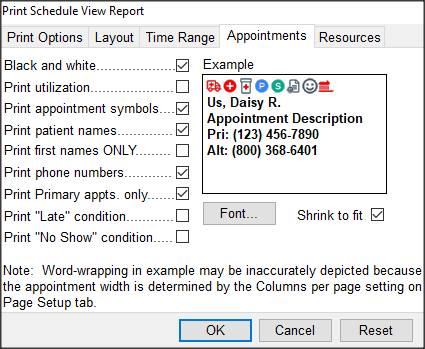
- Check the “Print first names ONLY” check box.
- Click OK.
Set up recall for the practice
Before you can use DAISY+’s recall capabilities, you have to set up these features at the system level in DAISY+:
- Set up recall defaults, such as the amount of time in-between recall appointments, how you will notify patients that recall is due, and whether you want enable Auto-create Recall.
- Define recall types. You give each recall type a unique name, and specify the duration and time in-between this type of appointment. For more information, see "Set up recall card messages ".
- Associate the recall type with a procedure. For example, if you define a recall type of Prophy, you need to associate it with a basic cleaning procedure such as D1110 – Prophylaxis, Adult.
In addition, if you want to use Hands-free Recall you have to enable it at the system level in the Scheduler. In most cases, your system is already set up to manage recall, so you simply need to set up individual patients for recall.
Set up recall card messages
Each recall card can contain three types of messages. You can set up default messages that will appear on each recall card, then customize them to fit your immediate needs.
The Broadcast Message contains information that is specific to the type of recall, such as Prophy or Perio. For example, a prophy message might say, “It is time for your cleaning.”
The Recall Message contains information that is specific to this recall card mailing. A different message is printed depending on whether the patient has a scheduled appointment or is unscheduled. For example, the scheduled message might say, “Your appointment is on Sept. 30, 2005.”
The Custom Recall Message defaults to a pre-defined custom message for all patients, but it can also be customized to contain information that is specific to the patient. For example, “If you are unable to keep your appointment, please call.”
Setup the Broadcast Message
The Broadcast Message prints on all the recall cards that you send for a particular recall type, such as prophy. You cannot customize this message for a specific patient.
► To set up the Broadcast Message:
- From the DAISY+ menu, select Configure then List Maintenance.
-
Click the Simple Lists tab.
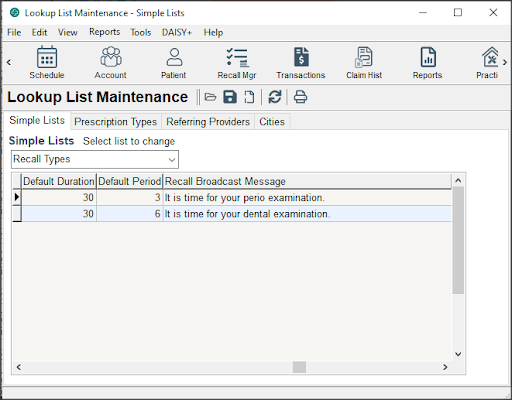
- From the Simple List Selection drop-down list, select Recall Types.
- Scroll to the far right and select the message under the Recall Broadcast Message column that you want to change.
- Type a new message.
- Click , then close the window.
Set up the Recall Message
The Recall Message prints on all recall cards. This message comes in two forms:
- If the patient has already scheduled a recall appointment, the message includes the recall date and time.
-
If the patient hasn’t scheduled a recall appointment, the message asks the patient to make an appointment soon.
Tip: You cannot customize this message for a specific patient.
► To set up the Recall Message:
- From the DAISY+ Recall Manager window, click the Patient tab.
- In the lower right corner, click next to the Recall Message text box.
-
To change the message for patients with a recall appointment, click the Scheduled Message text box and type the new message.
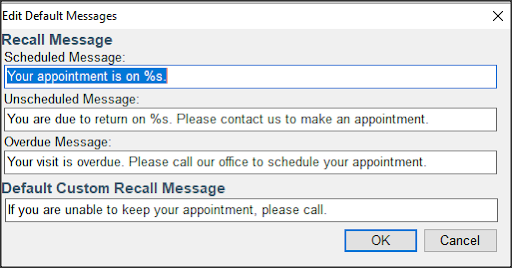
-
To change the message for patients without an appointment, click the Unscheduled Message text box and type the new message.
When you change the message, you must include the symbols “%s” (a percent sign followed by a lowercase s) if you want Recall Manager to automatically enter a patient's appointment date and time. For example, the message might say, “Your appointment is scheduled on %s.”
If you do not want to include the next recall date and time, simply omit the symbols.
- Click OK.
Set up the Custom Recall Message
You can either change the default Custom Recall Message or simply change the Custom Recall Message for a specific patient.
► To change the default Custom Recall Message:
- From the Recall Manager window, click the Patient tab.
- Click next to the Custom Recall Message text box.
- Click the Default Custom Message text box and type the new message.
-
Click OK.
Note: To always reserve the Custom Message for specific recall cards, leave the Default Custom Message text box blank.
► To customize the Custom Recall Message for a specific recall card:
- From the Recall Manager window, select a patient from the recall list.
- Click the Patient tab.
-
Do one of the following:
- Click the Custom Recall Message text box and type a different message.
- Next to the Custom Recall Message text box, click , select a canned message, then click OK.
Note: If no canned messages exist, you’ll be asked to enter text for one.
Create a list of Custom Recall Messages
You can create a list of the most common Custom Recall Messages, then select from that list when you want to customize a specific patient’s recall card.
► To create a list of Custom Recall Messages:
-
From the Recall Manager window, click the Patient tab.
Next to the Custom Recall Message text box, click .
If no Custom Recall Messages exist, then you see the Custom Recall Message window. If a list already exists, then you see the Search For - Custom Recall Message window.
-
Do one of the following:
-
In the Custom Recall Message window, type a new message, then click OK.

-
In the Custom Recall Message window, type a new message, then click OK.
- In the Search For - Custom Recall Message window, click the New Custom Recall Message button. Type the new message, then click OK.
-
Add a default overdue message
A default overdue message can be added to Recall Manager.
► To add a default overdue message:
- From the DAISY+ toolbar, click .
- Next to the Recall Message text box, click .
-
In the Overdue Message text box, type the overdue message.
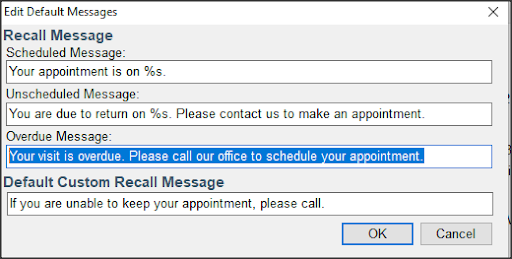
- Click OK to save the message.
Setup the Broadcast Message
The Broadcast Message prints on all the recall cards that you send for a particular recall type, such as prophy. You cannot customize this message for a specific patient.
► To set up the Broadcast Message:
- From the DAISY+ menu, select Configure then List Maintenance.
-
Click the Simple Lists tab.
- From the Simple List Selection drop-down list, select Recall Types.
- Scroll to the far right and select the message under the Recall Broadcast Message column that you want to change.
- Type a new message.
- Click , then close the window.
Set up the Recall Message
The Recall Message prints on all recall cards. This message comes in two forms:
- If the patient has already scheduled a recall appointment, the message includes the recall date and time.
-
If the patient hasn’t scheduled a recall appointment, the message asks the patient to make an appointment soon.
Tip: You cannot customize this message for a specific patient.
► To set up the Recall Message:
- From the DAISY+ Recall Manager window, click the Patient tab.
- In the lower right corner, click next to the Recall Message text box.
-
To change the message for patients with a recall appointment, click the Scheduled Message text box and type the new message.
-
To change the message for patients without an appointment, click the Unscheduled Message text box and type the new message.
When you change the message, you must include the symbols “%s” (a percent sign followed by a lowercase s) if you want Recall Manager to automatically enter a patient's appointment date and time. For example, the message might say, “Your appointment is scheduled on %s.”
If you do not want to include the next recall date and time, simply omit the symbols.
- Click OK.
Set up the Custom Recall Message
You can either change the default Custom Recall Message or simply change the Custom Recall Message for a specific patient.
► To change the default Custom Recall Message:
- From the Recall Manager window, click the Patient tab.
- Click next to the Custom Recall Message text box.
- Click the Default Custom Message text box and type the new message.
-
Click OK.
Note: To always reserve the Custom Message for specific recall cards, leave the Default Custom Message text box blank.
► To change the default Custom Recall Message:
Create a list of Custom Recall Messages
You can create a list of the most common Custom Recall Messages, then select from that list when you want to customize a specific patient’s recall card.
► To create a list of Custom Recall Messages:
-
From the Recall Manager window, click the Patient tab.
If no Custom Recall Messages exist, then you see the Custom Recall Message window. If a list already exists, then you see the Search For - Custom Recall Message window.
-
Do one of the following:
-
In the Custom Recall Message window, type a new message, then click OK.
-
In the Custom Recall Message window, type a new message, then click OK.
- In the Search For - Custom Recall Message window, click the New Custom Recall Message button. Type the new message, then click OK.
-
Add a default overdue message
A default overdue message can be added to Recall Manager.
► To add a default overdue message:
- From the DAISY+ toolbar, click .
-
In the Overdue Message text box, type the overdue message.
- Click OK to save the message.
Set up DAISY+ InCharge
Before you can use DAISY+ InCharge, you need to configure your practice to process electronic transactions as follows:
- Specify the credit cards that the practice accepts according to your contract with TransFirst. These card types will display on account statements.
-
Set up the TransFirst connection in DAISY+ for each office location.
Note: A DAISY+ representative will help you set up this connection.
Set up accepted credit card types for the practice
To use DAISY+ InCharge, you need to specify all of the credit card types that the practice accepts according to your contract with TransFirst. These credit card types will display on account statements.
► To set up the credit card types accepted by the practice:
- From the DAISY+ menu, select Configure, then Practice.
- In the Practice window, click the Financial Setup tab.
-
In the Accepted Credit Cards on Statement section, check the check box for each credit card type that the practice accepts.
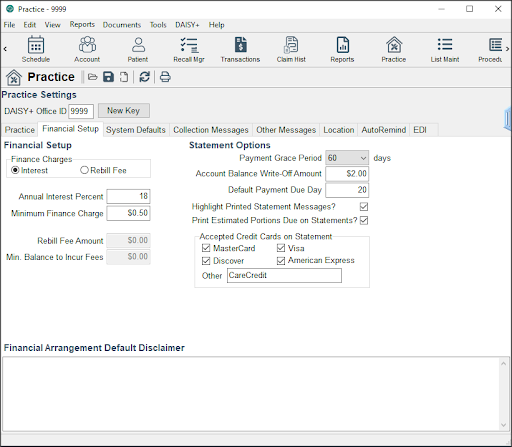
-
In the Other text box, type the name of one or more additional credit cards that the practice accepts, if any.
Use a space to separate the credit card names. You can type up to 25 characters, including spaces.
- Click to save the settings.
Set up each office connection to TransFirst
Next, you need to set up a connection to TransFirst for each office location. Each location has its own TransFirst merchant ID and registration key.
Note: Please wait for a DAISY+ representative to help you set up this connection.
► To set up an office connection to TransFirst/Global Payment Systems
- In the Practice window, click the Location tab.
- In the Office Locations section, select a location.
-
In the DAISY+ InCharge section, do the following:
- Check the Enable Card Services check box.
- In the Merchant ID text box, type the TransFirst merchant ID for your practice.
- In the Registration Key text box, type the TransFirst registration number.
- Repeat steps 2 through 3 for each additional office location.
- Click and close the window.
Set up access to TransFirst Virtual Terminal
You can access TransFirst Virtual Terminal directly from within DAISY+. You use the Virtual Terminal to view settlement reports and other financial reports, including:
- Transaction summary and detail reports
- Settlement summary and detail reports
- Return lists
- Recurring payments detail and problem summaries
- ACH statements
For more information, see the TransFirst Virtual Terminal documentation.
► To access Virtual Terminal:
- From the DAISY+ menu, select Account, then TransFirst.
- In the Merchant ID textbox, type your TransFirst merchant ID.
- In the Password textbox, type your TransFirst password.
-
Note: For easier access, add the Transaction Express button (
.svg) ) to the DAISY+ toolbar.
) to the DAISY+ toolbar.
Deactivate a referral provider
You can deactivate referral providers in the Lookup List Maintenance window. When you add a referral for a patient under the Referral Info tab in the Patient window, the deactivated referral provider will no longer appear as one of the selections.
► To deactivate a referral provider:
- From the DAISY+ menu, select Configure, then select List Maint.
- Click the Referring Providers tab.
- Search for and select the provider you want to delete.
-
Right-click and select Delete provider name.
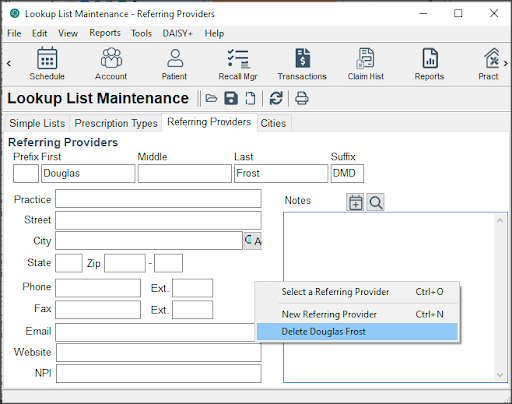
- Click to save the change.
Add adjustment types
Note: If you already have adjustment types with the same meanings but with different names, use them instead of creating new ones.
► To add an Adjustment Type:
- From the DAISY+ menu, select Configure, then List Maintenance.
- Click the Simple Lists tab.
- From the Simple Lists drop-down list, select Adjustment Types.
- Right-click and select New Item.
-
Type in the new item.
You see the new item added to the table.
Note: If you already have adjustment types with the same meanings but with different names, use them instead of creating new ones.
- For each additional adjustment type, repeat steps 4 through 5.
- Click and close the Lookup List Maintenance window.
Manage document types
DAISY+ includes several preconfigured document types. Document types are managed from the Lookup List Maintenance window.
► To manage document types:
- From the DAISY+ menu, select Configure, then List Maint.
-
In the Simple Lists drop-down list, select Document Types.
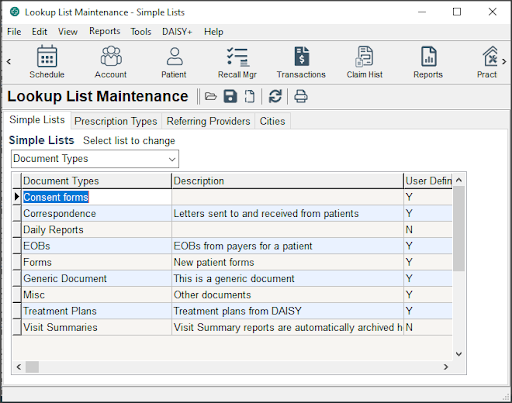
Note: The Visit Summaries document type cannot be changed or deleted, because Document Manager automatically archives any visit summary (walkout statement) that is printed. Visit summaries are attached to the account.
- To add a new document type, right-click in the list of document types and select New Item.
-
In the Document Types column, type the name of the document type.
For example, type Referral Slips to create a document type for referral letters.
- In the Description column, type a description of the document type.
- Click to save the new document type.
Add user defined tags
► To add an user defined tag:
- From the DAISY+ menu, select Configure, then List Maint.
- Click the Simple Lists tab.
- From the Simple Lists drop-down list, select User Defined Tags.
- Right-click and select New Item.
-
Type in the new item.
You see the new item added to the table.
Note: DAISY+ automatically alphabetizes the list for you, so the item you added may not be at the bottom of the table.
- For each additional tag, repeat steps 4 through 5.
- Click and close the Lookup List Maintenance window.
Use AutoRemind
DAISY+ AutoRemind uses a partner service that enables dental offices to automatically remind patients of upcoming appointments, resulting in fewer missed appointments and a more consistent revenue stream for your practice. Reminders can be communicated by phone, e-mail, or SMS text.
This add-on service is fully integrated with DAISY+. Database synchronization between the two programs takes place automatically every hour. This synchronization sends the latest appointment information to AutoRemind and updates the confirmation status in the DAISY+ schedule.
With AutoRemind, you can decide when and how to send reminders. You can also customize the look of your e-mail reminder messages using your practice logo or another appropriate image.
You use reminder schemes to define a strategy for sending reminders to patients who have upcoming appointments. DAISY+ provides the ability to create and name multiple reminder schemes so you can set up customized strategies for different types of patients or for individual patients.
For more information about subscribing to this service, contact DAISY Sales at 503.765.3471 or daisysales@astrapraticepartners.com.
Manage reminder schemes
A reminder scheme defines a strategy for sending reminders to patients who have upcoming appointments. For example, one strategy might be to send a confirmation e-mail seven days prior to an appointment, asking for the patient to confirm that appointment. If the patient does not confirm, then the patient will receive a phone call the night before the appointment at 5:00 p.m.
DAISY+ provides the ability to create and name multiple reminder schemes so you can set up customized strategies for different types of patients. When you sign up for AutoRemind, your practice is provided with the following default reminder schemes:
- Basic E-mail – AutoRemind sends the patient an appointment confirmation via e-mail four days before the appointment. If the appointment is not confirmed, then it makes a voice call two days before the appointment. AutoRemind also sends a final reminder via e-mail one day before the appointment.
- Basic Phone– AutoRemind uses the primary contact phone number in the patient’s Personal Info window to make a confirmation voice call two days before the appointment.
- Basic SMS– Uses the primary contact phone number if it is a cell phone. Otherwise it uses the first cell phone number in the Phone Numbers list. AutoRemind sends a confirmation text message four days before the appointment. If the appointment is not confirmed, then it makes a voice call two days before the appointment. AutoRemind also sends a reminder text message two hours before the appointment.
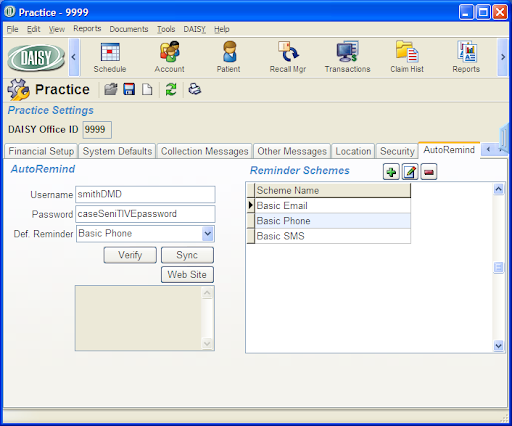
During initial setup, you select a default reminder scheme for your practice. If a patient is set up to use AutoRemind, all appointments set up for the patient will automatically use the default reminder scheme, unless an alternate scheme is selected for the patient.
Reminder schemes include reminder templates and reminder offsets.
Reminder templates
Reminder templates define the type of message, such as Confirm Appointment, and the language, such as US English. In each reminder scheme, a template defines the message content and the type of media (phone, e-mail, SMS text) that will be used to send the appointment reminder. For example, the practice may have one reminder template for e-mail reminders, and another one that asks the patient to confirm an appointment via an SMS text message.
Confirm appointment templates generate messages that ask the patient to respond. For example:
- If the template is a voice confirmation, patients are asked to press 5 to confirm that they received the message. AutoRemind considers this a personal contact confirmation. If the patient responds, the confirmation status displays as a green bell icon on the appointment in the DAISY+ schedule.
- If AutoRemind makes the call, and the patient does not answer but AutoRemind can still leave a message, then it treats this result as a personal contact confirmation. The confirmation status displays as a green bell icon on the appointment in the DAISY+ schedule.
- If the voice call is answered, but 5 is not pressed, then AutoRemind calls again every hour until the maximum number of voice call attempts allowed per appointment is reached. For more information about how to set the maximum voice call attempts allowed, "Set up the AutoRemind profile". The confirmation status displays as a red bell icon on the appointment in the DAISY+ schedule.
Personal reminder templates do not ask the patient to respond. Once the reminder is delivered, AutoRemind changes the appointment’s confirmation status to “left message”. The confirmation status displays as a yellow bell icon on the appointment in the DAISY+ schedule. For more information about confirmation statuses, see "Synchronize AutoRemind with DAISY+".
Note: If the appointment’s confirmation status is already set to “personal contact”, AutoRemind will not set the status back to “left message”.
Reminder offsets
Reminder offsets define the timeframe in which you want to send your reminder prior to the appointment. Offsets tell AutoRemind how far in advance to send the reminder, such as seven days before the appointment. Different offsets can be attached to different templates. For example, you might want to e-mail patients a week in advance, but text message patients only a day or an hour in advance.
If the time for sending the reminder falls into the range when AutoRemind is blocked from sending messages, then AutoRemind will send the reminder one hour and 15 minutes before the block begins. For example:
- If the office has blocked the sending of reminders between 8:00 p.m. and 8:00 a.m. and a patient is supposed to receive a reminder two hours before their 8:00 a.m. appointment, then AutoRemind will send the reminder at 6:45 p.m. the prior evening.
- If the appointment is on Monday, and the patient is supposed to receive a phone call two days before, but the office has blocked calls on Saturday, then AutoRemind will call the patient on Friday.
Each scheme can have one or more templates and offsets. Using combinations of templates and offsets, a practice can build a variety of reminder schemes that address patient needs.
Set up a reminder scheme
In this example, the front office wants to create a reminder scheme that sends a confirmation text message a week before the appointment, then follows that with an 8:00 a.m. reminder on the day of the appointment, if the patient has not confirmed.
► To set up a reminder scheme:
- From the DAISY+ menu, select Configure, then Practice Config.
- Click the AutoRemind tab.
- In the Reminder Schemes section, click to add a reminder scheme.
-
In the New Scheme cell, type the name of the new reminder scheme.
Choose a name that is descriptive of the scheme’s strategy. For example, a scheme called “Confirm Appt SMS” could be set up to send a text message in US English a week before the appointment. If the patient does not confirm, then the scheme will send a reminder at 8:00 a.m. the day of the appointment.

-
In the Scheme Name column, select the new scheme, then click to add reminder templates and offsets to the scheme.
You see the Reminder Scheme window for the selected scheme.
- In the Reminder Template column, click a blank row and select the appropriate reminder template from the drop-down list.
-
Tab to the Reminder Offset column and select the appropriate offset from the drop-down list.
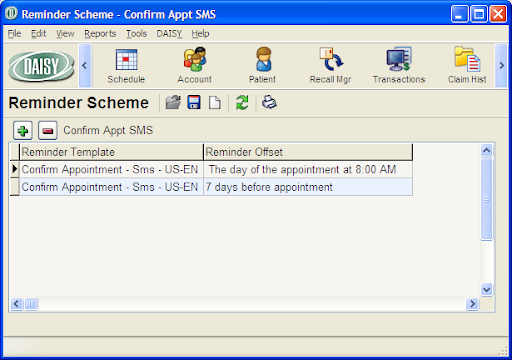
- To add another template and offset, click . Repeat steps 6 through 7.
- Click and close the Reminder Scheme window.
- To add another Reminder scheme, repeat steps 3 through 10.
- Close the Practice window.
Note: Reminder schemes can be entered in the Reminder Scheme window in any order.
Modify a reminder scheme
► To modify a reminder scheme:
- From the DAISY+ menu, select Configure, then Practice Config.
- Click the AutoRemind tab.
-
In the Reminder Schemes section, select the scheme, then click to edit the scheme.
You see the reminder templates and offsets associated with the scheme.
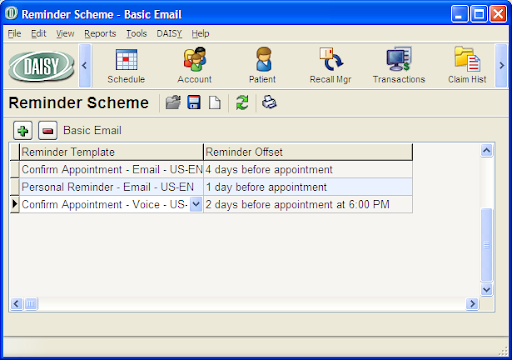
-
In the Reminder Schemes window, do one of the following:
- To change the reminder template, click the template and select a different one from the drop-down list.
- To change the reminder offset, click the offset and select a different one from the drop-down list.
- To add a reminder template, click . Click the template column and select the appropriate template. Tab to the Reminder Offset column and select the appropriate offset.
- To remove a reminder template and its offset, click the template, then click . In the Confirm dialog box, click Yes.
- Click and close the Reminder Scheme window.
- Close the Practice window.
- Configure DAISY+ Chart
Configure workstation settings
Workstation settings apply only to perio charting, not hard tissue charting. Settings at the top of the window (Pocket Depth Red Line Indicator and Probe) are specific to the computer, so they apply no matter who logs in to the computer.
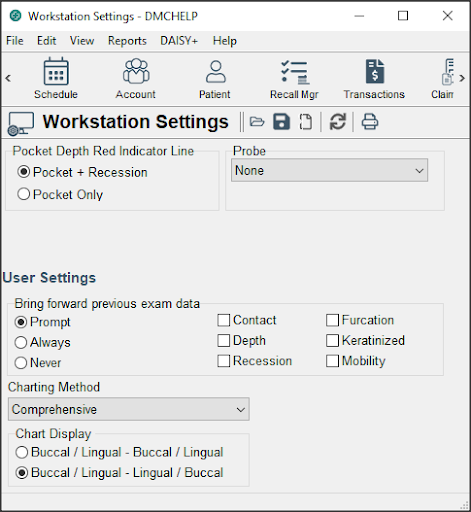
Settings under the User Settings section, however, are user specific per computer. For example, if you work in multiple operatories, you need to set up DAISY+ Chart on each computer in those operatories. These settings will apply only to the account you log into.
Dr. William Taylor performs perio exams in operatory 2. Dr. Sharon Perez performs perio exams in operatories 2 and 4. In operatory 2, Dr. Taylor logs in with his user name and password to the computer, and in the Workstation Setting window, he makes his perio setup selections under User Settings. He logs out.
Later, Dr. Perez logs in with her user name and password to the computer in operatory 2, and in the Workstation Settings window, she makes her perio setup selections under User Settings. She logs out. Next, she logs in with her user name and password to the computer in operatory 4, and she completes the User Settings. She logs out.
► To set up workstation settings:
-
Log in to DAISY+.
Be sure to log in with the user account that the settings should apply to.
- From the DAISY+ menu, select Chart, then Configure, then Chart Workstation Settings.
-
Under Pocket Depth Red Line Indicator, choose the option that specifies what the Pocket Depth Red Line Indicator should represent.
In the Perio Exam Full View, the Perio Comparison Chart, and the Periodontal Graphic Chart, a red line on the tooth graphic indicates a pocket depth that is 4 mm or greater. You set up this indicator to specify the measurement for either the pocket depth, or the pocket depth plus the recession.

- Under Probe, select the type of electronic probe attached to the computer, if any.
-
Under Bring Forward Previous Exam Data, select whether data from the patient’s previous exam should be brought forward into a new exam:
- Choose Prompt to have DAISY+ Chart ask if previous exam data should be brought forward.
- Choose Always to bring previous exam data forward automatically.
- Choose Never to always open a blank exam.
-
In the User Settings section, select the exam information that should be brought forward, if any.
Check all check boxes that apply: Contact, Depth, Recession, Furcation, Keratinized, and Mobility.
-
In the Charting Method drop-down list, select the method for this user.
In DAISY+ Chart, exam methods control how you navigate through a periodontal exam. The method controls the path through the mouth, the type of measurements to perform, and the views for each tooth. For more information about methods, see "About Perio Exams".
Note: Exam methods are set up for each user during DAISY+ Chart installation and training.
-
Under Chart Display, choose the order that the teeth are displayed onscreen and when printed.
For example, Buccal / Lingual - Buccal/ Lingual displays the teeth in this order: upper teeth cheek side, upper teeth tongue side, lower teeth cheek side, lower teeth tongue side.
- Click , then close the Workstation Settings window.
Customize Chart tabs and buttons
In hard tissue charting, Chart buttons, organized by tabs, can be customized to include only those procedures you commonly use. For example, if you never fit dentures or perform root canals, those Chart buttons can be removed. If you want a button for a bridge instead of a pontic and an abutment crown, you can create a Bridge button that contains both.
Note: Changes made to Chart buttons and tabs affect all DAISY+ Chart users.
Add a Chart button
DAISY+ Chart comes with a list of pre-defined Chart buttons that have the appropriate procedure codes attached. You can choose from the list or define your own buttons.
► To add a Chart button:
- Log in to DAISY+ and open a hard tissue exam.
-
Click the appropriate Chart tab.
For example, click Restorations to add a button in the Restorations tab.
-
In the Chart button section, right-click and select Add Button.
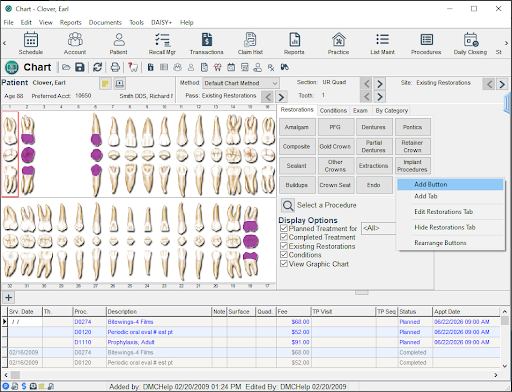
-
In the Search For - Button window, search for and select the button to add, then click OK to close the window.
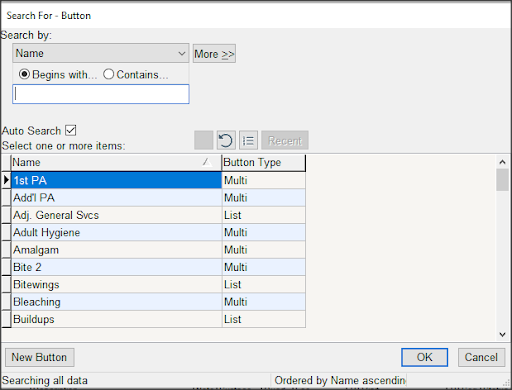
Define a new Chart button
► To define a new button:
- Log in to DAISY+ and open a hard tissue exam.
-
Click the appropriate Chart tab.
For example, click Restorations to add a button in the Restorations tab.
- In the Chart button section, right-click and select Add Button.
- Click New Button.
-
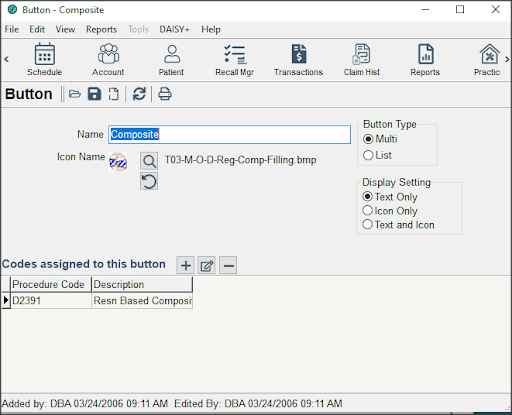
In the Name text box, type the name of the button.
-
In the Button Type section, select the type of button.
For example, a Multi type button applies a procedure code or set of codes automatically to the tooth when you click the button. A List type button presents a list of procedure codes you can choose from.
-
(Optional) In the Icon Name section, click to search for and select the graphic file for this button.
You only need to select an image if you want one to show up on the button.
Note: This graphic image is used on the button only. It does not affect what shows up on the tooth graphic chart.
-
In the Display Setting section, select how the button is labeled.
For example, if Text Only is selected, then the button label is the text you typed in the Name text box. If Icon Only is selected, then the button label is the Icon Name graphic file.
-
In the Codes Assigned to this Button section, assign one or more procedure codes:
- Click to open the Select A Procedure window.
-
Click the appropriate tab.
For example, if you want to search for a dental code, click the Dental tab.
- In the Enter Procedure or Description text box, type part or all of the code number or description.
- Select the code, then click OK.
- Repeat step 9 until all the appropriate procedure codes are selected.
- Click and close the window.
Edit a Chart button
You might want to customize a Chart button to have a different name or to include only those procedures you commonly use. For example, if you only perform simple extractions, you can remove the procedures associated with bony or partial bony extractions.
► To edit a Chart button:
- Log in to DAISY+ and open a hard tissue exam.
-
Click the appropriate Chart tab to show the button.
For example, click Restorations to edit a button in the Restorations tab.
-
Right-click on the button and select Edit button name Button.
For example, right-click on the Extractions button and select Edit Extractions Button.
-
In the Button window, change the definition of the button.
For example, delete one of the codes assigned to the button.

- Click to save the changes.
Remove a Chart button
When a Chart button is removed, it no longer displays in the Chart buttons section of the Chart window. However, the definition of the button (including procedure codes associated with it) remains in the DAISY+ Chart database, so you can easily add it again to the Chart window.
► To remove a Chart button:
- Log in to DAISY+ and open a hard tissue exam.
-
Click the appropriate Chart tab to show the button.
For example, click Restorations to edit a button in the Restorations tab.
-
Right-click on the button and select Edit button name Button.
For example, right-click on the Extractions button and select Edit Extractions Button.
Add a Chart tab
DAISY+ Chart comes with a list of pre-defined tabs that include a set of appropriate buttons. You can choose from the list of tabs or define your own tabs.
► To add a Chart tab:
- Log in to DAISY+ and open a hard tissue exam.
-
Click the appropriate Chart tab to show the button.
For example, click Restorations to edit a button in the Restorations tab.

- In the Search For - Tab window, search for and select a tab, then click OK.
- In the Tab window, check the Display check box.
-
Click , then close the window.
The tab is added to the right of existing tabs in the Chart window.
Note: Tab order cannot be rearranged.
Define a new Chart tab
If an appropriate tab is not already available, you can define your own tab and assign Chart buttons to it.
► To define a new Chart tab:
- Log in to DAISY+ and open a hard tissue exam.
-
In the Chart button section, right-click and select Add Tab.
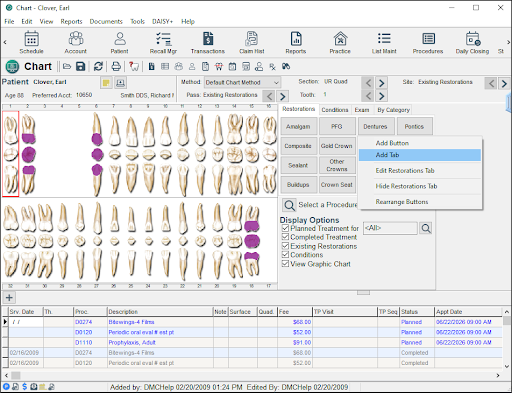
- In the Search For - Tab window, search for and select a tab, then click OK.
- In the Name text box, type the name of the tab.
-
Add the appropriate Chart buttons to the tab.
For more information about adding buttons to a tab, see "Add a Chart button".
-
Add the appropriate Chart buttons to the tab.
For more information about adding buttons to a tab, see "Add a Chart button".
-
Click and close the window.
The tab is added to the right of existing tabs in the Chart window.
Remove a Chart tab
When a Chart tab is removed, it no longer displays in the Chart buttons section of the Chart window. However, the definition of the tab (including buttons associated with it) remains in the DAISY+ Chart database, so you can easily add it again to the Chart window.
► To remove a Chart tab:
- Log in to DAISY+ and open a hard tissue exam.
-
Click the Chart tab that you want to remove.
For example, click the Restorations tab.
-
Right-click and select Hide tab name Tab.
For example, right-click and select Hide Restorations Tab. The tab is removed.
Change printer settings for DAISY+ Chart
DAISY+ Chart installation assigns your Windows default printer settings as the default printer settings for DAISY+ Chart. These settings determine where to print DAISY+ Chart reports.
You may want to change the default printer for DAISY+ Chart, or you may want to send a specific DAISY+ Chart report to a different printer.
Note: DAISY+ Chart printer setup does not change your DAISY+ or Windows printer settings, nor does it change printer settings for DAISY+ Chart on any other PC.
► To change the default printer settings for DAISY+ Chart:
- From the Reports menu in any DAISY+ Chart window, select Printer Setup.
- From the Name drop-down list, select a printer.
- If needed, change the printer settings, such as paper type and orientation.
- Click OK.
Note: If you changed the settings for a specific report, be sure to change the settings back to the original default printer when you are done.
Customize color coding for the tooth graphic chart
By default, DAISY+ Chart uses the standard set of color codes in the tooth graphic chart: blue for existing restorations, green for condition of teeth, red for treatment planning, and purple for completed treatment. However, you can customize these colors to fit your practice.
Note: Changes made to colors in the tooth graphic chart affect all DAISY+ Chart users. Be sure to check with them before making this change.
► To change color coding:
- Open a hard tissue exam.
- From the Tools menu, select Color Scheme.
-
Click the appropriate Set Color button.
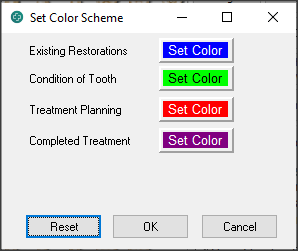
- In the Color window, click the new color, then click OK.
- To change another color code, repeat steps 3 and 4.
- When done, click OK to close the Set Color Scheme window.
Note: You can also customize the graphics associated with each procedure. For more information, contact DAISY+ customer support.